I’ve been compiling these notes for over a year, gathering information and jotting down thoughts. Now, it’s time to share.
In June 2013, I bought a 90-square-meter apartment. It was pre-construction, so I waited two and a half years, finally getting the keys in November 2015. As a UI designer, interior design was unfamiliar territory. But, I decided to manage the renovation myself. The renovation team’s designer only measured the rooms and drew up plans for plumbing, electrical, and carpentry. Essentially, I handled 95% of the design, from layout to details.
It was more rewarding than expected. It was a hassle, yes, but fun. I documented the process to consolidate what I learned.
Should You DIY?
This requires careful consideration. You need to understand the project’s complexity. Assess if you have the energy and if it’s truly for you. Taking charge means managing every detail. You don’t have to do the work yourself (full-service, semi-service, or DIY are options), but you need to grasp most of the details.
Renovation is a collection of small problems. Figuring out where to start took time. Time, space, and budget all factor in. It’s unlike computer design; techniques and materials limit you, and budget often dictates choices. Perfection isn’t achievable in one go. Everything, including your ideas, will evolve. Embrace the exploration.
Start by reading articles about renovation. I stumbled upon one about kitchen cabinets, which opened my eyes. The countertop alone had so many details: drip grooves to protect cabinets, raised edges for waterproofing, curved surfaces for easier cleaning…
Pay attention to these details. If you’re intrigued rather than discouraged, you might be a tinkerer. I hope this content helps.
Pre-Preparation Prep
Ultimate Goals
Renovation needs clear goals beyond aesthetics. Consider durability, aesthetics, storage, ease of cleaning, and ease of modification. Budget isn’t a primary goal; it’s a constraint considered within each detail.
Imagine 10 points to allocate across these 5 indicators (each with a perfect score of 10). My goals were:
[3/10] Durability
[1/10] Aesthetics
[4/10] Storage
[2/10] Ease of Cleaning
[0/10] Ease of Modification
I’m clearly a storage enthusiast. My girlfriend criticized my designs as ugly. She’s right; I neglected aesthetics.
If unsure, visit friends’ homes. Don’t aim for a mediocre 2/10 on everything. Goals are crucial; stick to them.
Logical Organization
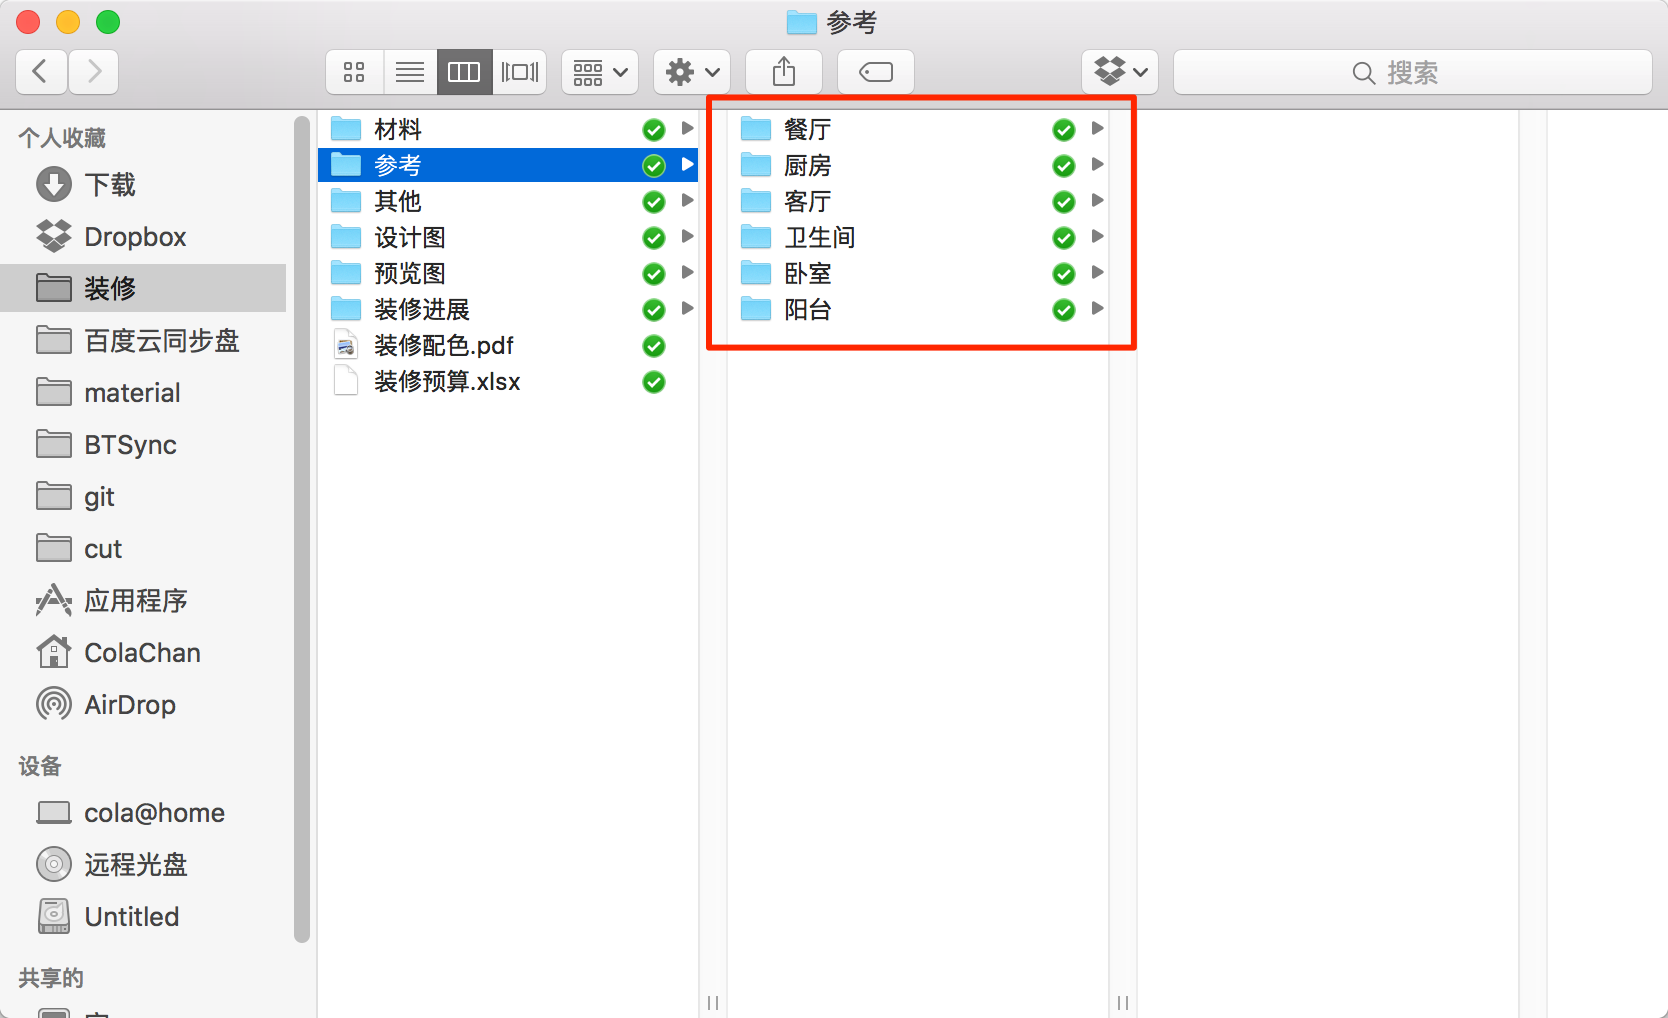
Before starting, plan how to organize information. Renovation is information-heavy. Consider categorization, organization, summarization, portability, and sharing. Tools, structure, recording methods, and formats matter. Consistent maintenance and updates are key. Adjust your framework as needed.
I initially used a mind map, which worked for a high-level overview (listing rooms, contents, construction phases). But as details increased, each area became a complex system, beyond a tree structure’s capacity. So, each dimension got its own documentation:
Space: floor plans, 3D models, plumbing/electrical diagrams.
Time: construction/purchasing schedules, photo albums.
Design: style references, color palettes.
Budget: spreadsheets.
ToDoLists for small tasks.
The mind map became less relevant. It served its purpose of untangling initial thoughts.
Key documents: floor plan, 3D model, dimensions list, color palette, budget spreadsheet, construction/purchasing schedule.
Floor Plan
The renovation company provides this with precise dimensions. Keep a copy on your phone for early material cost estimates.
3D Model
This helps design the layout and communicate ideas. Creating it takes effort, but it’s worthwhile for expressing your vision.
Dimensions List
Record dimensions not shown on the floor plan (vertical dimensions, curtain widths, etc.). Note dimensions as you think of them to avoid extra trips.
Color Palette
Useful for controlling color consistency. Keep it on your phone and follow it strictly, even for small items. This applies to new purchases; don’t discard old items solely for color coordination.
Edit the color palette in Illustrator.
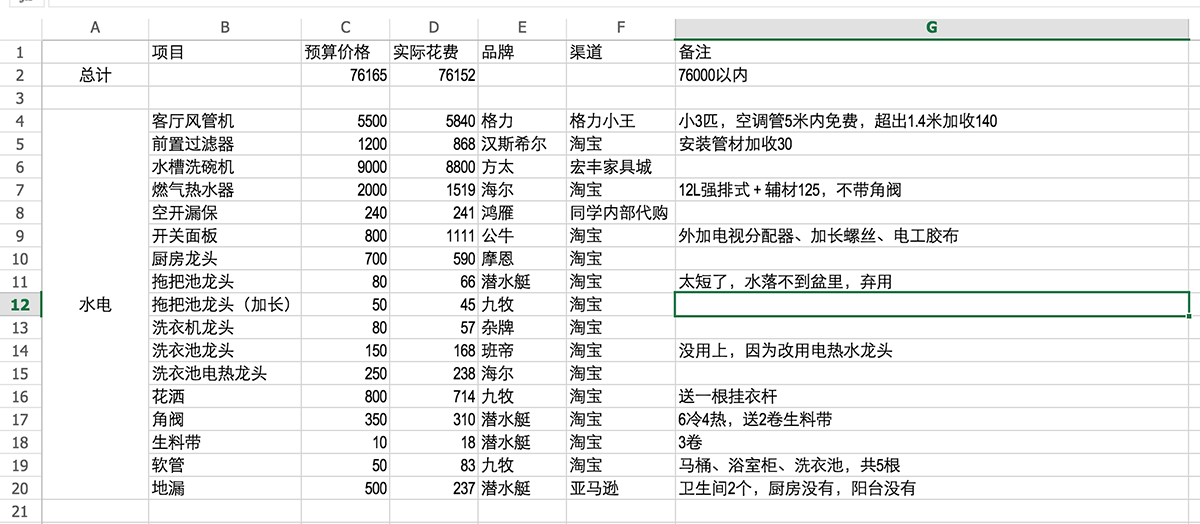
Budget Spreadsheet
Essential in later stages, it needs constant updating and mobile access. (I splurged on the kitchen faucet…)
Construction and Purchasing Schedule
This document connects the process in time, showing what to do when. Print it, check off completed items, and cross out unnecessary ones.
These are excerpts. Complete files are available for download at the end of the article.
Home Inspection
Home inspection is the first step. Ruling out quality issues is paramount. The renovation company will check most items, but ensure thoroughness.
Test water pipes: Pour water down each drain to check for blockages and leaks. Leak detection is crucial to define responsibility before renovation.
Mark hollow areas: Tap walls and floors, circling hollow sounds for repair.
Check for flatness: Use a straight edge to check wall flatness, which affects tile, flooring, and baseboard installation.
Look for cracks: Cracks indicate quality problems. Cracks on beams and load-bearing walls are serious. Check adjacent floors.
Check doors and windows: Ensure smooth operation, tight closure, and no damage.
Layout Design
Layout dictates function and lifestyle. A balcony for relaxation needs a table and chairs. Extensive clothing requires a walk-in closet. Yoga needs open living room space. Layout serves lifestyle, not just copying appealing designs.
Layout comes first, then aesthetics.
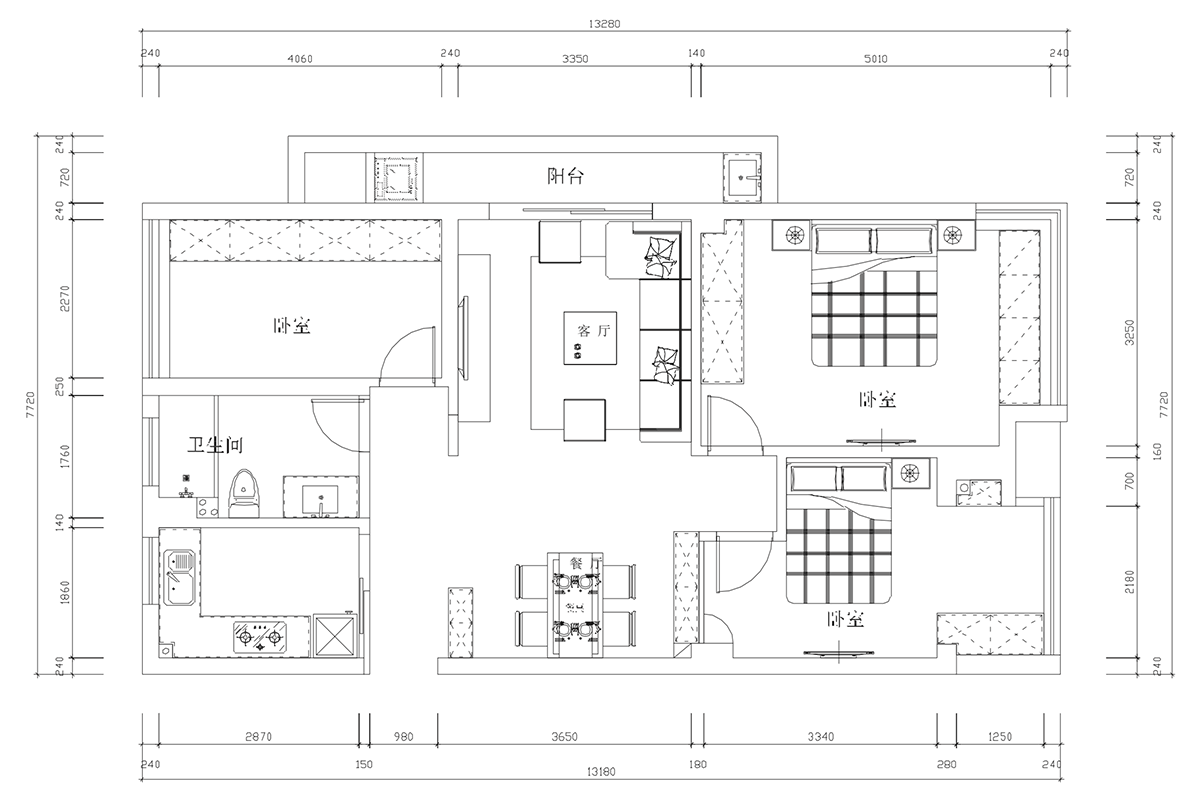
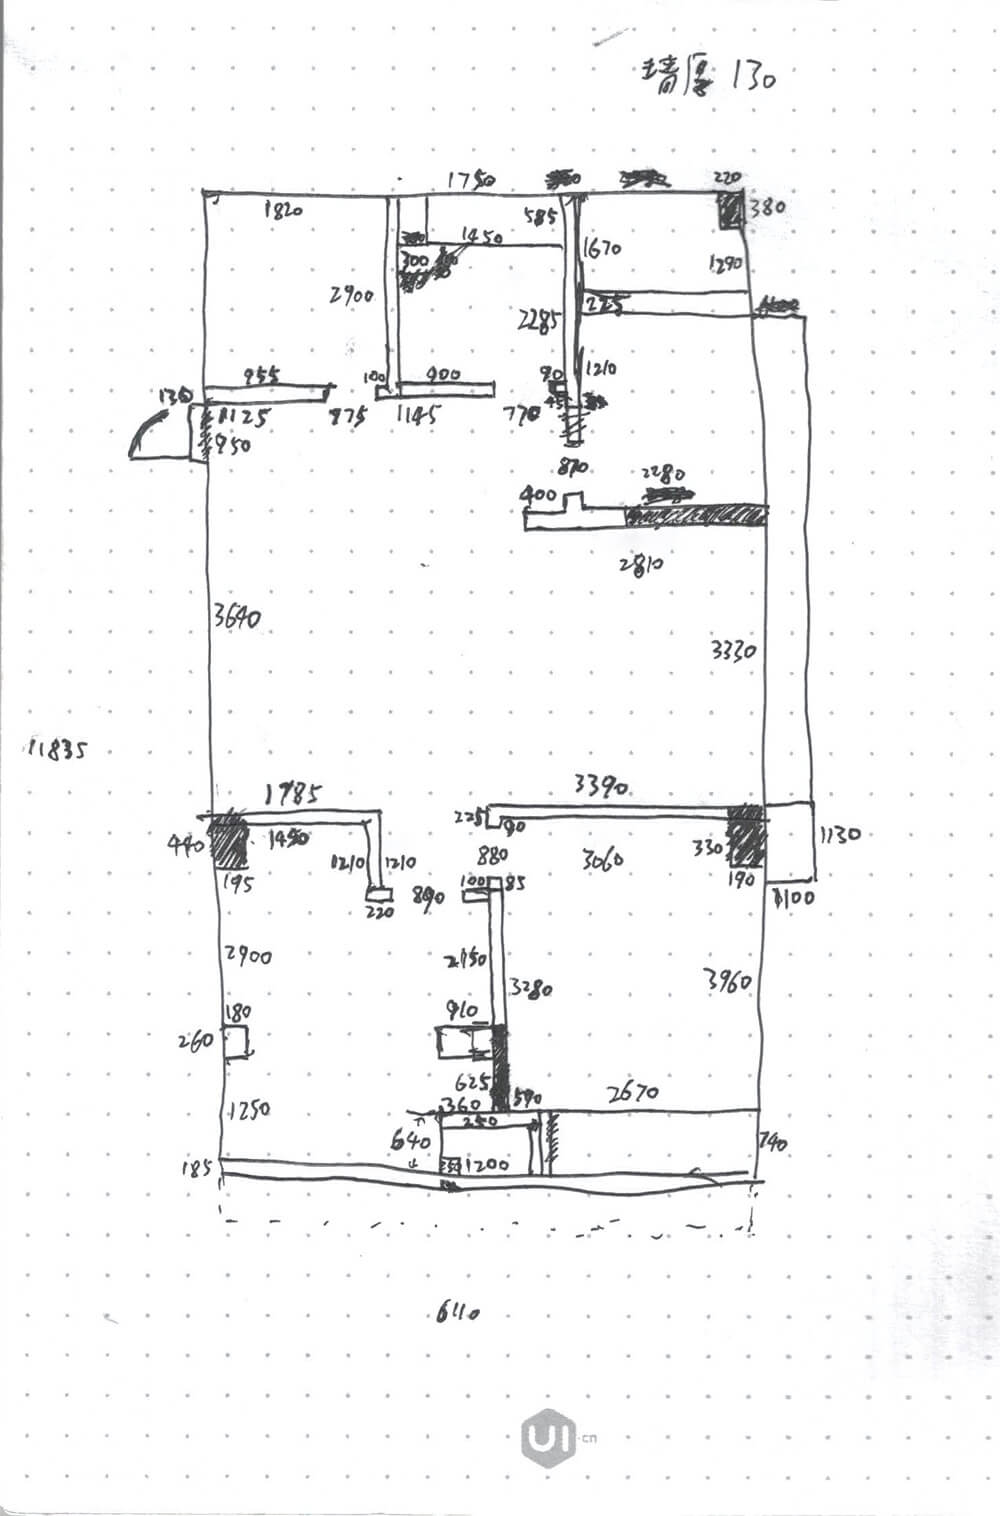
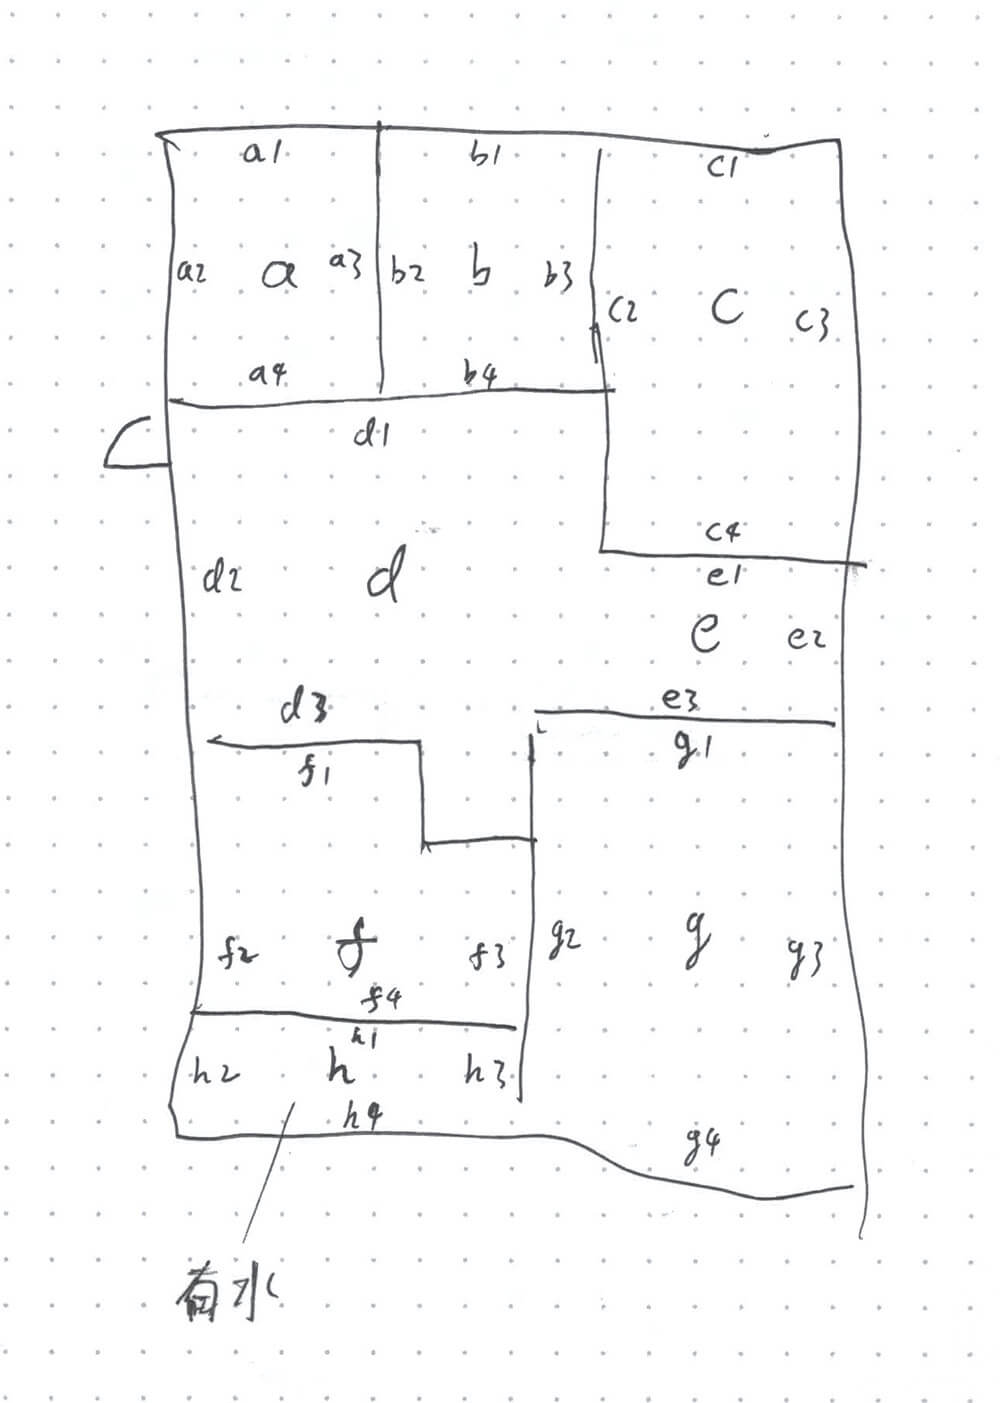
Six-Sided Measurement Method
When measuring, a 5cm error is acceptable. The renovation company’s measurements suffice for a floor plan, but we need more data, including window size and height for the 3D model.
First, draw the floor plan. Based on the developer’s plan, draw a rough shape. Record wall width and thickness, doorway width and position, bay window size, and pillar size. Mark load-bearing walls.
My measured floor plan; blacked-out areas are unalterable load-bearing walls. (Excuse my handwriting.)
Second, create a labeling diagram. Label each area (e.g., room ‘a’ is my kitchen). Label kitchen walls a1-a4. Consistent labeling prevents confusion.
Area ‘h’ is a small balcony with a water source and drain.
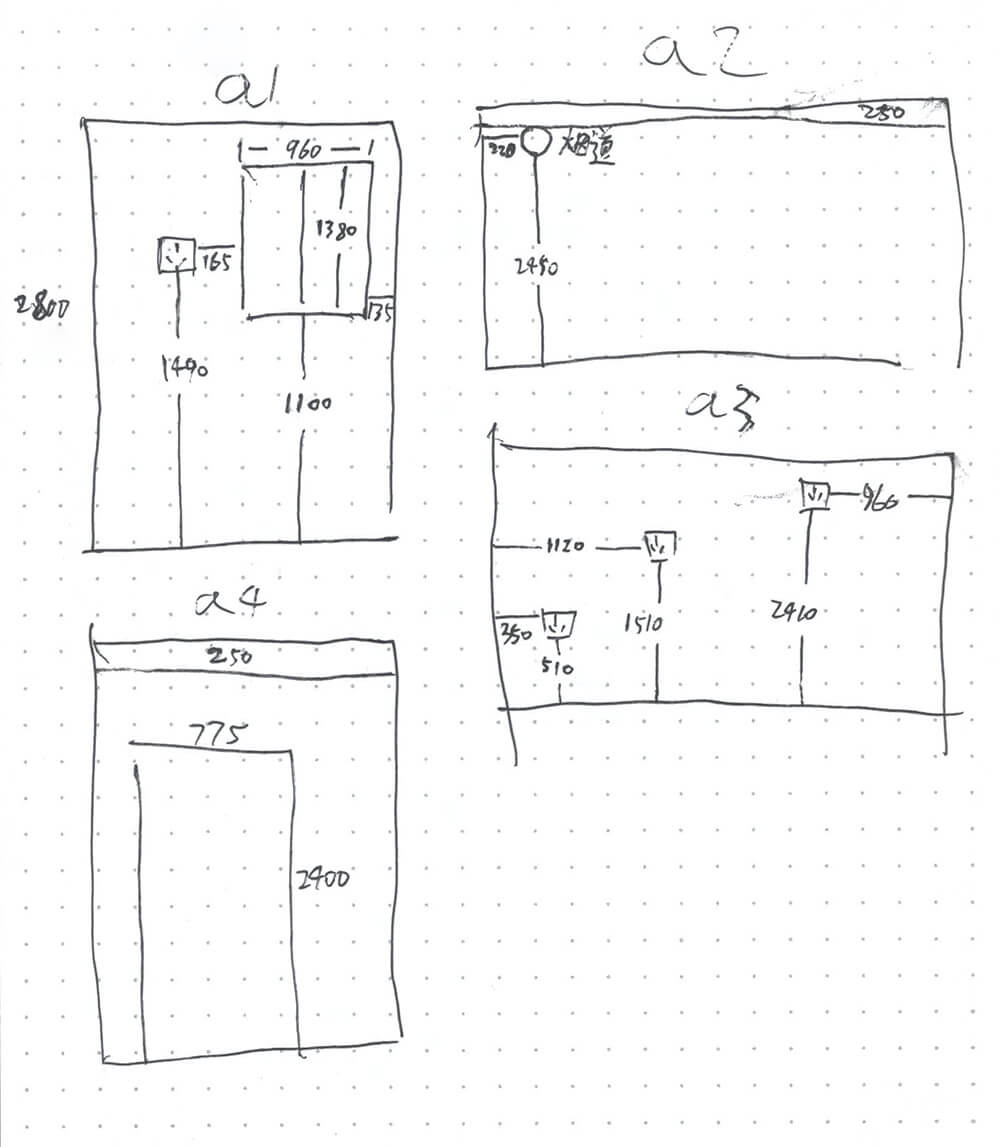
Then, draw each room’s four walls, one room per page. Record wall height, window size and position, doorway height, beam position, and special facilities (exhaust vents, AC holes). Beam position accuracy is less critical.
My kitchen’s four walls. The narrow strips on a2 and a4 are 250mm-high L-shaped beams. I unnecessarily recorded switch/socket positions, as wiring will be redone.
My master bedroom. The frame on g4 is a window, 400mm from the floor, 2100mm high. Combined with g3, it’s an L-shaped window.
The top surface is missing from the six-sided method, but it’s hard to measure accurately. Visually record beam positions. If there are few beams, drawing them is unnecessary.
Take photos. They can clarify roughcast details later.
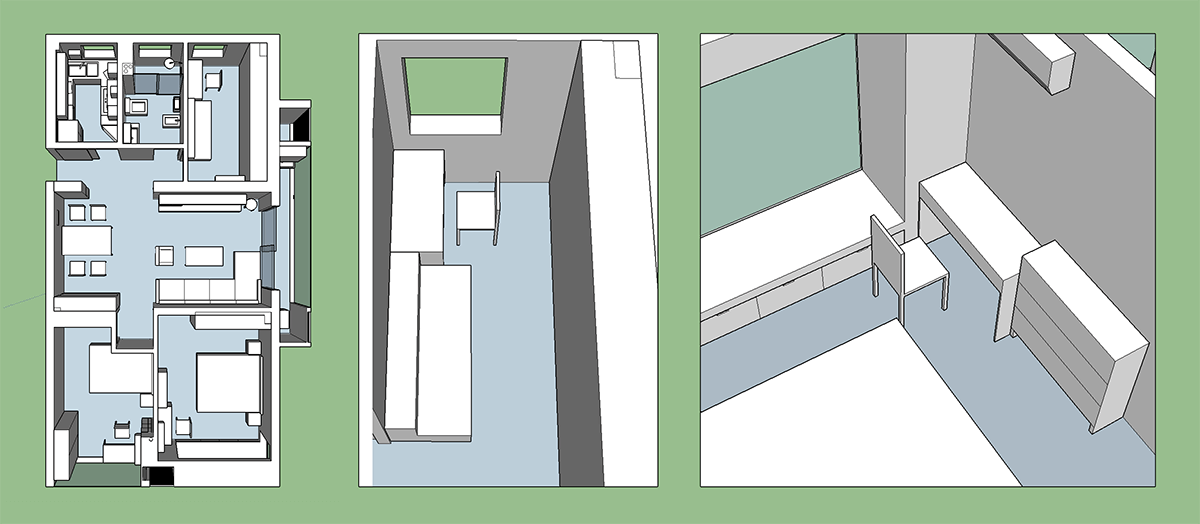
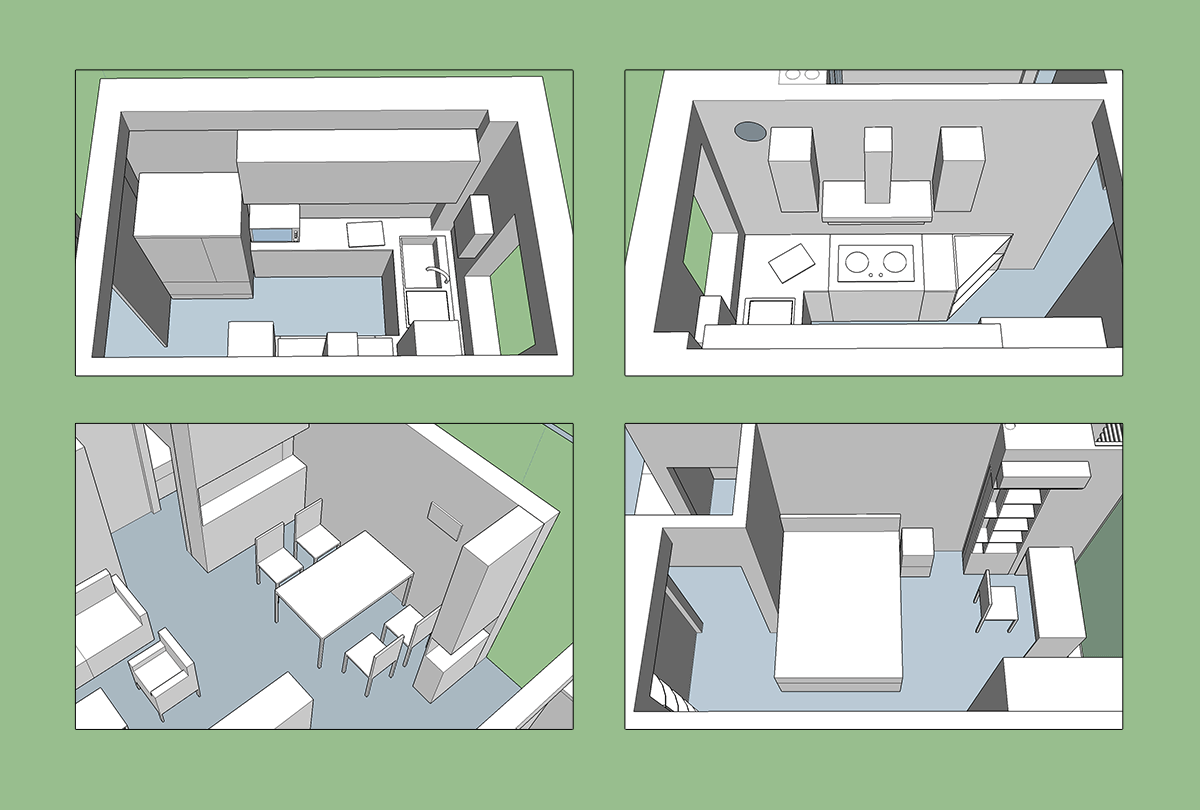
Drawing the 3D Model
Convert measurements to a 3D model while the manuscript is fresh. Learn SketchUp, an architectural design software.
It’s simple; drawing cubes and cylinders suffices. No need for architectural design expertise. This tutorial is enough for one day:
I only finished Chapter 6. I focused on dimensions and furnishings, not material textures.
Reflecting materials and textures is unnecessary. This diagram is for communication and layout planning. It helps determine room usage and facility purchases.
The 3D model looks like this – various blocks, but descriptive of furnishings (see below, upper left, microwave to the right of the refrigerator):
The challenge isn’t drawing, but knowing object dimensions (cabinet height, aisle width). Research and measure. Carry a tape measure.
Discuss the model with family and friends. Adjust the plan if needed. This 3D model is the core of the renovation plan until soft decoration. Use it for buying materials and communicating with the renovation team. Update it promptly.
I had several earlier versions. Kitchen sides were swapped, sofa area furnishings were different, and the second bedroom door was elsewhere. Modifying the prototype is better than costly rework.
Special Items to Consider First
Certain items significantly impact layout, usually related to plumbing and electricity. Decide on these before plumbing/electrical work begins. Changing your mind later causes major rework.
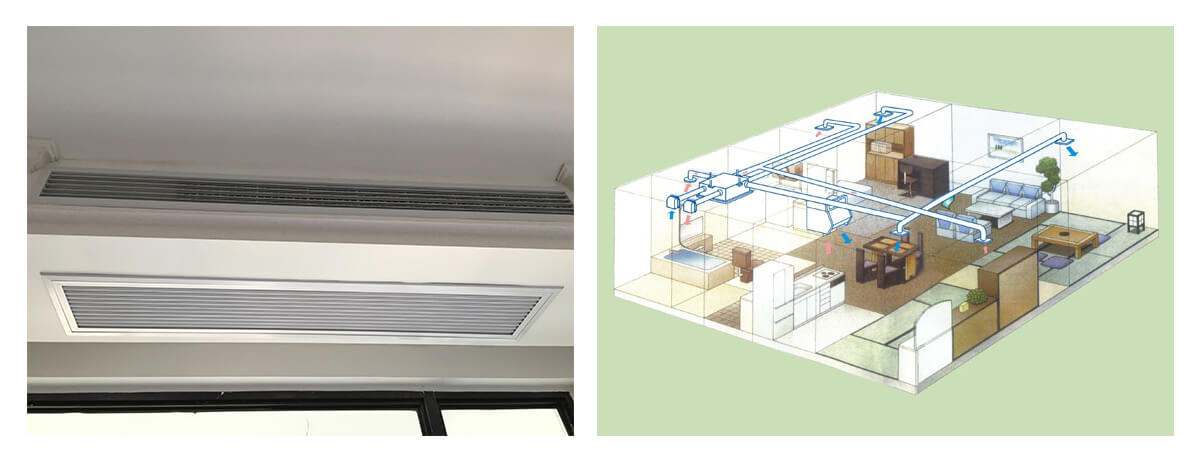
Central AC and fresh air systems require pre-buried pipes/wires and drilled holes.
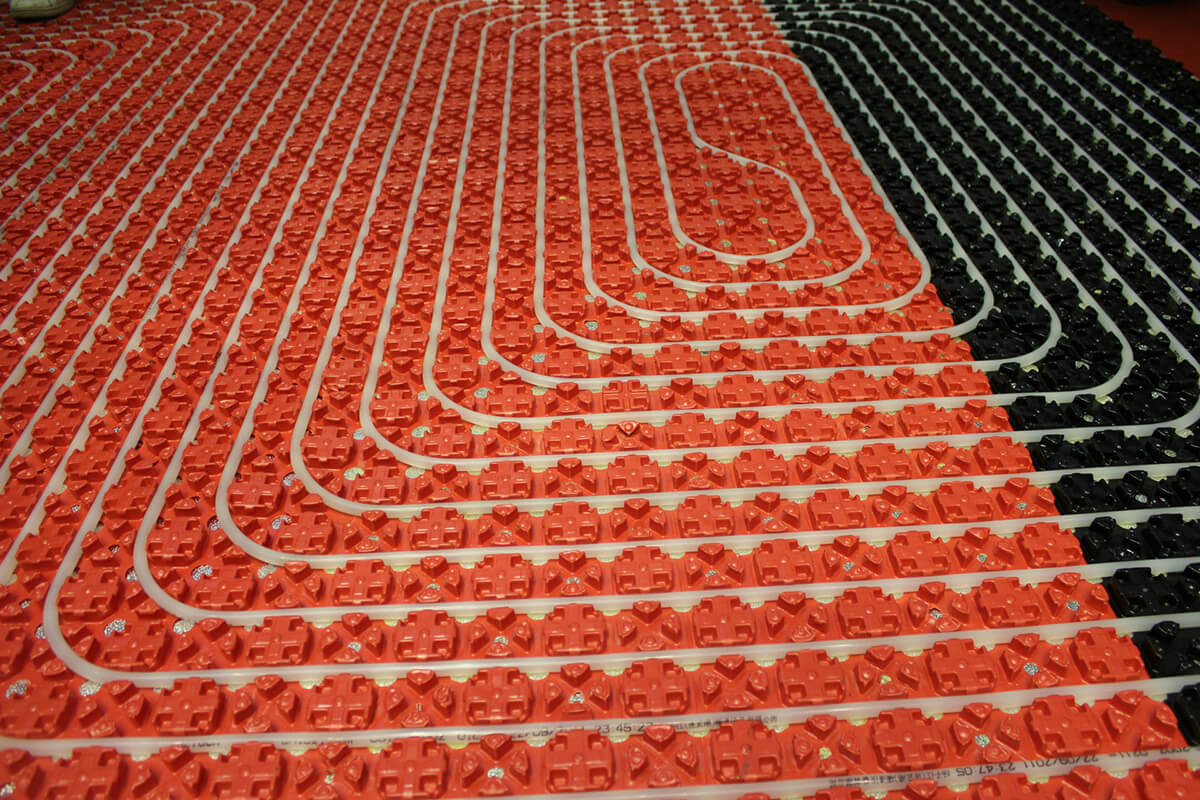
Underfloor heating requires electricity and affects floor leveling.
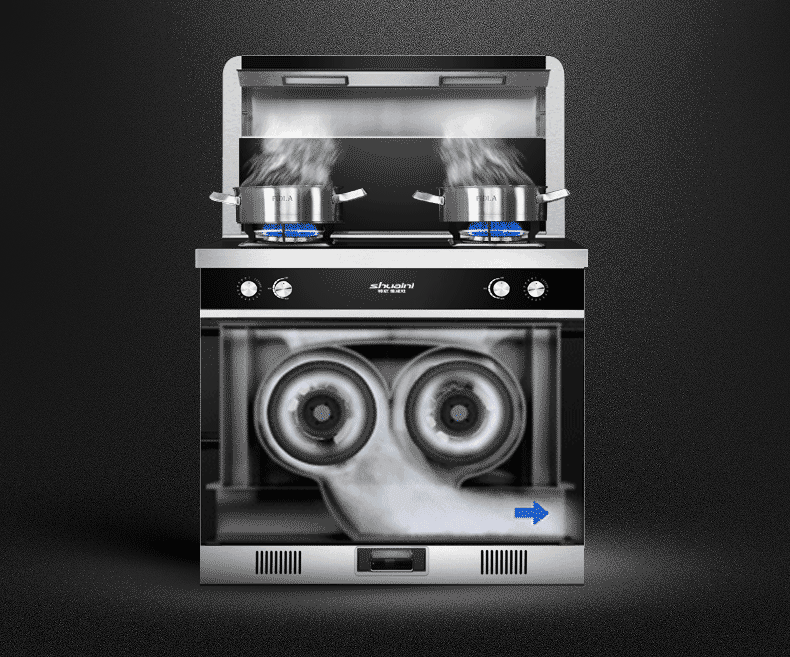
Integrated stoves have downward smoke exhaust, requiring different socket and vent positions. The space under the stove has options (bowl baskets, disinfection cabinets, ovens, steamers). Ovens require specific wiring; inform the electrician.
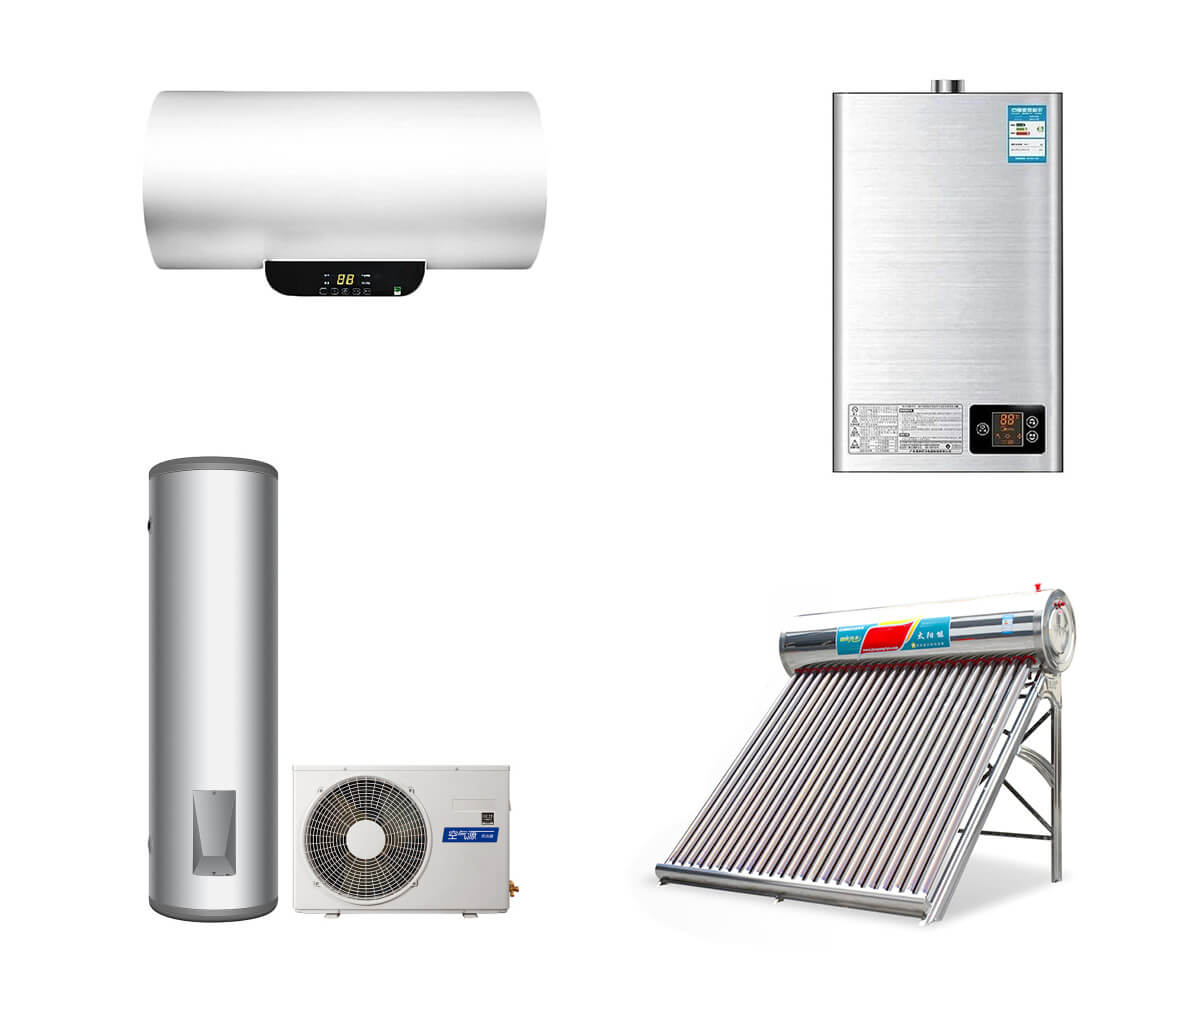
Decide on the water heater type (gas, electric, air-source, solar). Different types have different plumbing/electrical layouts.
Consider hot water needs in the kitchen, bathroom, and balcony. If close, one water heater suffices. If far, prioritize the bathroom. For distant kitchens/balconies, consider a small kitchen treasure instead of long pipes. Leave a socket for it. My kitchen and bathroom share a gas water heater; the balcony has an electric faucet.
Wall lamps and functional lighting require reserved power lines.
For bathroom cabinets and toilets, decide between floor-standing or wall-mounted. This determines drain location (floor or wall).
Defining Your Decor Style
Let’s get to the fun part: defining your home’s style. I admit, I fumbled this a bit.
Finding Your Direction
Collect interior design photos. Organize them by room (kitchens, bedrooms, etc.). Show your favorites to your partner. Each of you should remove the ones you dislike. The remaining photos will likely suggest one or more styles.
Then, find more photos of those specific styles and repeat. Removing the disliked images again helps narrow down details. For a Mediterranean kitchen, should cabinets be white or blue? Bedroom walls: paint or wallpaper? Living room: tiles or hardwood? These are key choices. Find mutually agreeable solutions.
Don’t fixate on one style unless you’re absolutely certain. Styles often blend – Mediterranean and American, for example. “Authenticity” isn’t crucial; go with what appeals to you. My home mixes modern, Mediterranean, and Scandinavian elements, but most items are neutral. For major purchases like materials and furniture, avoid anything with a very strong style. A single, contrasting item can add drama.
Understanding Style
Analyze your reference pictures. Identify common elements and extract the universal ones. For Mediterranean: arches, rounded corners, white walls, mosaics, stone, wrought iron, shutters. Incorporate these, and the vibe will follow.
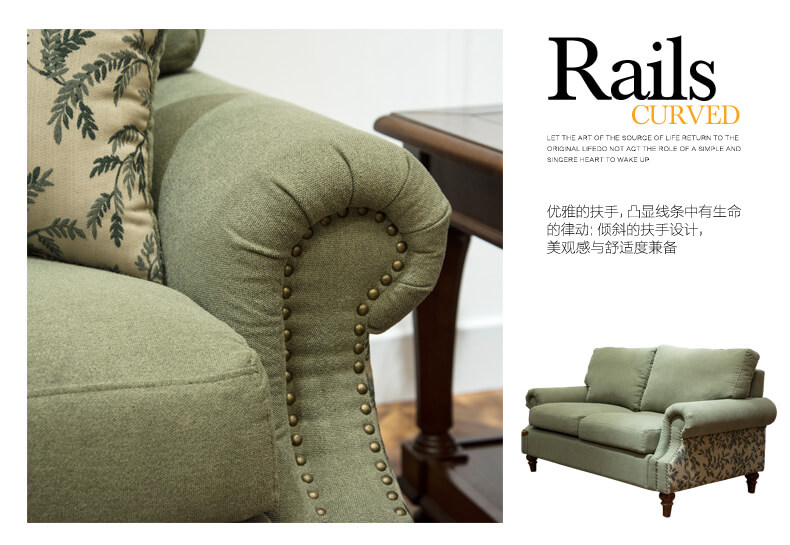
Understanding style requires viewing many pictures. Seeing numerous American interiors, you’ll recognize those signature sofa armrests.
Choosing a Color Palette
After this process, your basic color scheme should be clear, especially if you’re limiting colors. Create a color chart and keep it on your phone for comparisons while shopping. I waited until buying tiles to consider the overall style (a bit late), but the chart still helped. My home’s main tone is a bright, true blue. I avoided using too many teal or purple-toned blues to keep the scheme consistent.
Consider natural wood color. Wood tones, besides wall paint/wallpaper, sofas, and curtains, are significant. Stain colors vary widely. Walnut and ash are usually dark brown, but one might be reddish, the other greenish. Even slight differences can clash.
My place fails here – wood tones are inconsistent. I recommend a maximum of two wood tones for major items. Be selective with wood-grain furniture.
Be Careful with Inspiration
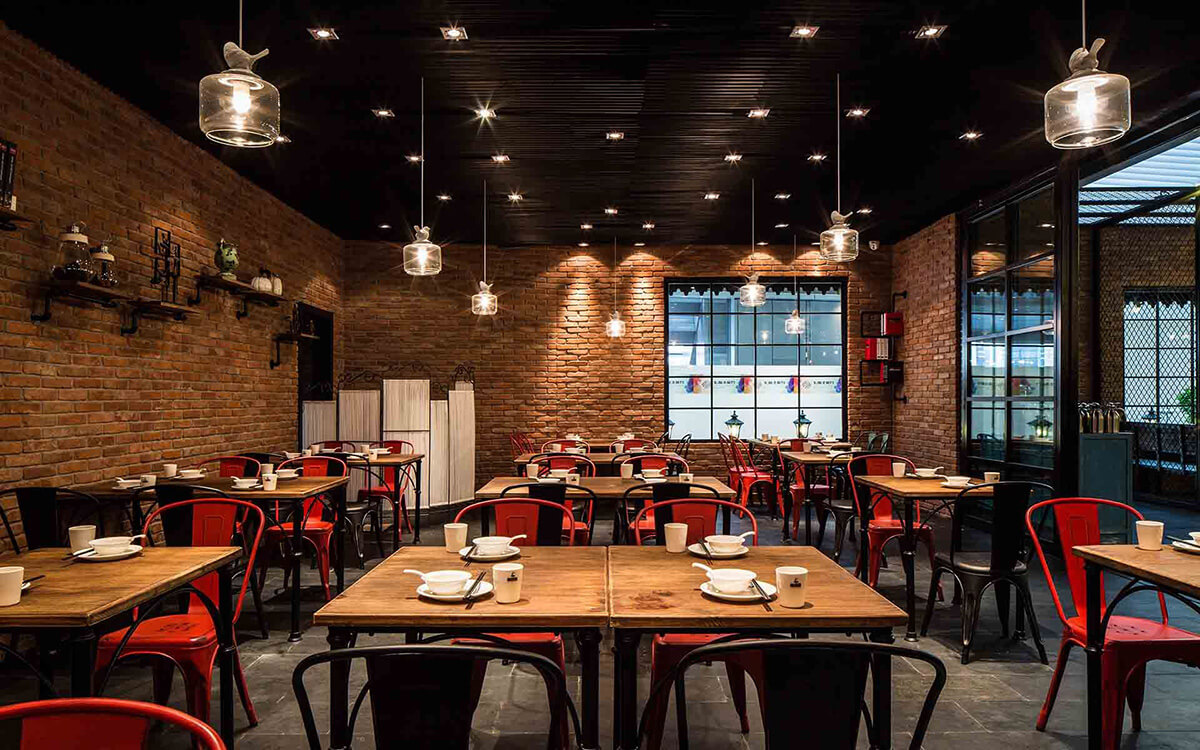
Don’t blindly copy attractive designs. Restaurants and cafes, while atmospheric, serve different purposes.
Dark ceilings are common in modern restaurants but rare in homes. Dark ceilings can feel oppressive. Lighter elements above heavier ones are visually preferable. A modular TV stand with wall-mounted and floor cabinets shouldn’t have larger wall units.
Restaurant’s black ceilings hide pipes and dirt. With downward lighting or high ceilings, they’re almost invisible. But homes aren’t brightly lit 24/7. Public space decor is a poor reference.
Open-concept designs (wardrobes, bookshelves, louvered-door shoe cabinets, cabinets) are another example. Consider local air quality. Increased surface area invites dust. Don’t copy designs from other regions.
Budgeting
With a large budget, prioritize quality. With a tight budget, control costs. Categorize materials/furniture into four tiers based on the consequences of compromise:
Safety: Gas water heaters/stoves, switches/sockets.
Unless aesthetics are paramount, cut costs according to this. Start with top-tier products, understand their benefits, and then make trade-offs. This clarifies your needs.
Cutting the budget doesn’t mean neglecting quality. I skimped on kitchen wall tiles, and they’re awful – rough, uneven. Better tiles were available at the same price elsewhere.
The Imaginary Overall Budget
Establish a preliminary budget, perhaps based on others’ experiences. My classmate’s 90-square-meter apartment renovation cost 180,000 RMB. I aimed for 160,000 RMB, a somewhat arbitrary figure.
The Budget Sheet
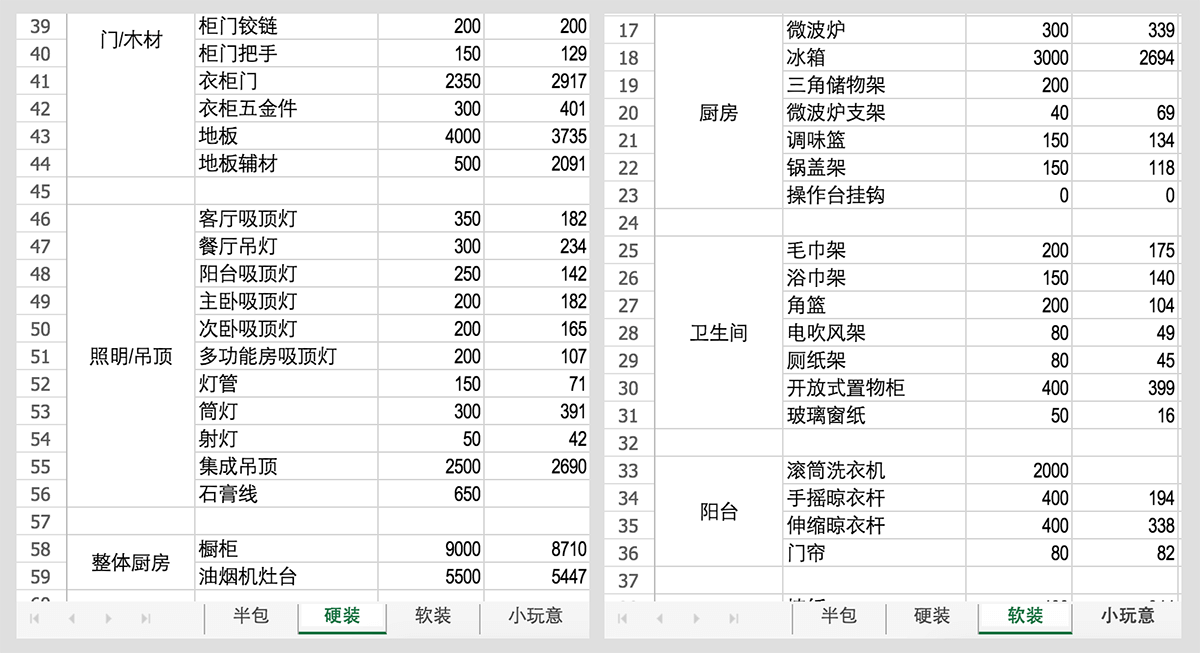
List your budget items. This document needs constant updating. My renovation was semi-inclusive, so I divided the budget into: semi-inclusive, hard finishes, soft finishes, and small items. Only hard and soft finishes are fully controllable.
The semi-inclusive part is technical; I don’t recommend full DIY for beginners.
Small items (decorations, spice jars, etc.) are bought as needed, so just keep a record.
My initial ratio of semi-inclusive, hard finishes, and soft finishes was about 6:8:4. This varies. High kitchen demands increase hard finishes; a love of wood furniture increases soft finishes. Determine item prices through research: visiting markets and browsing Taobao. Understand quality levels, price ranges, and brand variations. More knowledge means less expense deviation. Don’t forget miscellaneous costs: initial cleaning, property management fees, supplementary materials, delivery fees.
Use my sheet as a starting point. Hard finishes are grouped by material (tiles, flooring, doors are bought in bulk), while soft finishes are grouped by space (allowing for more detailed combinations).
Modifying the Budget
A budget isn’t perfect. Allow one modification, and only one. Use it only if you initially underestimated necessary items and prices. It’s not for impulsive changes in standards.
I used this opportunity. I underestimated supplementary materials (wallpaper adhesive, curtain gauze/tracks, screens, appliances, installation). The total budget rose to 185,000 RMB. The final ratio was 6:8:5.
Finding a Renovation Company/Team
This can start during layout planning. I didn’t compare many companies.
My classmate used a relative who was a project manager. Our homes were renovated simultaneously, off-the-books.
The materials were reliable, and the price was fair. However, renovation teams often overextend, prioritizing whoever pushes hardest. Hard finishes took half a year. It’s hard to hold acquaintances fully accountable.
This off-the-books team lacked professionalism. Floor leveling and plumbing/electrical details were rough. Skill limitations led to less-than-ideal results.
Construction
Once construction starts, the schedule is key. It clarifies tasks and material needs. Here are some general tips:
Photograph each phase for reference. You might need to check for a beam location or socket height.
Photograph plumbing/electrical lines before tiling to prevent damage.
My photo organization. Cloud storage is essential.
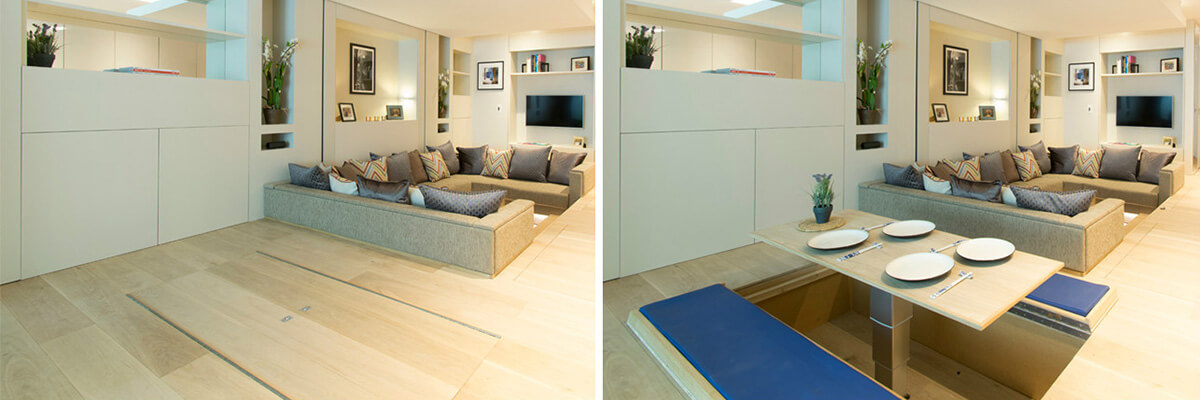
Hidden furniture saves space but requires more effort. It also needs skilled carpentry.
Frequently used furniture should be traditional, unless space is extremely limited. Small daily actions become annoying.
A flatbed trolley is useful for moving large items.
Items that aid the transition are worthwhile (ladders, toolboxes, etc.).
Now, the construction stages:
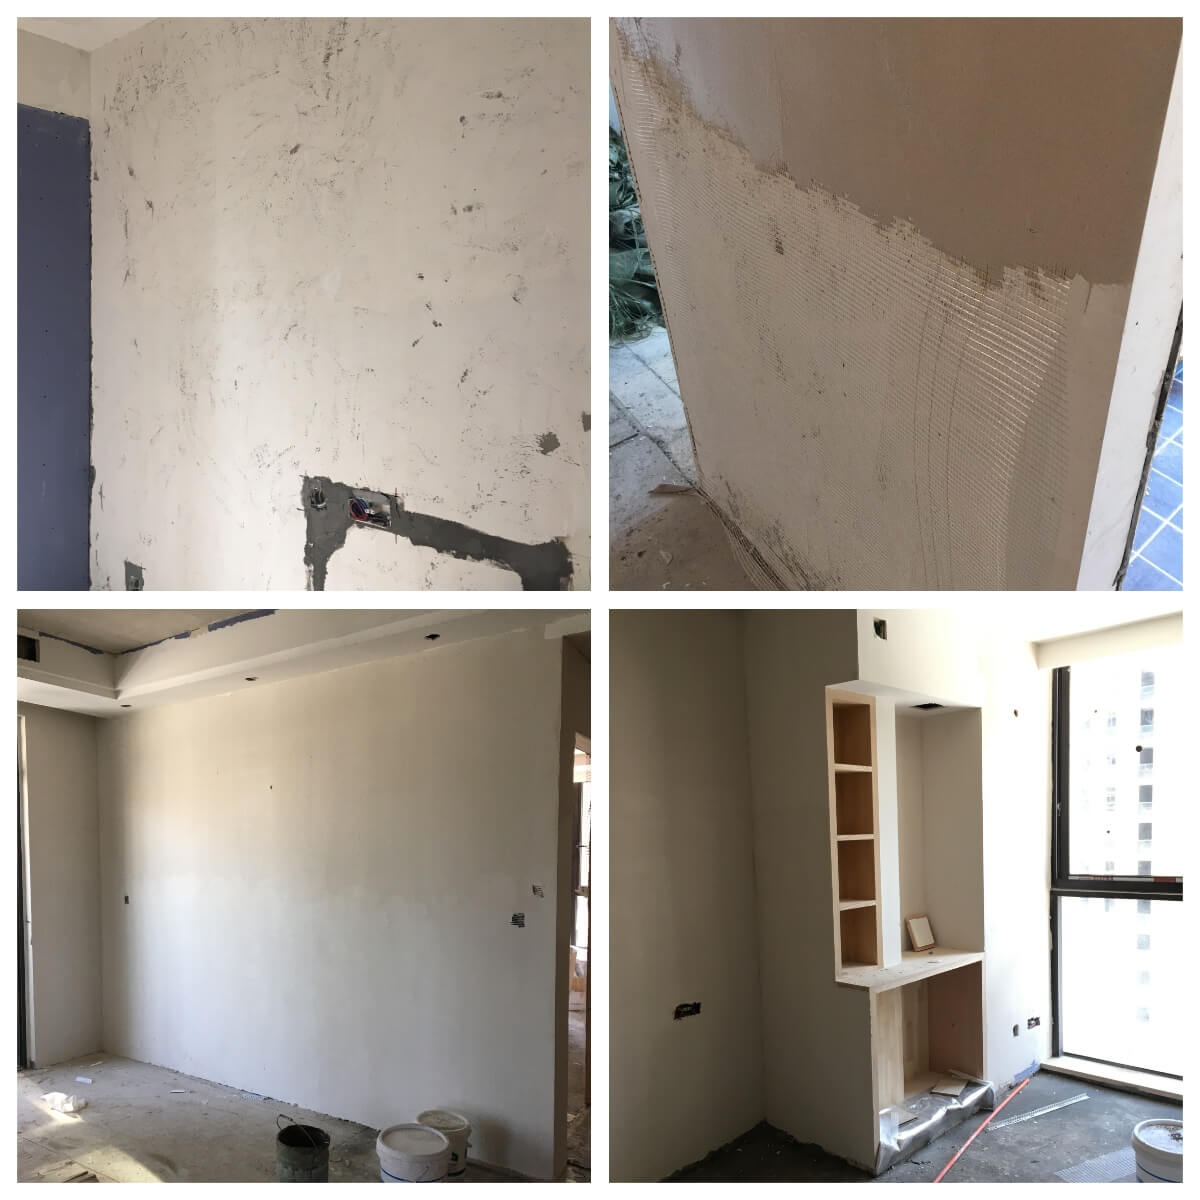
Demolition and Alteration
This involves removing old renovations, wall modifications, and altering door openings. Even new walls need scraping/repainting. Spatial changes should be updated in the 3D model.
Cover drainpipes to prevent blockages.
Drill air conditioning holes now.
Determine range hood, stove, sink, and built-in appliance brands/models for dimensions. Cabinets are needed, and the hood affects wall cabinet layout. Stove/sink affect countertop openings. This allows time for price comparisons.
Plumbing and Electrical
Before this stage, confirm water outlet, switch, and socket locations with the electrician. Mention high-power appliances (oven sockets need thicker wires). Specify wall lamp, night light, and speaker locations for wiring. I later switched two sockets and found the thicker copper wire in the 6-point pipe.
Each functional area’s electricity should be independently controlled. Generally: lighting, kitchen sockets, other sockets, each AC, refrigerator, underfloor heating, electric water heater, weak current box. Finer division by space is better.
I won’t re-emphasize needing more sockets. Frequent kitchen users should ensure all kitchen sockets have switches. It’s easy and safe.
Each water outlet needs an angle valve, not a direct faucet connection, for easier repairs.
After trenching, inspect before sealing. Check for missing/misplaced openings. I missed the dishwasher socket and had to lengthen the cord.
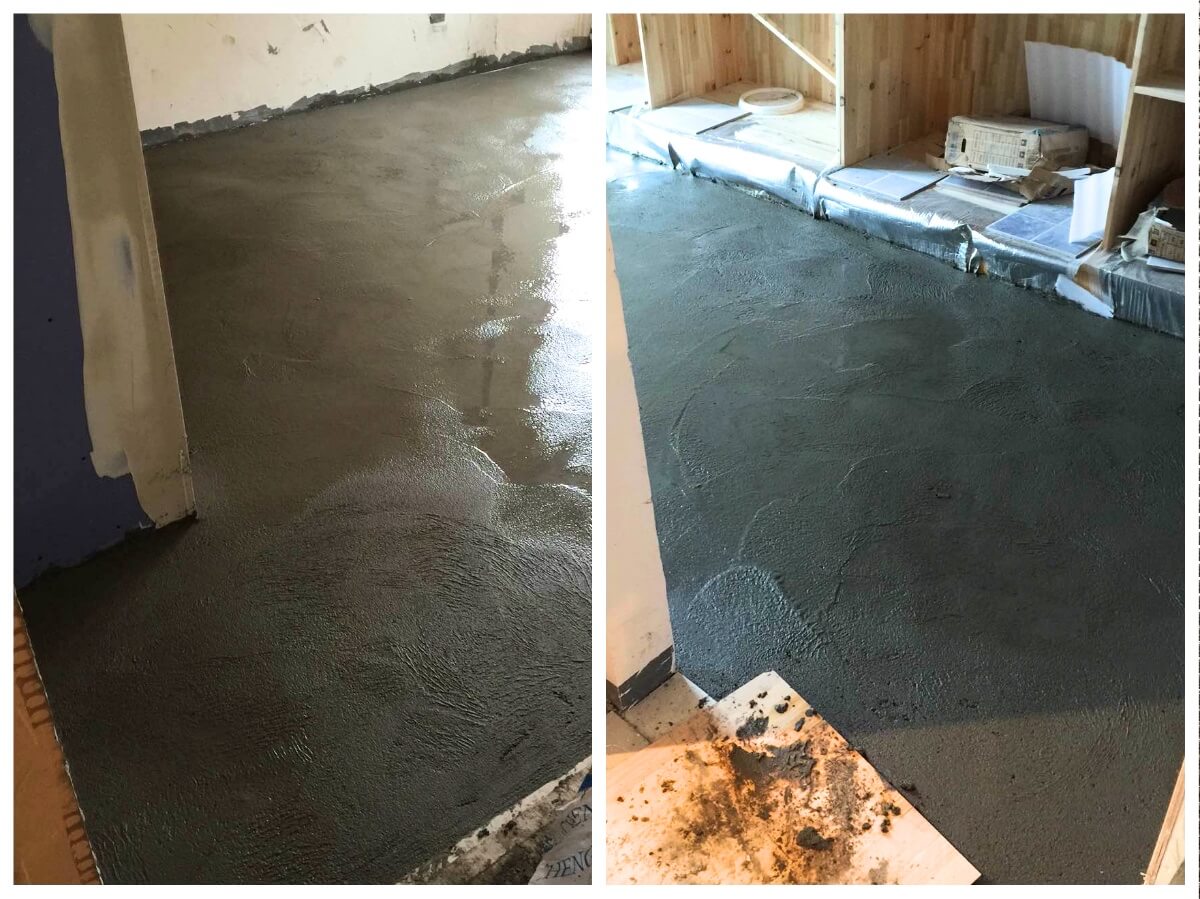
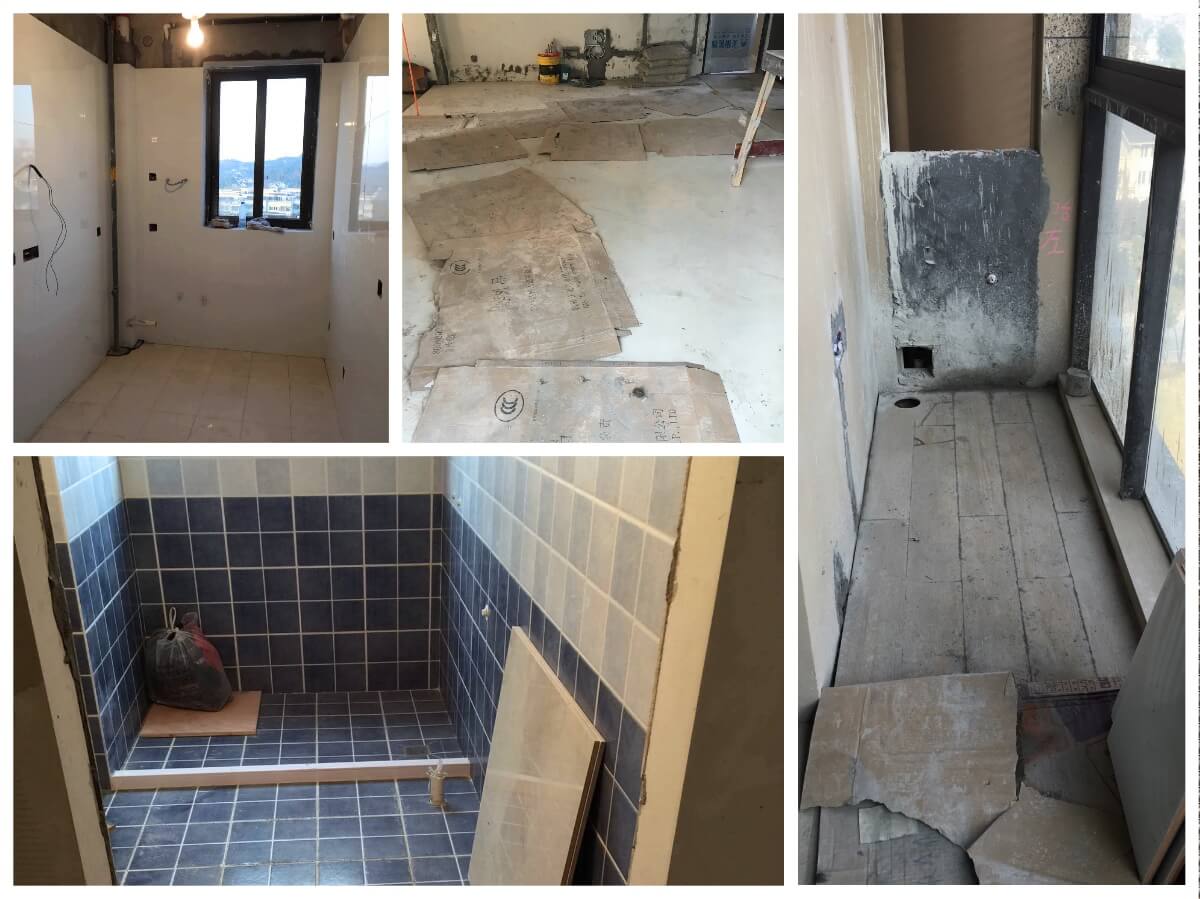
Tiling
This involves sealing trenches, leveling, waterproofing, shower curb installation, tile laying, and floor drain installation.
Consider flooring type in advance (joists or cement leveling). Information is in the purchasing section. This affects leveling layer thickness, aiming for level floors (bathroom slightly lower).
I switched from engineered wood flooring + joists to laminate + cement leveling. The tiler re-leveled the room floor.
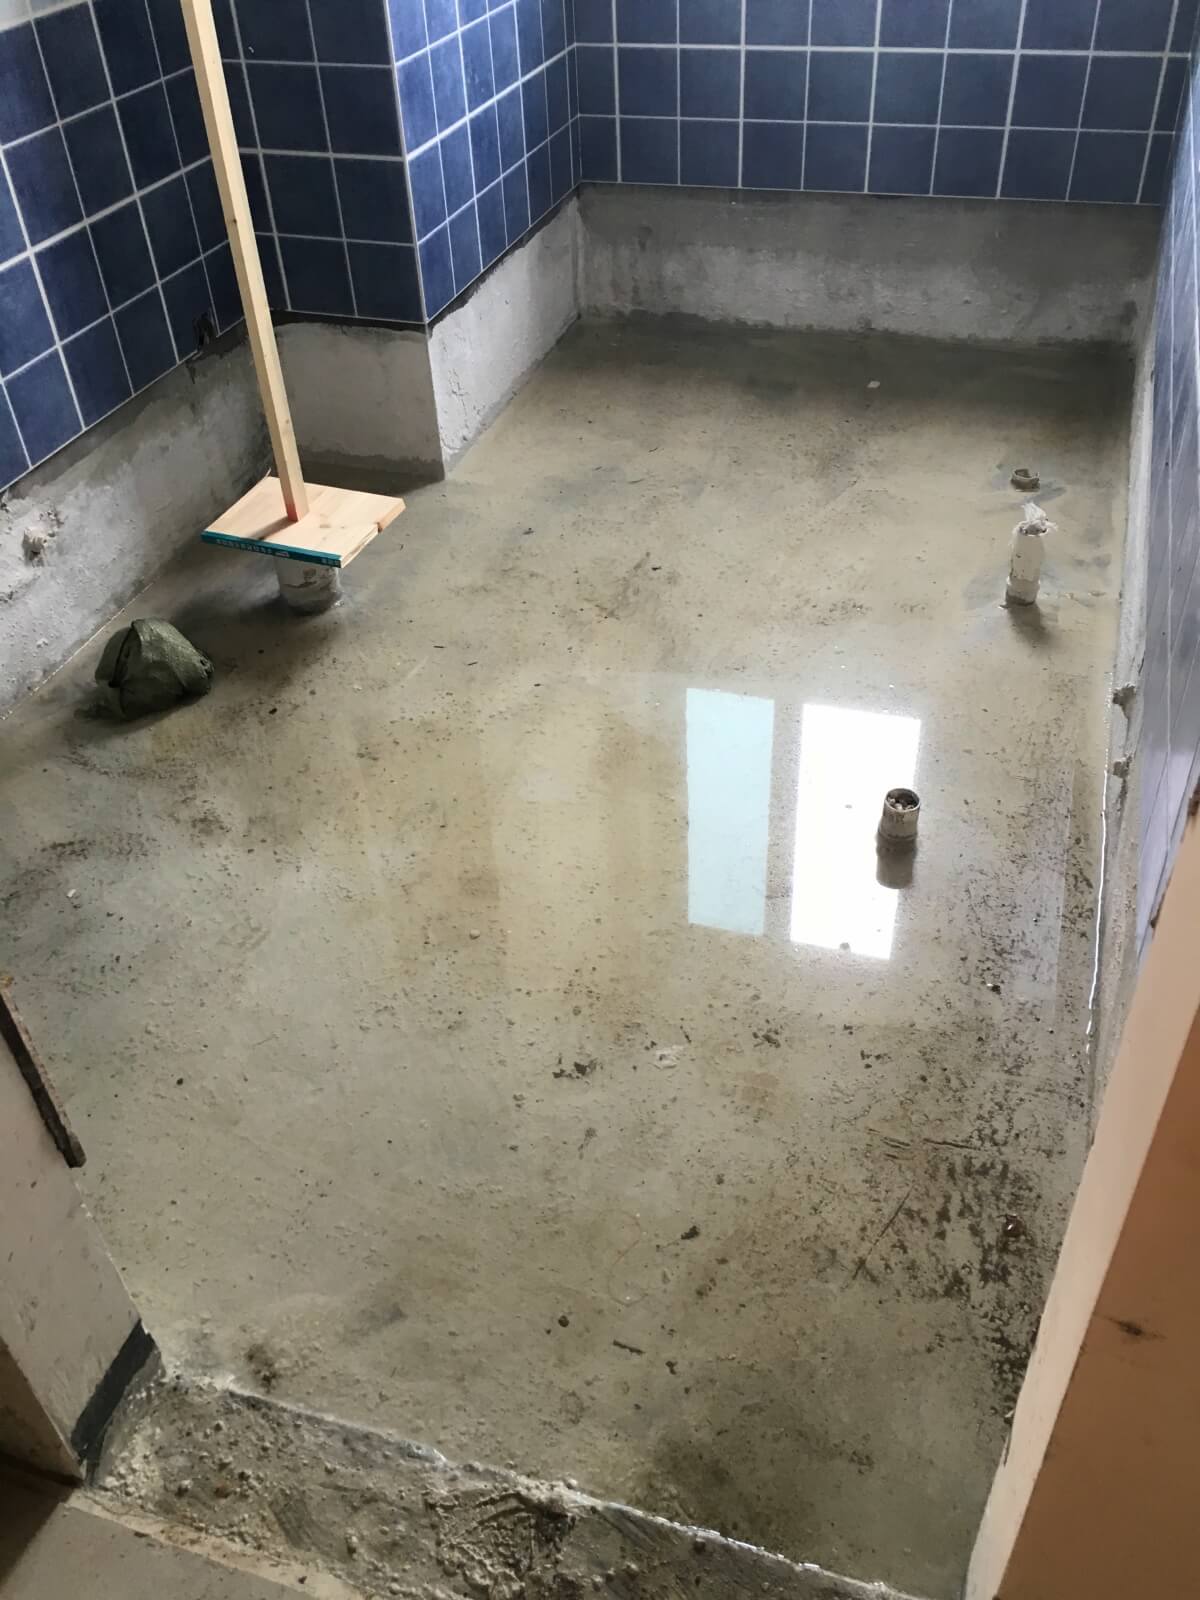
After bathroom waterproofing, do a water test and photograph. Shower area waterproofing must reach the top. Otherwise, water can seep through tile joints.
Ensure the floor slopes towards the drain in areas with floor drains. My bathroom has a non-draining corner, but it’s outside the shower.
Tiles give the first glimpse of the finished home. I used wood-look tiles on my balcony.
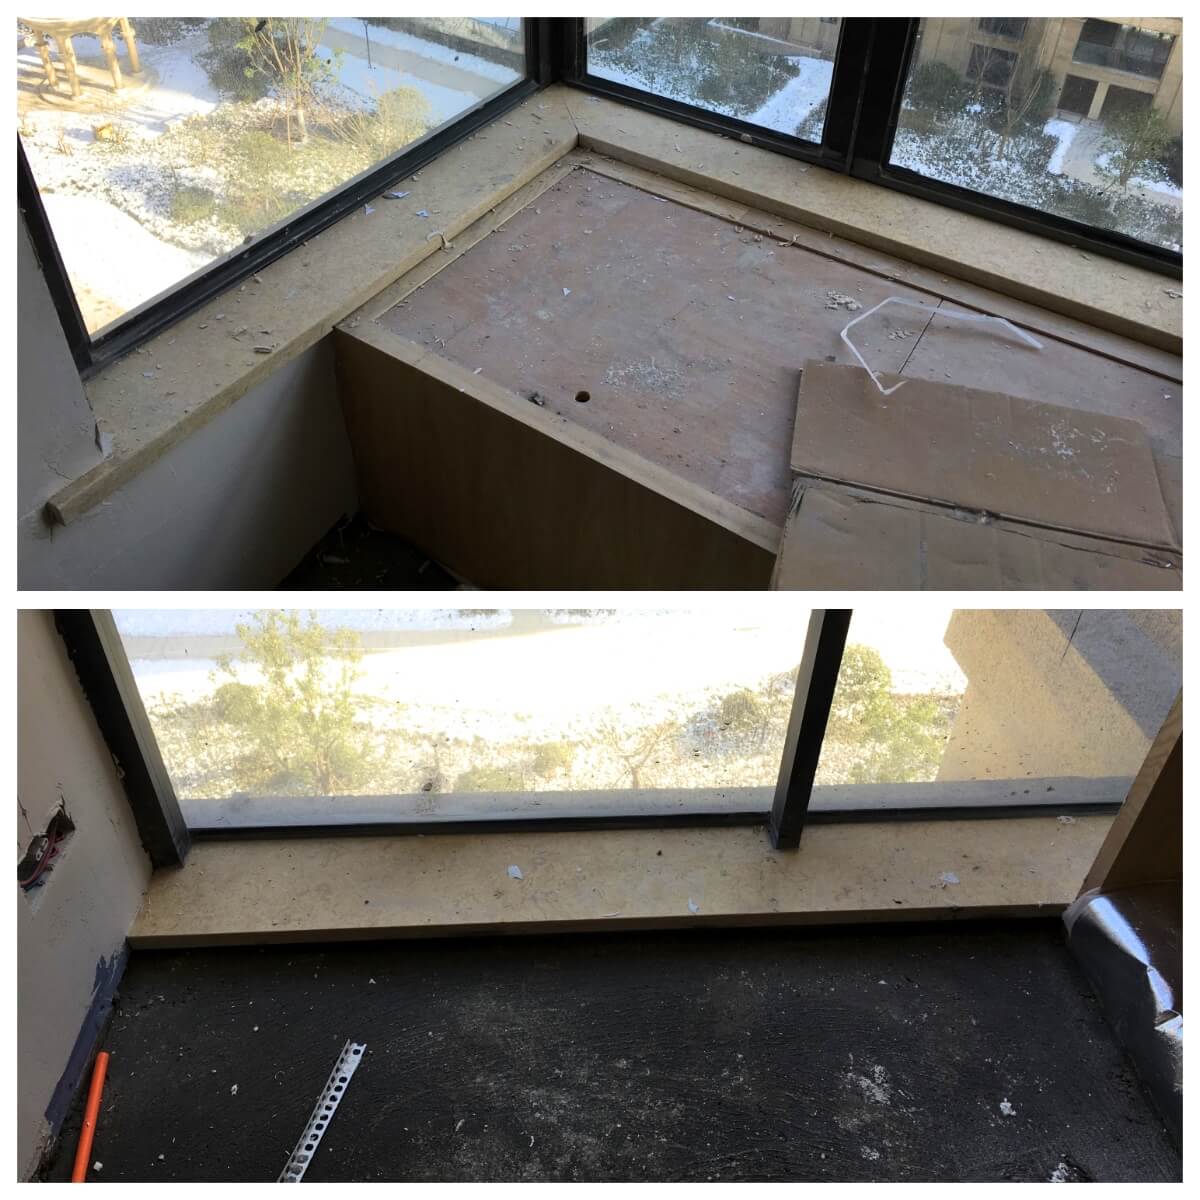
The tiler also installs threshold stones and windowsill boards (can be done later).
Schedule gas meter installation after kitchen tiles.
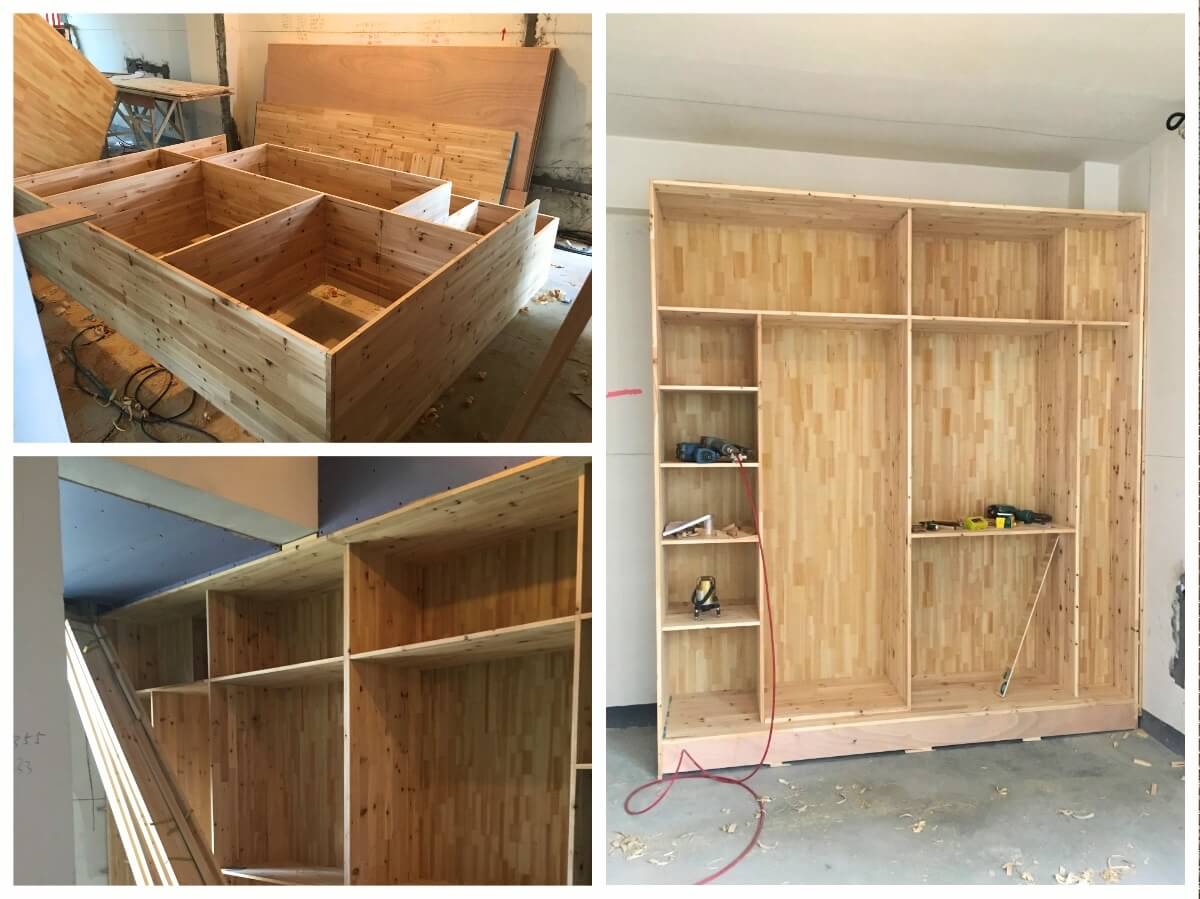
Carpentry
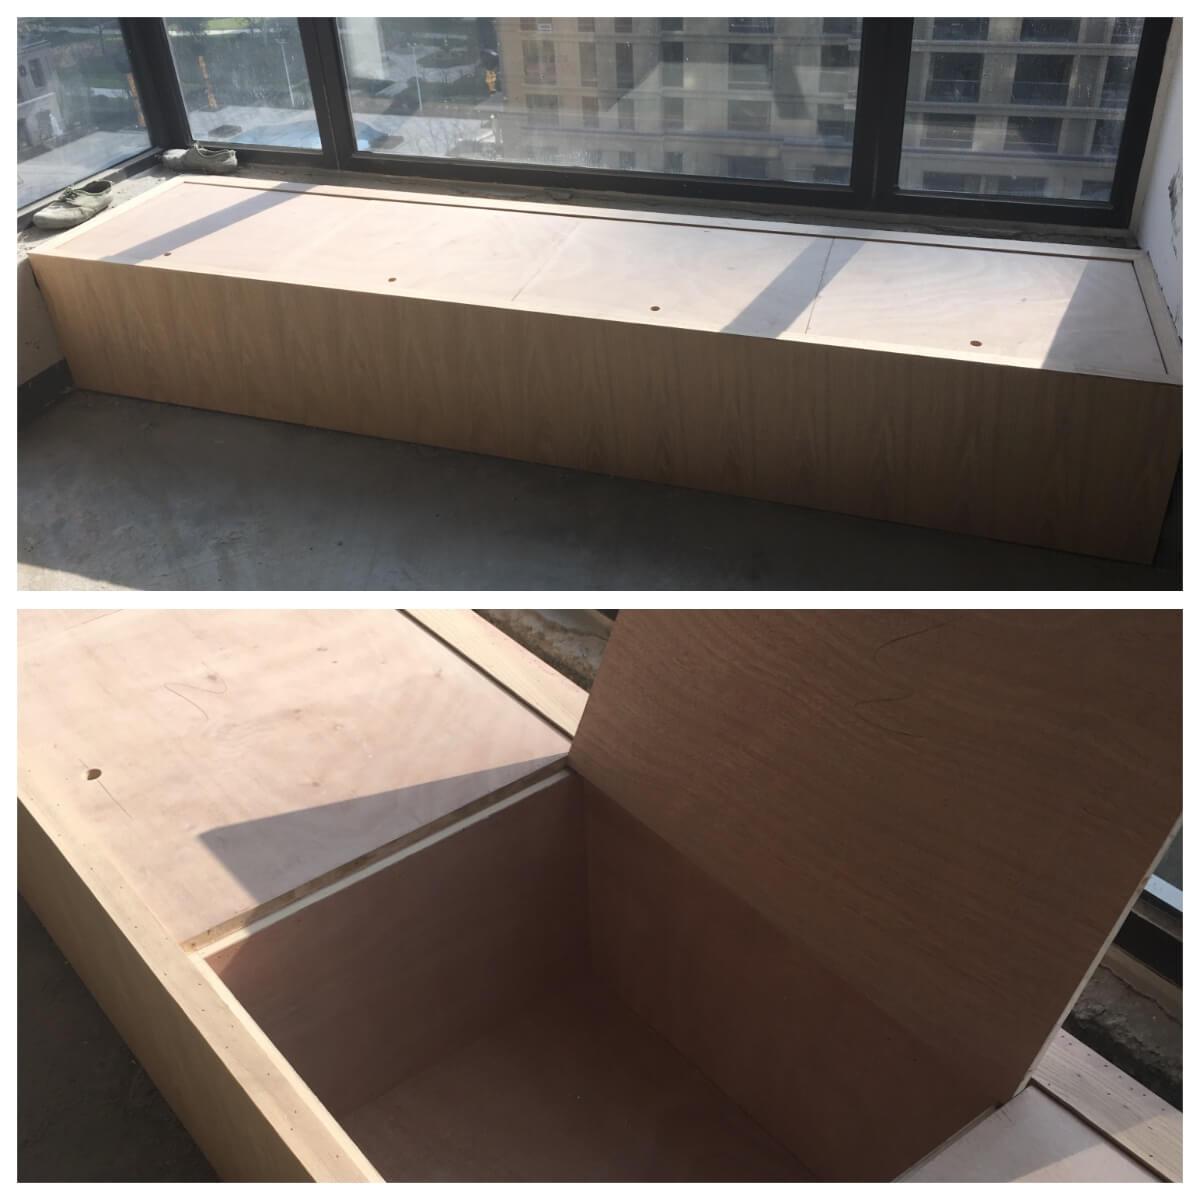
This involves ceilings, cabinets, tatami mats, and bay windows. Discuss special needs with the carpenter. My classmate had a dressing table made with a flip-up lid and mirror.
Wardrobe construction. My wardrobes were carpenter-made, including a wall of wardrobes in the walk-in closet. Carpenter-made wardrobes are more environmentally friendly.
Design the wardrobe’s internal structure yourself, or with the renovation company designer. Carpenters are dimension-sensitive; their wardrobes usually have no practical issues.
Carpenter-made bay window with storage.
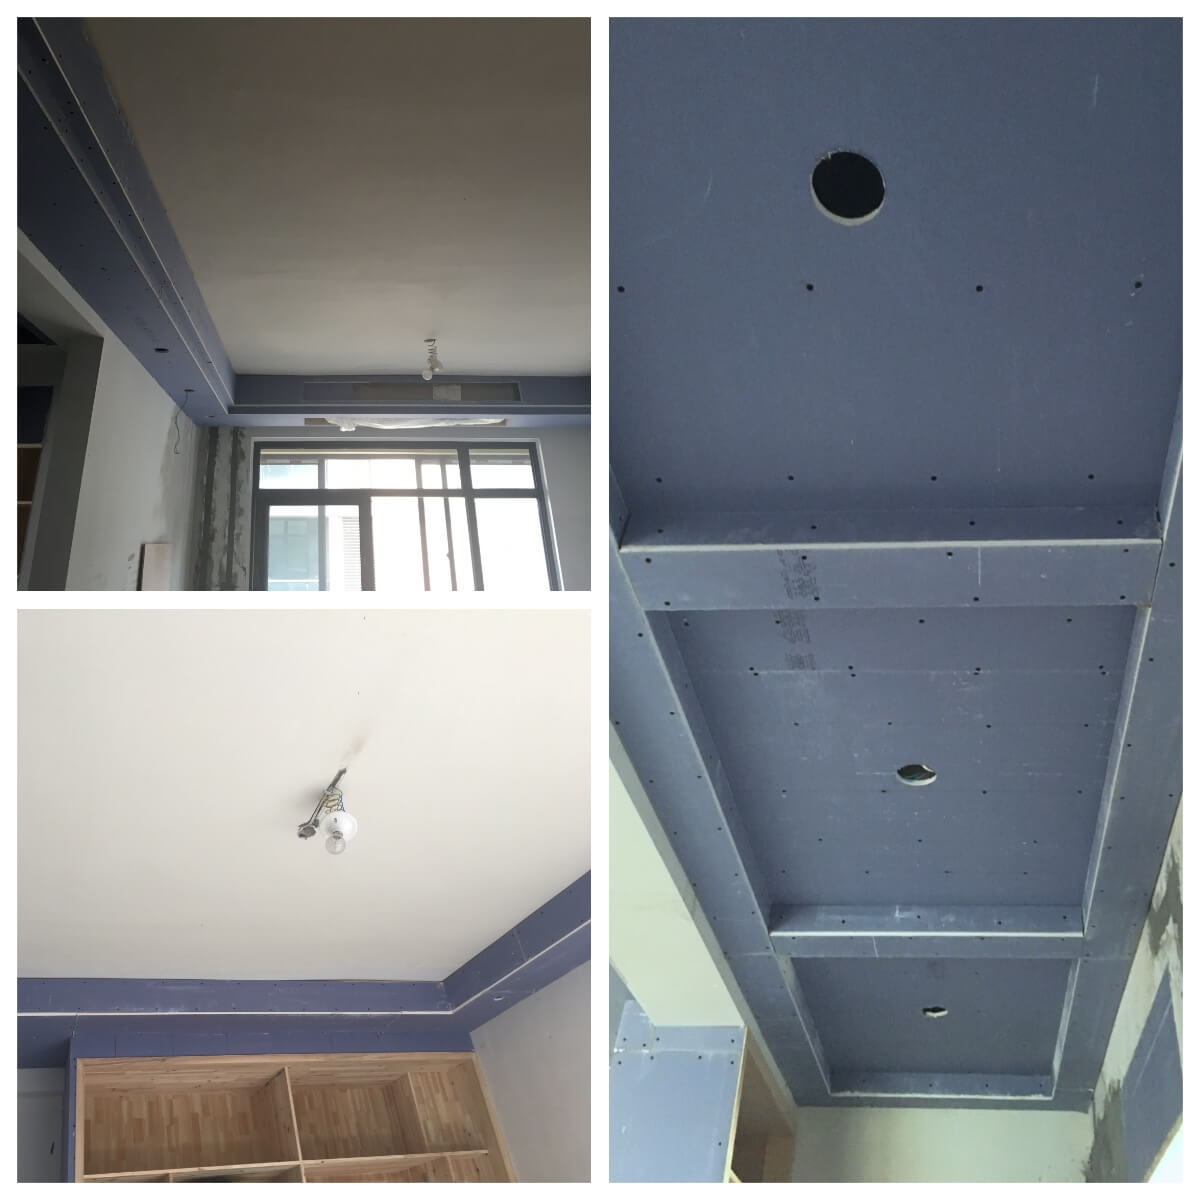
Living room ceiling to conceal the duct machine. Rooms had simple right-angle ceilings to hide beams.
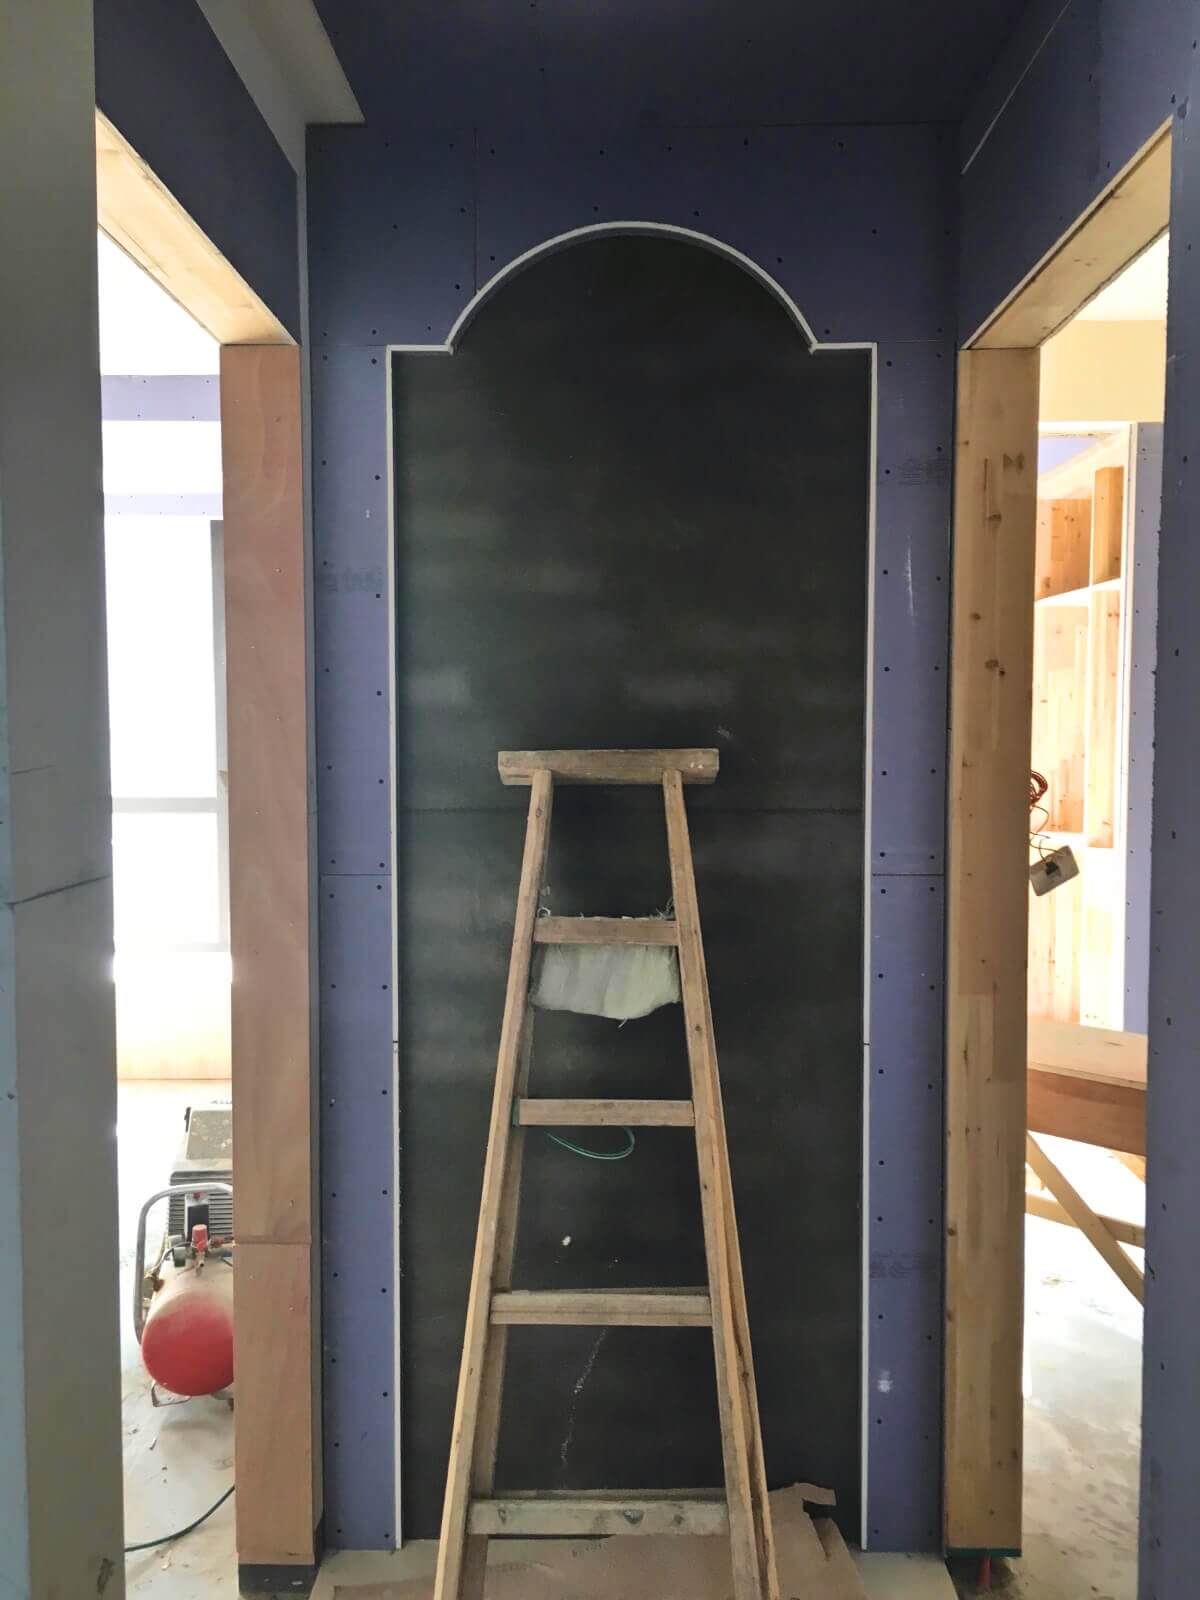
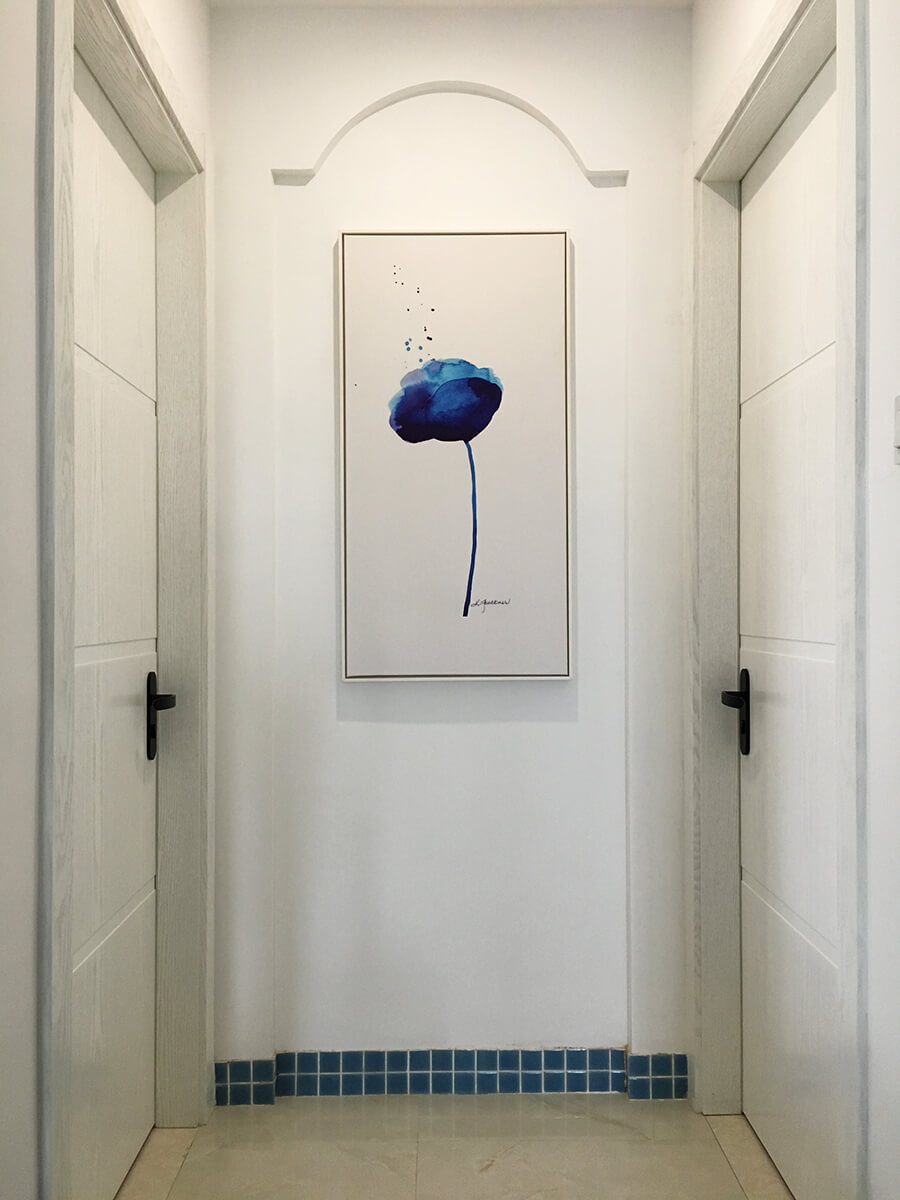
Carpenter-made door frame for two bedroom doors. I’ll hang paintings here.
For TV stands, consider future TV size. Don’t limit the possibility of a larger TV.
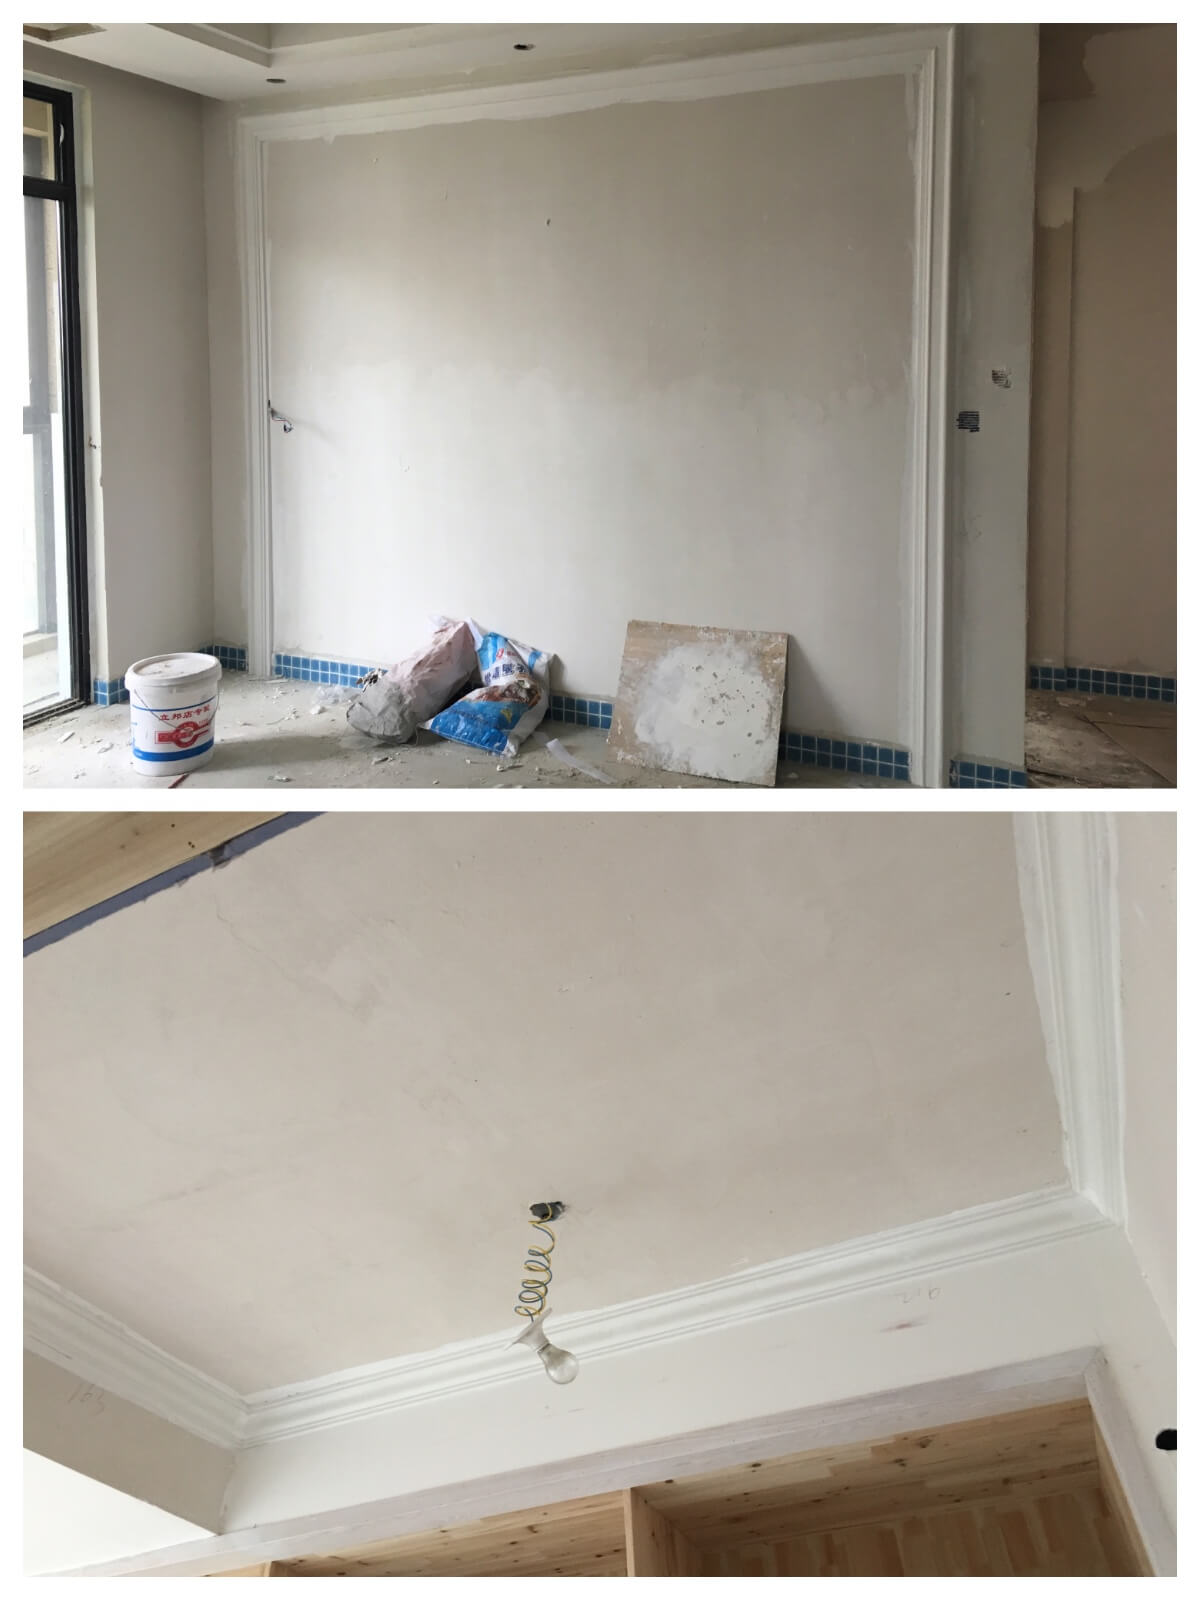
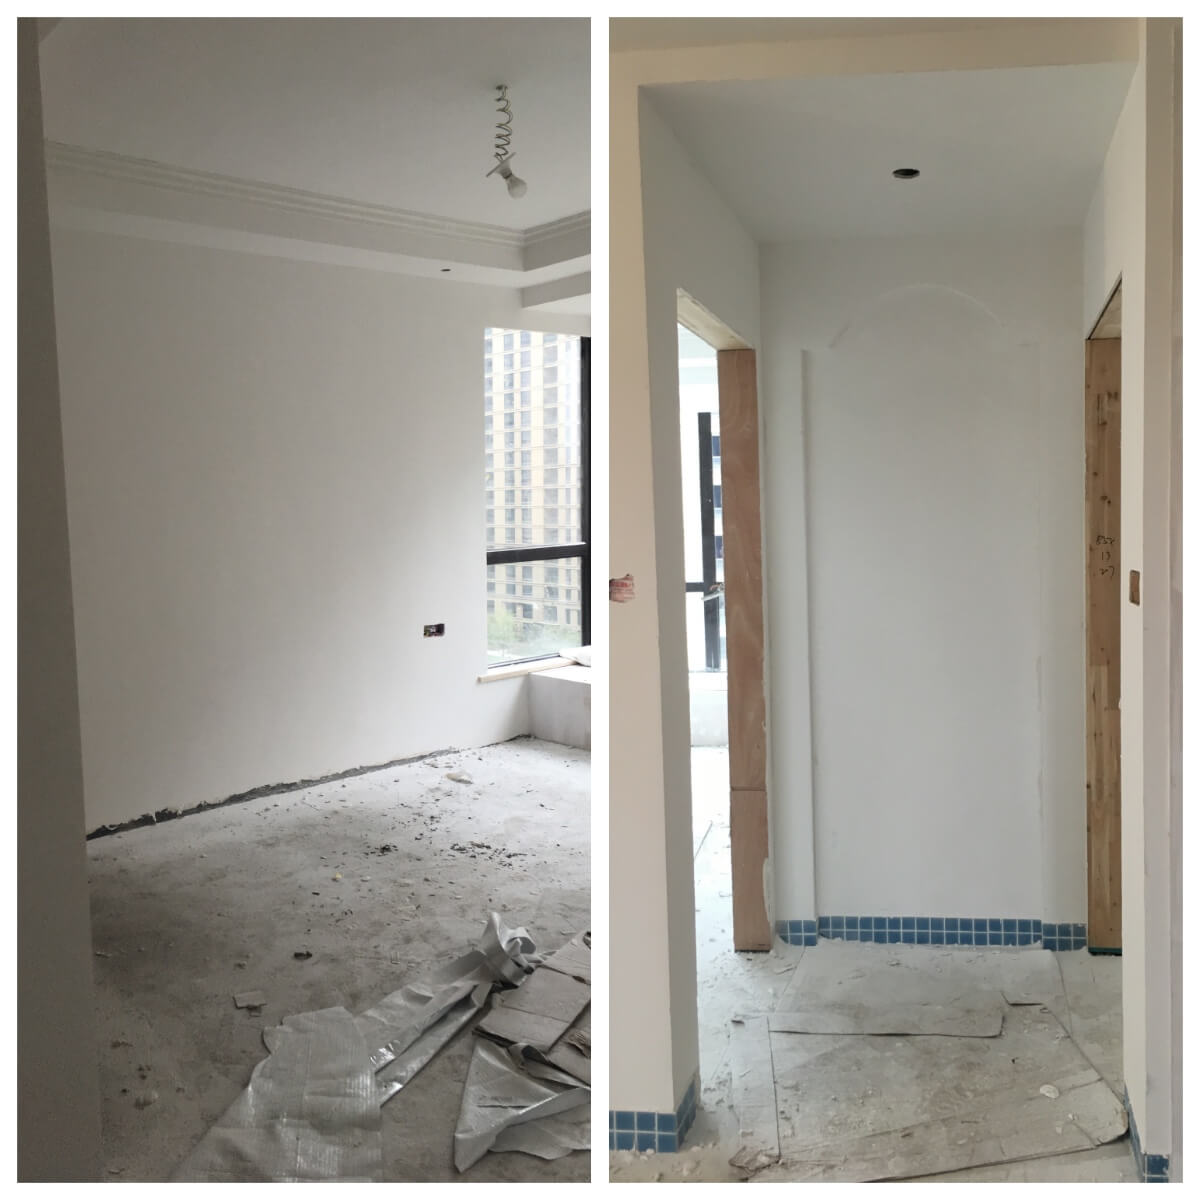
Painting
This stage is repetitive: putty, latex paint. It requires many purchases (see schedule).
White wall paint; things are taking shape.
Install gypsum lines during painting and paint them with the walls.
The painted house looks spacious, but it’s an illusion. Furniture will reveal the reality. The tape measure doesn’t lie.
Latex paint drips. Keep packaging cartons to protect tiles/floors and prevent damage from heavy objects.
Installation
The electrician installs water/electricity facilities: switches, sockets, faucets, angle valves, toilets, basins, hooks. Vendors install integrated cabinets, doors, floors, fixed appliances (stoves, dishwashers). The gas company lights the fire.
Kitchen/bathroom are complex (electricity, water, gas). The wrong order causes rework (see schedule).
Water heaters, cabinets, doors, ceramics, lamps, wallpaper… It’s complex. I visited the new house almost every weekend.
Supervise the electrician. Problems can arise: reversed angle valves, reversed switch states, crooked panels/switches, upside-down switches, crooked lights, foam debris in lampshades.
Be firm when needed. My electrician claimed a reversed switch was unsolvable. I had him remove it, set it to “off,” and reinstall it. It worked.
Lighting is crucial, especially functional lighting. Eliminate dead spots in frequently used areas. Reserve power lines during plumbing/electrical. Emphasizing again: before plumbing/electrical, consider water/electricity usage. The electrician handles standard lights. You must specify wall lamps and functional lighting.
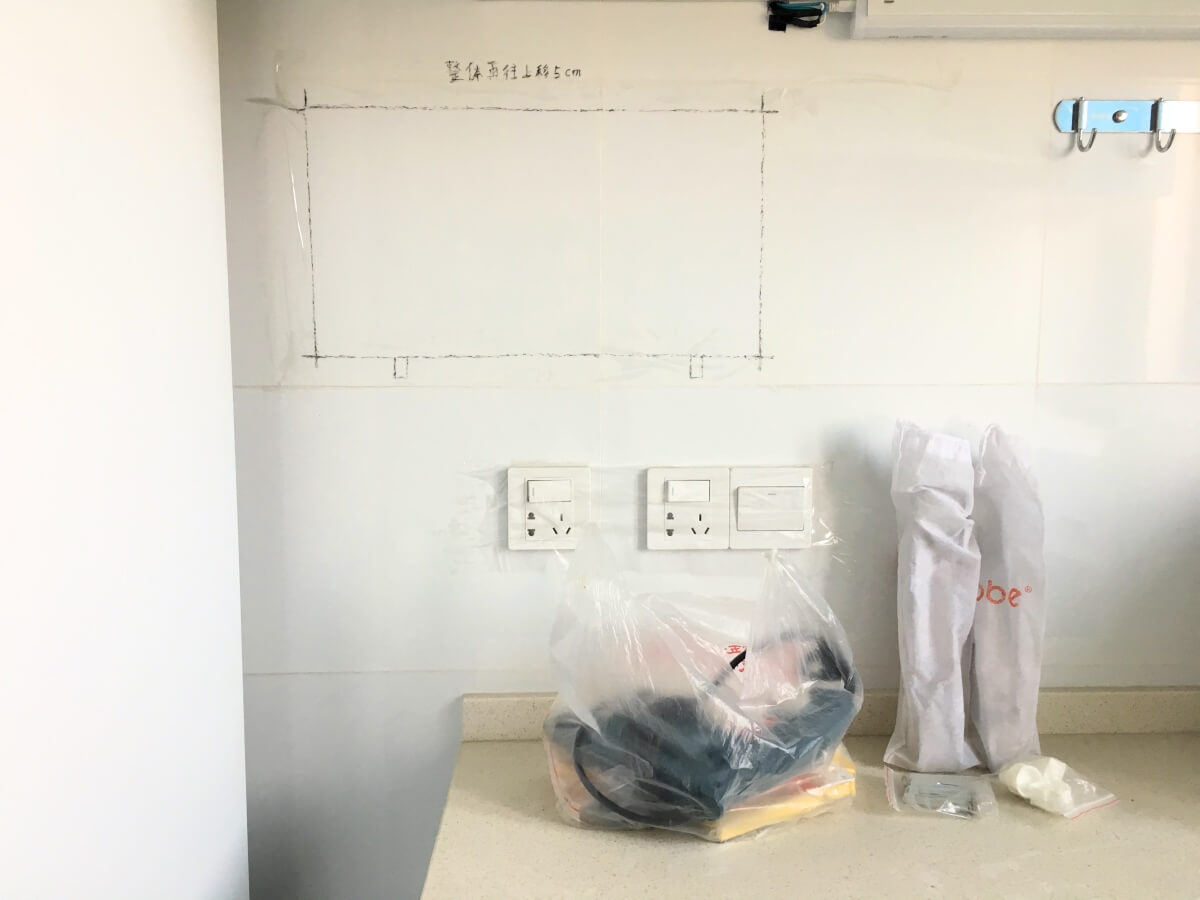
Select and purchase the microwave before final installation if you plan a kitchen wall bracket. It determines the bracket’s drilling position.
I provided a schematic, marked the location, and placed the microwave nearby. Workers will re-measure for accurate installation.
Purchasing
Purchasing and construction go hand-in-hand. Here’s some advice:
Choosing materials and furniture can be overwhelming at first. I developed a system: ① Research the basics. ② Visit stores, examine top products, learn their benefits, and confirm your research. ③ Decide on quality, material, and structure, making trade-offs. ④ Visit more stores, compare prices, and order.
Taobao is a great resource. Ask customer service for details you can’t find online. After contacting several sellers, you’ll likely have a good understanding, even if they aren’t technical experts.
I avoided group-buying events for renovations. I don’t trust them. Responsibility is unclear, even though they attract many people. Sellers are accountable for their products, but group-buying events aren’t. You might find a few deals, but you’ll mostly encounter slow-moving items or bundles with useless extras. After-sales service is also a concern with multiple parties involved (venue, group leader, seller), leading to potential blame-shifting. Delivery delays are a major problem, disrupting your schedule. In home renovation, time is money (rent).
Furniture stores often feature mid-to-high-end items, which can easily break your budget. However, visiting during holidays can yield unexpected deals. I found a promotional flooring model from a major brand, and the quality and service have been excellent.
Monitor promotions on e-commerce platforms, especially for appliances. Price comparison tools are useful. Appliances are standardized; the same model is identical everywhere. These tools display the lowest current price and historical trends, helping you determine the best time to buy.
There’s extensive information online about most building materials and furniture. A good search engine is invaluable.
The following information isn’t exhaustive. It’s simply what I gathered. I excluded straightforward items like tiles (beginners can hardly tell the difference unless they’re side-by-side). I also omitted items I didn’t purchase. For instance, I have a gas water heater, so I didn’t research electric ones. This focuses on the products themselves; judging industry “tricks” is up to you.
Conflicting information exists about some products, with sellers contradicting each other. I concentrated on gathering information on these. Ignore any brand mentions and focus on the basic knowledge:
Floor Drains
Two main types: water-sealed and air-sealed. Water seals can be shallow or deep; air seals have various mechanisms. No single type is best; different locations require different drains. Areas with constant, heavy drainage versus rarely wet areas need different solutions. See this article:
The spacing between the two-prong and three-prong holes in a five-hole socket should prevent plugs from interfering. Modern sockets are usually well-designed, but ensure they have a safety feature. This design connects metal parts only when all holes are inserted. A child inserting a chopstick into one hole will be blocked by an insulating plate.
Shower Curb
Two installation methods: pre-embedded and non-pre-embedded. Pre-embedded involves fixing the curb before tiling. Non-pre-embedded means attaching the curb to the tiles later with sealant. The latter requires a very flat floor and precise tiling. The sealant must be perfect to prevent aging, cracking, and leaks. Pre-embedded is generally preferred for new homes, provided waterproofing is done correctly, as leaks under the tiles are a major issue.
Curbs are usually PVC or marble. Marble is more durable and solid. PVC curbs are hollow and require cement filling.
Two curb shape details: the skirt and sealant groove. A skirt helps with water resistance if you use a shower curtain (irrelevant with a glass enclosure). The sealant groove is useful for non-pre-embedded installations but irrelevant for pre-embedded ones.
Kitchen cabinets are complex; understanding them took time. Base and surface materials have confusing, similar-sounding names. Here’s a breakdown. You can search online for property comparisons. Base materials and surface materials are distinct concepts and not directly comparable. Some sellers exploit this to mislead customers.
First, the base materials. Many are used in doors, wardrobes, sofas, and tables, so differentiation is important.
From top to bottom:
MDF (Medium-Density Fiberboard): Made of wood fibers, glue, and other materials. Dense and uniform.
Particle Board: Often called “solid wood particle board,” but it’s not solid wood. Made of wood chips and glue.
Plywood: Multiple layers of wood veneer glued together.
Blockboard: Two thin wood panels sandwiching wood strips. Commonly used for custom furniture.
UV Board: Smooth surface made by curing liquid paint on the base material.
Lacquer Board: Same material used on cars and pianos.
Melamine Board: Sellers avoid “melamine,” calling it “double-sided panel” or “eco-board.” It’s paper with color/texture soaked in resin, dried, and hot-pressed onto the base. (Melamine in building materials is harmless and common.)
Thermofoil Board: Similar to melamine, but the surface is thicker, not paper. It can have 3D textures and seamless wrapping without edge banding.
Acrylic Board: Called “crystal board” or “organic glass,” but it’s plastic, unrelated to crystal.
Crystal Steel Board: Tempered glass glued to the base, often metal instead of wood.
Fireproof Board: Low-end material, rarely used in homes. I haven’t seen it sold; you can likely ignore it.
Molded board refers to a processing method using a mold for shaping. It’s unrelated to material but usually refers to thermofoil board.
When designing cabinets, reserve space for the refrigerator based on dimensions with the door open. A 60cm wide refrigerator needs more than 60cm. Drawers won’t pull out if the door only opens 90 degrees. Opening it wider exceeds the refrigerator’s width.
Line the cabinet under the sink with aluminum foil. It’s very humid, potentially damaging the cabinet. Even with quality materials, leaks can happen. Foil is the last defense, significantly reducing damage.
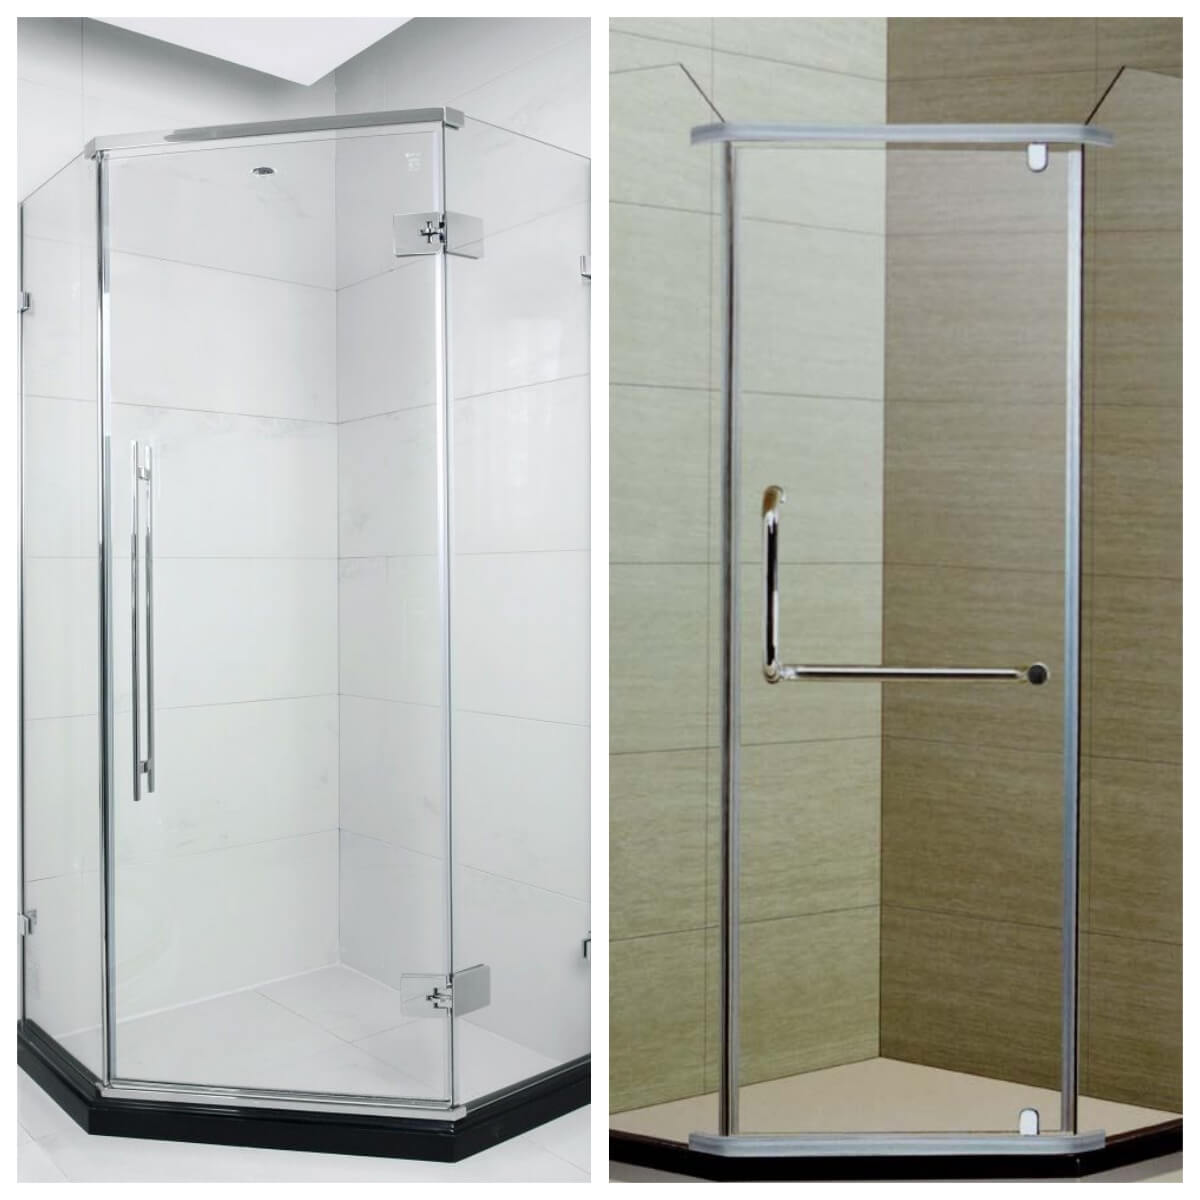
Shower Enclosures
Two points about shower enclosures lack definitive answers:
Hardware can be copper, stainless steel, or aluminum alloy. Most sellers favor copper, but some stainless steel models are pricier, even from known brands. Pure copper is more corrosion-resistant but less hard than stainless steel. Theoretically, copper is better. But pricier stainless steel models suggest low-quality copper might be worse than low-quality stainless steel. It’s unclear; avoid being too cheap.
Hinged doors have hinges or pivot hinges. Stress points on the glass differ, and sellers disagree.
Left: Hinge; Right: Pivot hinge. Note the door’s rotation connection point.
Delli stated they don’t make pivot hinges due to sagging and shattering risks, making them less safe than hinges. Lower-priced brands often use pivot hinges, but in these stores, they’re often more expensive, with sellers claiming superiority. The pivot hinge structure seems more robust, but understanding internal structures is needed for a conclusion, and I found no information. However, for the same door width, a hinged door’s opening is wider.
This Zhihu article details other shower enclosure aspects:
Flooring discussions mainly involve solid wood, engineered wood, and laminate. Comparison is easy: price and environmental friendliness decrease, while durability and ease of maintenance increase. See this:
Common types include forced exhaust and balanced flue, referring to exhaust methods.
Some sellers mention constant temperature and condensing types, but these are separate features. Constant temperature models adjust water/gas flow for stable temperature. Condensing models reuse combustion gas heat to preheat water, offering some temperature stability but primarily saving energy.
Pay attention to condensing models. They’re more energy-efficient but have an extra condensate pipe. This needs draining via a sewage pipe, so consider how to manage this small pipe.
A smoother glaze inside the toilet facilitates cleaning with a single flush.
Two flushing methods: direct flush and siphon flush. Direct flush uses gravity; siphon flush uses pressure from the water seal. Jet siphon adds a jet for enhanced flushing.
Water fittings are crucial. Even for major brands, ensure official fittings. Stuck flush buttons or failure to refill are common toilet problems. Half the toilets in apartments I’ve lived in had these issues.
Two drainage types: floor drain and wall drain. Wall drains are less common, requiring wall load-bearing capacity. Floor drain toilets are more reliable; install at the original drain location, avoiding shifters if possible, for better sealing.
Before buying, measure the “rough-in” – the distance from the drain center to the nearest wall. The seller needs this for the correct toilet.
Downlights provide broad illumination, often for hallways or supplementary lighting. Spotlights have a concentrated, adjustable beam for illuminating specific areas, like paintings.
Three common base materials: MDF, wood-plastic composite, and particle board (called “solid wood particle board” by sellers). Particle board is only for flat doors. Designs like faux shutters or carvings require the first two.
Wood-plastic composite is a new material. These articles provide definitions and discussions:
Bathroom cabinets have wall and floor drain options, like toilets. Common materials are PVC and wood panels, usually solid wood. Avoid sellers substituting MDF; it absorbs water and swells in humid bathrooms, making it the worst choice.
First, understand LED working principles and the resulting excessive blue light issue. The harm isn’t as exaggerated as some claim. Insufficient light and incorrect color temperature can also damage eyes. Improper use is more harmful.
But reality isn’t ideal. Online, you rarely see lumens, color rendering index, or heat dissipation. You can only compare wattage and color temperature. Besides style, there’s little for ordinary consumers to compare. Visiting a physical store is more insightful. I was lazy and bought online.
Home lighting has two functions: illuminating the entire space or a specific area. Ceiling lights in most rooms do the former, being the main source. Dining rooms are exceptions, only needing to illuminate the table. I chose simple LED square lights for most spaces, providing even illumination without unnecessary colors/shadows. Square lights emit light broadly; you usually won’t look directly at them. A simple style isn’t problematic; it just might not garner compliments.
Bed Frames
Bed frames come in leather, wood, fabric, and metal. These are surface materials; the core load-bearing material is wood or metal.
Metal frames are durable and non-polluting but have limited styles and usually lack storage.
Wooden frames are divided into panel and solid wood. Panel frames use particle board and other engineered wood, with lower environmental friendliness and durability, lower prices, and more varied styles. Solid wood frames are durable and environmentally friendly, with higher prices and simpler styles. Solid wood has many tree species, with significant quality differences. Sellers often recommend teak and walnut. Softer woods like pine might be weaker than panel beds.
This article details wood, more than the kitchen cabinet section:
Not all frames use one material; some mix materials. Key load-bearing parts might be solid wood, side panels engineered wood, and the headboard leather or fabric.
Mattresses
Common types: spring, coir, memory foam, and latex. A spring mattress doesn’t only have springs; a latex mattress doesn’t only have latex. Mattresses usually have three layers: innermost spring layer, padding layer, and outermost fabric layer. Some all-coir mattresses genuinely have no springs.
The padding layer determines the type. If it’s mainly coir, it’s a coir mattress; if mainly memory foam, it’s a memory foam mattress. The padding can be multiple layers of different materials. Materials ranked from hard to soft: coir > memory foam > latex. Some mattresses are double-sided, with different padding on each side of the spring layer. For coir mattresses, note they’re not the old coir beds. Modern coir mattresses use glue to bond fibers into a dense layer. Another process uses all-coir fibers woven without glue.
Two common spring layers: innerspring and pocket spring. Innerspring is cheaper but has a mutual influence problem; turning over affects your partner’s side. Older, noisy mattresses are often this type. Pocket springs are independent, and the mainstream now. Pocket springs have a zoning concept, dividing springs into zones with different firmness. Head/waist zones use firm springs, shoulder/hip zones soft springs, back/leg zones medium-firm springs. More zones mean more precise support and higher price. Common zones: 3, 5, and 7.
Mattress firmness is affected by both padding and spring layers. Firmness isn’t a single indicator; soft padding with firm springs feels different from firm padding with soft springs.
This Zhihu article explains it; the above is my summary. Trying it yourself is most important:
Comfort is the primary consideration. Based on your height and habits, try sofas in a store and determine two key data points: seat depth and backrest height. Cushions can adjust, but the sofa itself is more stable and reliable.
I’m 167cm tall. After trying sofas, 50-55cm seat depth was most comfortable. Shallower decreases thigh contact, increasing pressure and fatigue. Deeper lacks lower back support; adding a cushion strains my neck.
My girlfriend, similar in height, wants to rest her head on the backrest, not a headrest. Headrests are unfixed and too soft, so we need a high-back sofa with 60-65cm backrest height. I searched online; it was challenging. We wanted a sectional sofa with a chaise. High-back searches usually exclude chaises, and styles tend to be classic European, Chinese, or American country, which are hard to match.
With these requirements, we went to the market and found more suitable sofas than expected. Many sellers offer customization: fabric, height, and width are changeable.
Ensure sitting comfort first, then consider material, style, and color. Don’t sacrifice function for the latter. There’s plenty of information online about these aspects.
Don’t be obsessed with storage or sofa bed functions unless necessary. Adding these requires a hardboard under the seat cushion, reducing comfort.
Curtains
Besides aesthetics and feel, consider installation: curtain rods or tracks?
Curtain rods: Simple. Exposed rods look better than tracks without a curtain box; no valance is needed. However, rods have a length limit; excessive length causes deformation. For very wide curtains, two rods are needed, with a gap between curtains. Removing and washing curtains is more troublesome.
Tracks: Flexible. Tracks can be L-shaped for seamless corner coverage. Curtains hang with hooks, making removal easy. For multiple layers (blackout and sheer), tracks save space.
When adding sheer curtains, ensure the curtain box is wide enough for two tracks with sufficient distance. If not, it’s better to forgo sheer curtains. Two layers squeezed together rub, hindering sliding and causing noise, defeating the purpose.
Curtains aren’t limited to these; roller blinds, fan-shaped blinds, and shutters exist, but are usually for smaller windows.
“Lightwave” ovens combine microwave heating with a heating tube, half microwave, half oven. It’s a differentiated product; not as advanced as advertised, nor as terrible as rumored.
Choosing a TV is personal preference. But it involves considering factors related to TV usage, then choosing the TV.
First, understand common home TV signal sources, usable in combination:
Cable Digital TV: TV signals from the cable company, mainly live broadcasts, with limited, paid on-demand content. Best clarity and stability, dedicated TV line, not affecting internet.
IPTV from Internet Service Providers: Set-top box from the provider, often bundled with broadband. Live broadcasts and on-demand. Live content similar to cable; on-demand is richer. Shares network cable but doesn’t occupy bandwidth. Requires a dedicated line. China Telecom’s IPTV must connect directly to the optical modem; a router in between prevents it from working, complicating home network topology.
Internet Set-Top Box: Most flexible and independent, richest on-demand. Live broadcasts via third-party apps. Affects internet speed; basically an Android computer. Smart TVs are the same, with the box integrated.
About size. Many distance/size charts exist. Don’t be limited. If you like big screens, exceeding the ratio is fine. My TV-to-eye distance is ~3m; I bought a 58-inch TV. It looks great, not too big.
About 4K. TVs seemingly need 4K. But consider usage. For live broadcasts, 4K is irrelevant; resolution isn’t that high; 1080p isn’t widespread. For on-demand movies/shows, 4K matters little; internet speed is a bottleneck. Even if platforms support 4K, your network might not handle it. For downloaded 4K content, a 4K TV is meaningful; the HDMI interface should preferably be 2.0, supporting higher frame rates.
About HDR. Great technology adding brightness layers, enriching shadow/highlight details. You won’t see HDR content for long. Better to have it, but not essential.
About boxes. I struggled: traditional TV + box or smart TV? It’s not a question. Like most cars over 300,000 yuan are automatic, finding a manual is hard. You won’t buy a very cheap TV; at that price, they’re mostly smart. But does a smart TV mean no box? Probably not. I don’t know if all are like this, but my Hisense smart TV is semi-open. Its app store has few apps, no live broadcast apps. No third-party app stores, file managers, or browsers. It wouldn’t read .apk files from USB; it didn’t want me installing other apps. So, I bought a box. The TV’s memory is small; it’s Android, needing enough memory.
Washing Machines
Characteristics and differences between front-loading and top-loading:
Top-loading: cheaper, saves electricity and water, faster, harsher on clothes, gravity drainage
Front-loading: more expensive, saves water and electricity, slower, protects clothes, motor drainage
Front-loading and top-loading washing machine capacity isn’t comparable. My new 7 kg front-loader and previous 4.5 kg top-loader hold about the same amount of clothes. Capacity isn’t entirely proportional to the number.
Preparations Before Moving In
Even after the contractors finish, you still have plenty to do.
Acceptance Inspection
A thorough inspection is crucial. Check for these potential issues:
Plug in all appliances to ensure they’re working.
Test two-prong outlets with a phone charger. For three-prong outlets, use a power strip. Test the 16A air conditioner outlet directly with the AC unit.
Confirm all light fixtures are functioning.
Verify that switches control the correct lights, and that bedroom lights have multi-location control (e.g., door and bedside).
Turn each faucet to maximum to check water flow.
Ensure floor drains are draining quickly. (Drainage speed depends on the drain type, but slow drainage is a problem.)
Look for cracked or loose tiles, and missing grout.
Check that room and cabinet doors open and close smoothly, without looseness or noise.
Inspect walls for cracks.
If you find problems, photograph them and contact the contractor or vendor for repairs.
Initial Cleaning After Construction
The first post-renovation cleaning is called “initial cleaning.” It’s much more intensive than regular cleaning, and thus more expensive. Hiring professionals is recommended, as it’s quite tiring.
Initial cleaning mainly involves:
Window washing, especially the exterior glass, which accumulates construction dust.
Floor cleaning, including scraping off dried latex paint and glue.
Cabinet cleaning, wiping down the insides of all cabinets.
Regular cleaning (dusting and mopping).
Removing dried paint is demanding. Good protection during painting saves effort (and money, as some cleaning companies adjust prices based on floor condition). Don’t expect perfection; remind cleaners about paint on baseboards and switch panels.
Keep a ladder handy for cleaning staff to reach cabinet tops.
Airing Out Formaldehyde
Formaldehyde primarily comes from newly purchased furniture. Cabinets built on-site often use more eco-friendly materials. Specifically, formaldehyde originates from glue; denser boards use less glue and emit less formaldehyde. MDF (medium-density fiberboard), being completely crushed and reshaped, has the highest content. Multi-layer boards, with glue only between layers, have significantly less.
We say “airing out” because furniture continuously releases formaldehyde. We can only address it once it’s airborne. The goal is to accelerate this release and reduce the airborne concentration to a safe level.
Four principles for reducing formaldehyde:
Ventilation: Essential. Without it, formaldehyde remains trapped.
Water Solubility: Formaldehyde dissolves in water; increasing humidity helps. Humidifiers and plants increase humidity through transpiration. Plants don’t absorb formaldehyde preferentially; they increase humidity, allowing airborne formaldehyde to dissolve. Large-leaf plants like pothos are more effective due to higher transpiration rates.
Adsorption: Porous materials like activated carbon adsorb formaldehyde. However, this only traps it on the surface. Regularly air out or discard the charcoal. Curtains and sofa covers also adsorb, but less effectively due to less dense pores. Washing curtains helps remove formaldehyde they’ve absorbed.
Chemical Reaction: Photocatalysts, sprayed on furniture, react with formaldehyde to reduce airborne levels temporarily.
However, the last three are far less effective than ventilation. In a closed space like a shoe cabinet, formaldehyde saturates the air, halting further release. Opening the door is more effective than water, charcoal, or chemical reactions.
Therefore, ventilation is key. 24/7 window opening is ideal. I did this without other measures, and tests confirmed significantly lower formaldehyde in well-ventilated spaces.
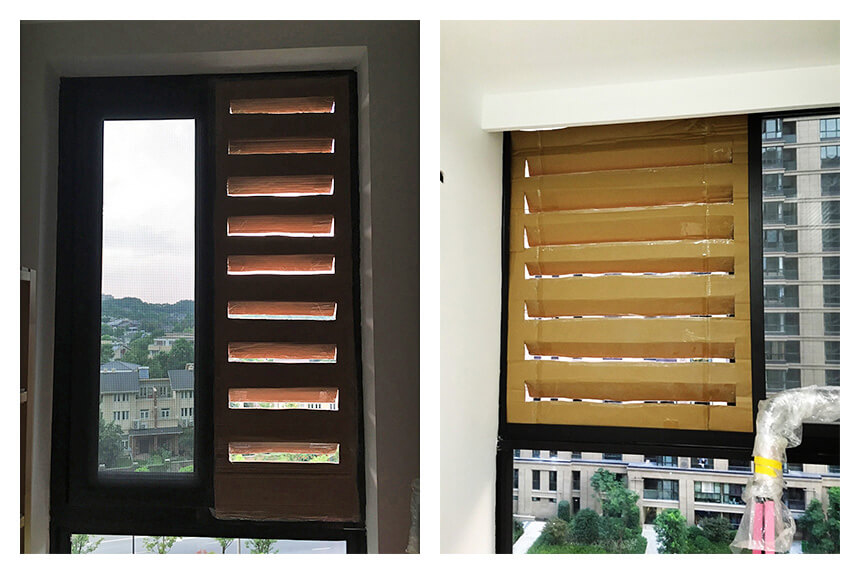
I made a cardboard louver for my window to allow constant ventilation while preventing rain damage.
Install the doorbell and property-provided intercom.
Seal unused holes, especially those leading outdoors, with expanding foam to prevent pests.
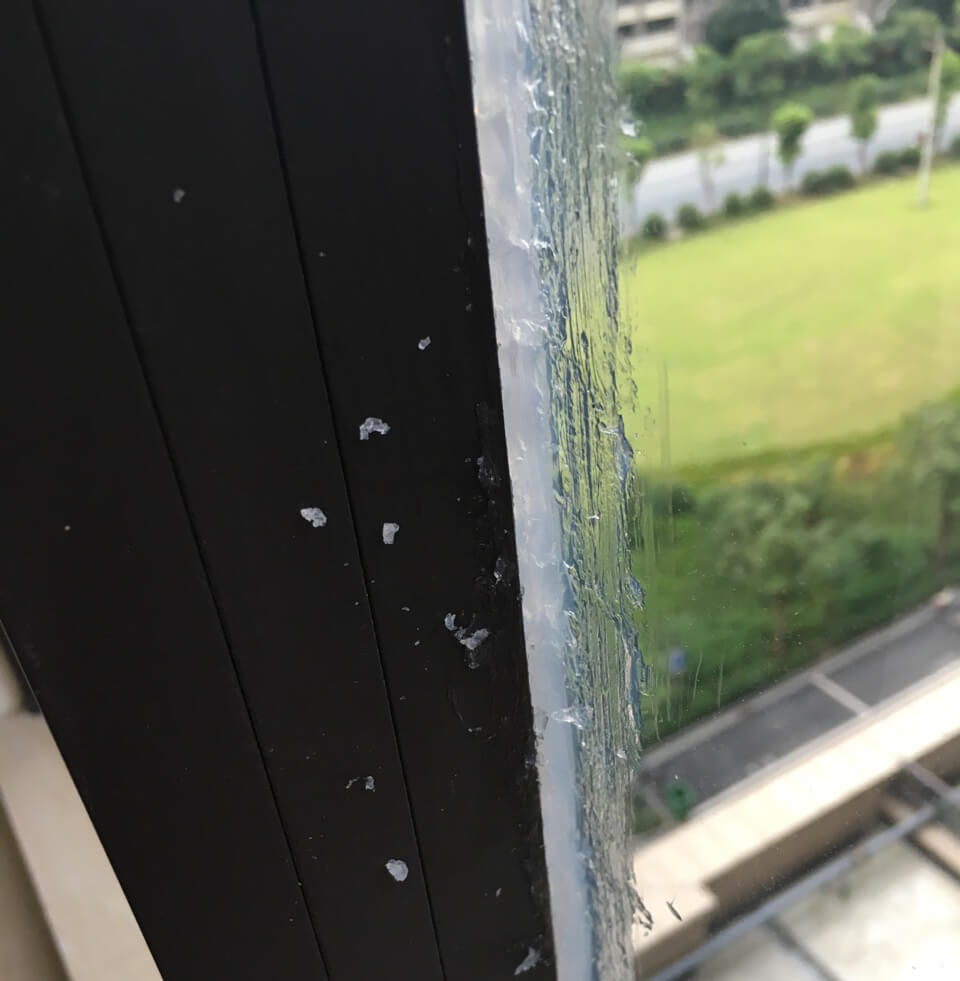
Inspect balcony floor-to-ceiling glass for gaps and seal them with sealant. My home had a large gap between panes, and the railing was distant from the glass, causing drafts even with closed windows.
The sealant looks rough initially, but you can trim it neatly after it dries.
Design Showcase
Time for the reveal! Here’s how the design turned out in real life. These photos were taken four months after I moved in, once I’d settled into the space and everything felt just right.
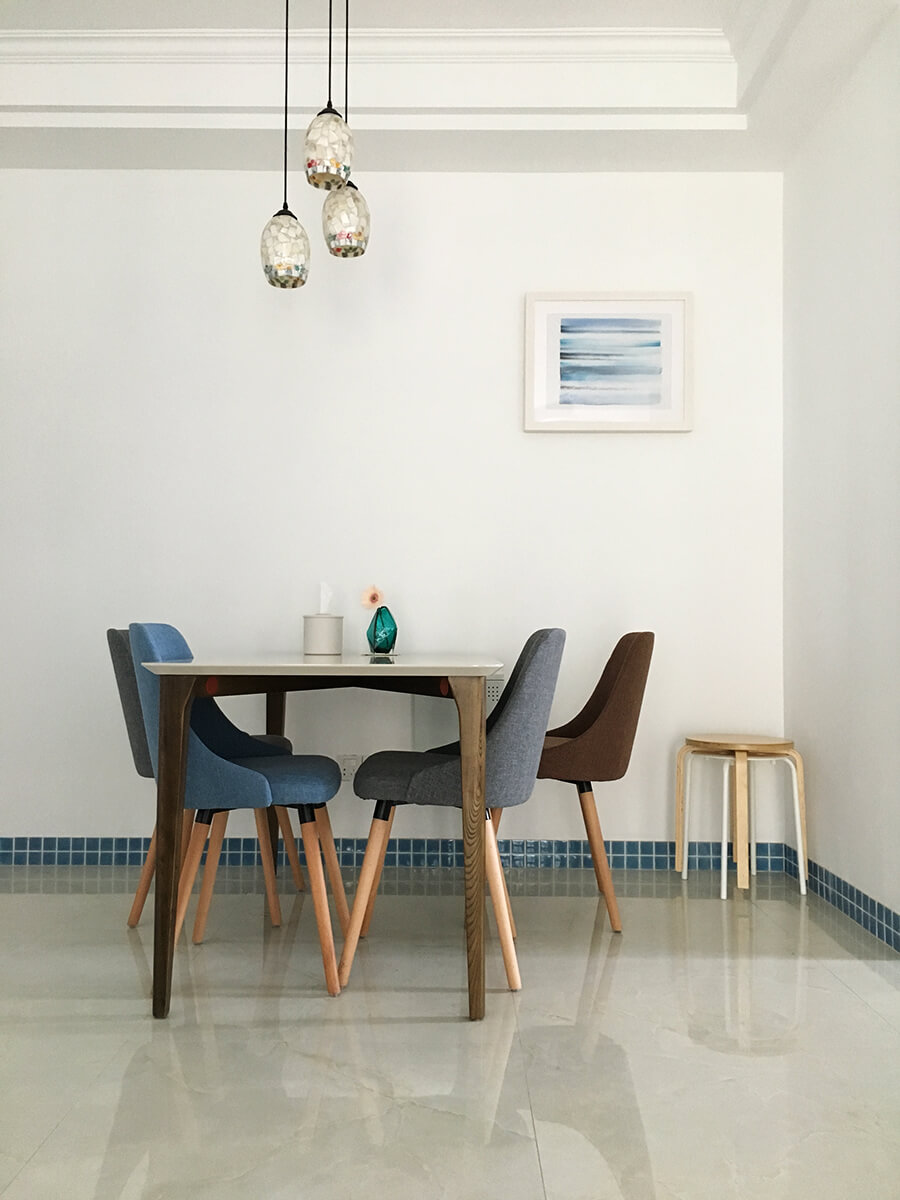
Living and Dining Room
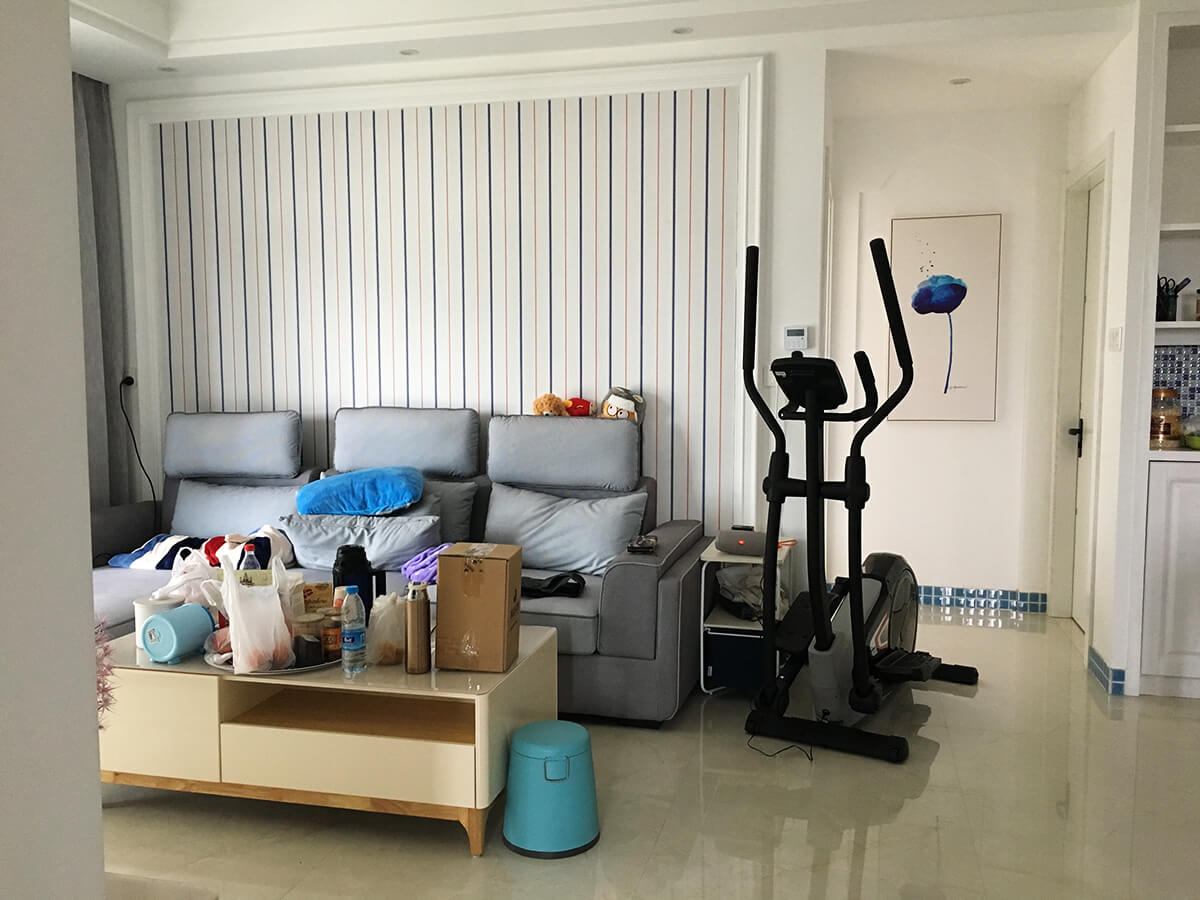
The living room greets you upon entry. The coffee table’s a bit messy, but that’s everyday life.
I initially didn’t plan on having the elliptical in the living room; I thought it’d block the walkway. I hadn’t factored in space for fitness equipment. After some back-and-forth with my girlfriend (she insisted on watching TV while exercising), I realized putting it in the multi-purpose room, as planned, meant it’d gather dust. So, the elliptical stayed.
Wallpaper’s behind the sofa, within the plaster line. Why not on the TV wall? I’m a storage nut and always want to keep my options open for future shelving or cabinets.
The TV sits on the stand, not mounted.
Fake flowers in a vase on the TV stand.
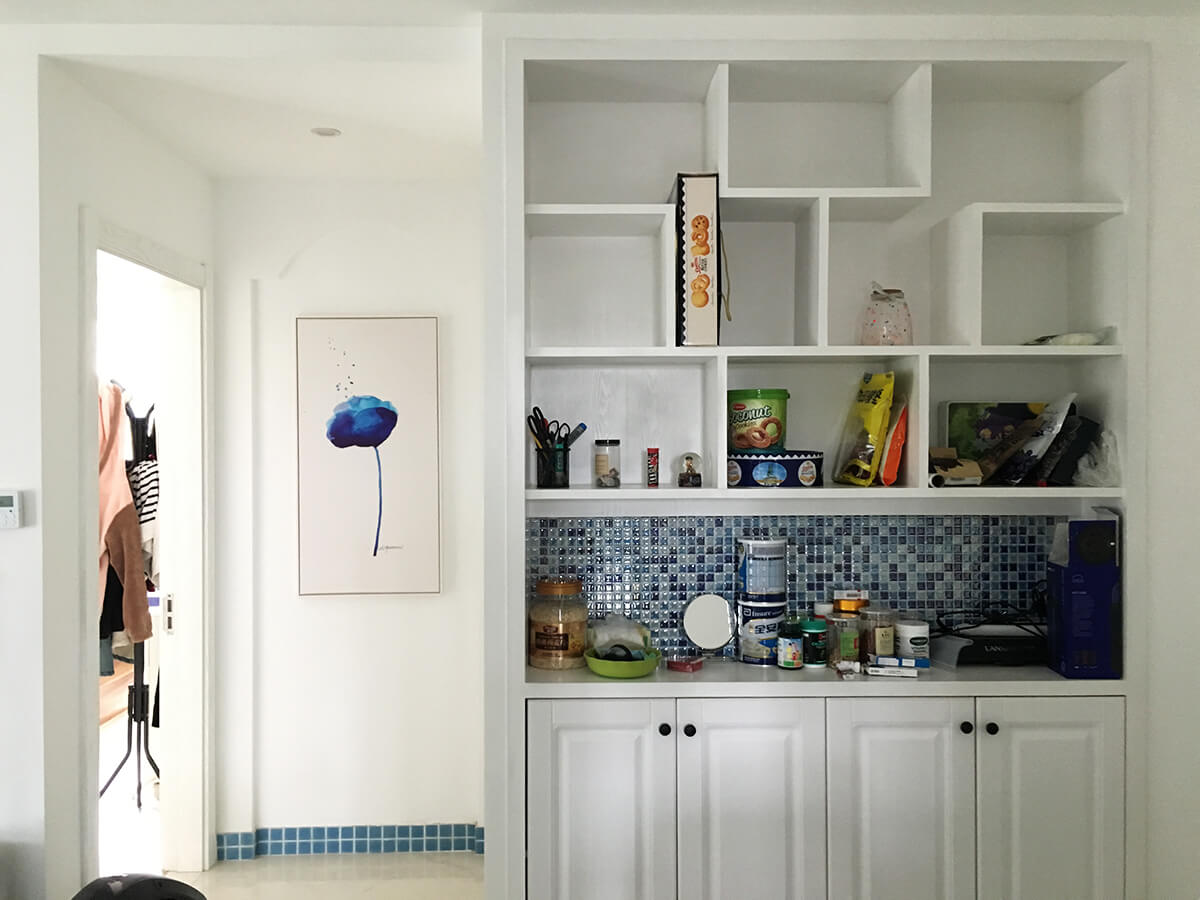
The dining room sideboard, with lighting in the mosaic area. I’d envisioned decorative pieces here, but after four months, I couldn’t sacrifice the convenience. It’s now home to daily essentials and snacks.
The main walkway, the only path to the bedrooms. A key feature: the blue mosaic baseboard – we call it the “swimming pool.”
The dining room. The four chairs (gray, blue, and brown) follow a color scheme. The painting hides the electrical box.
The dining room chandelier’s the only decorative light fixture. Elsewhere, it’s all large, square LED panels.
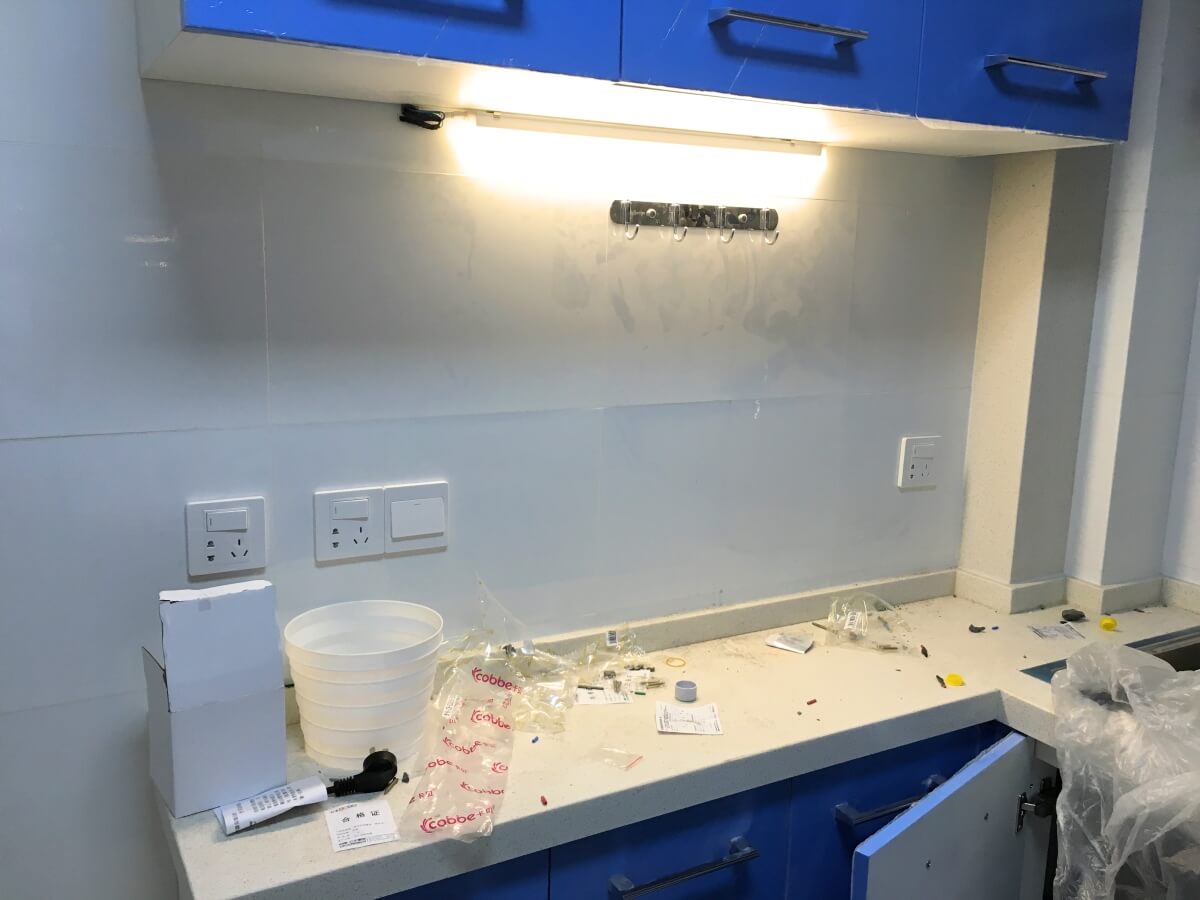
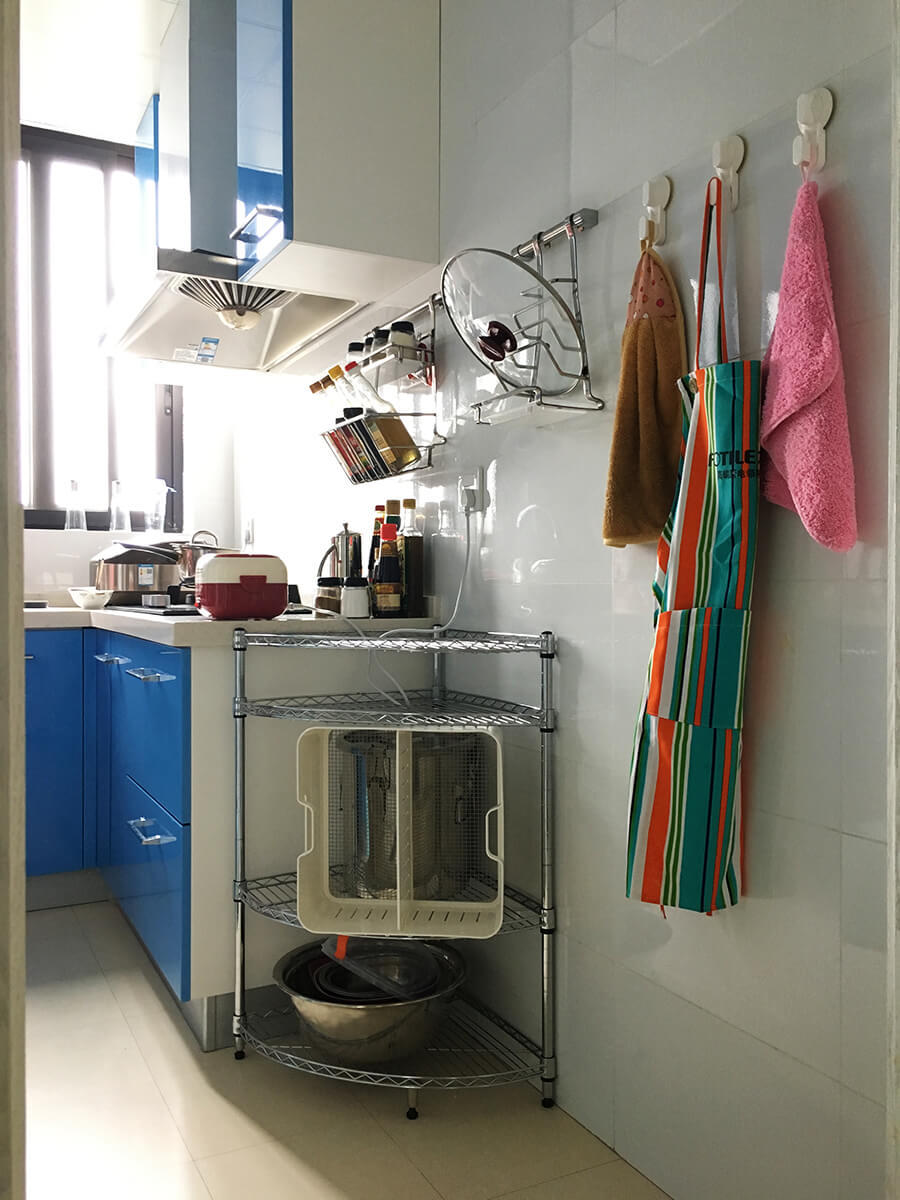
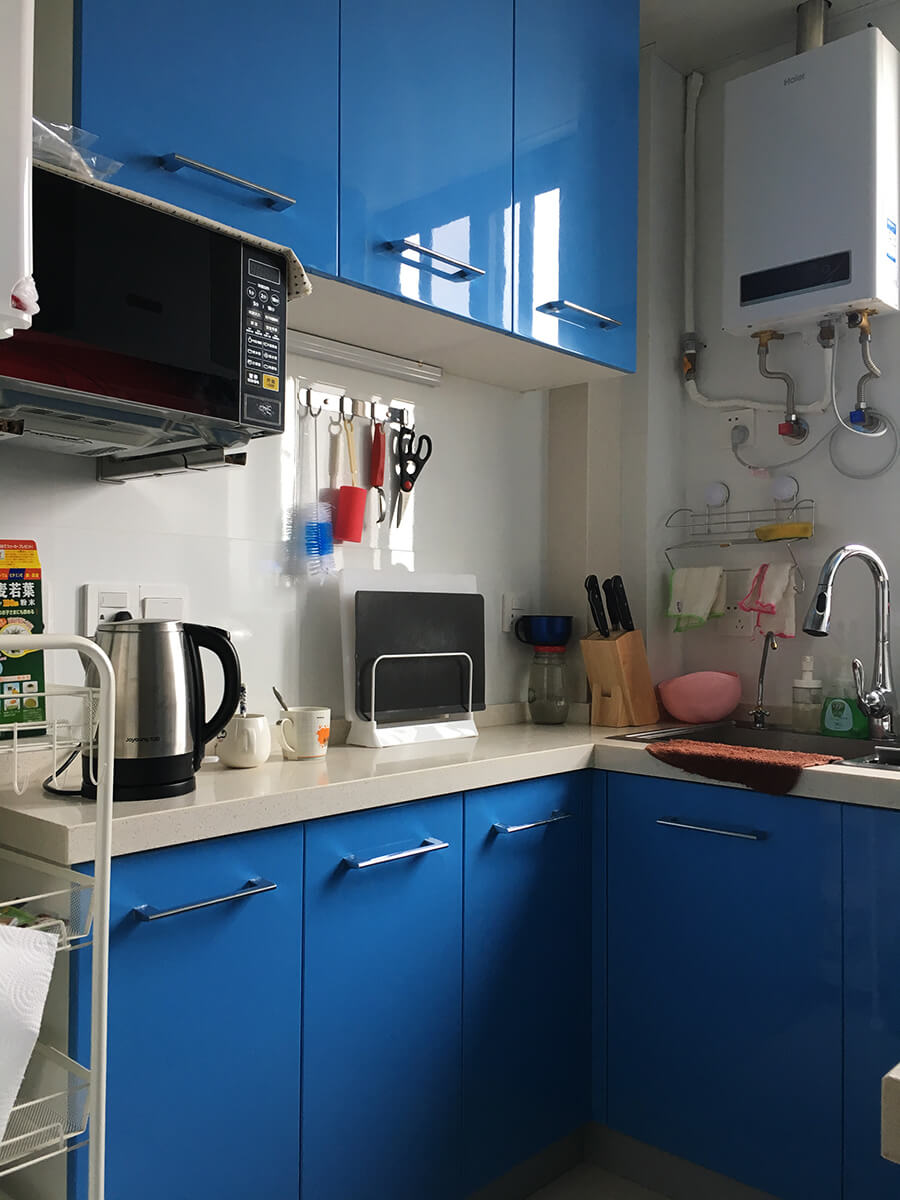
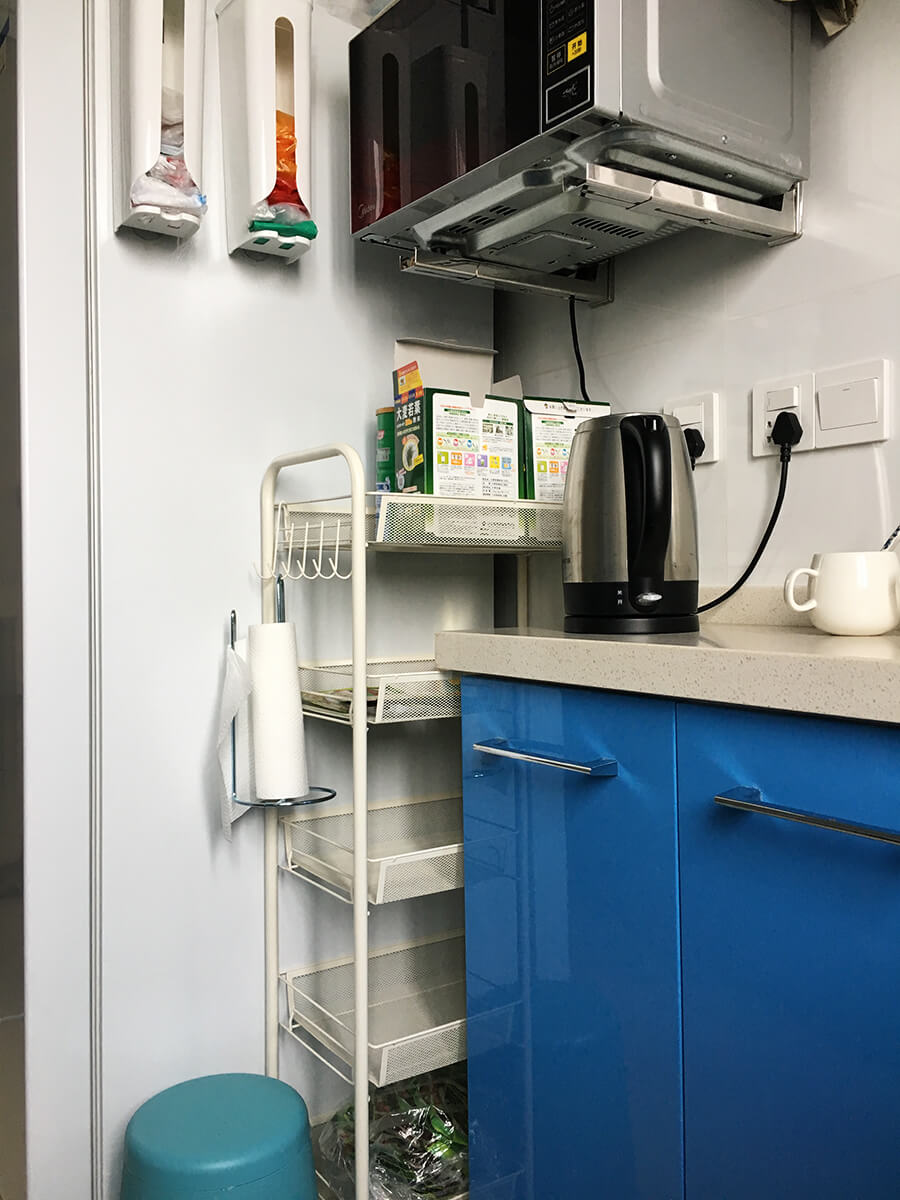
Kitchen
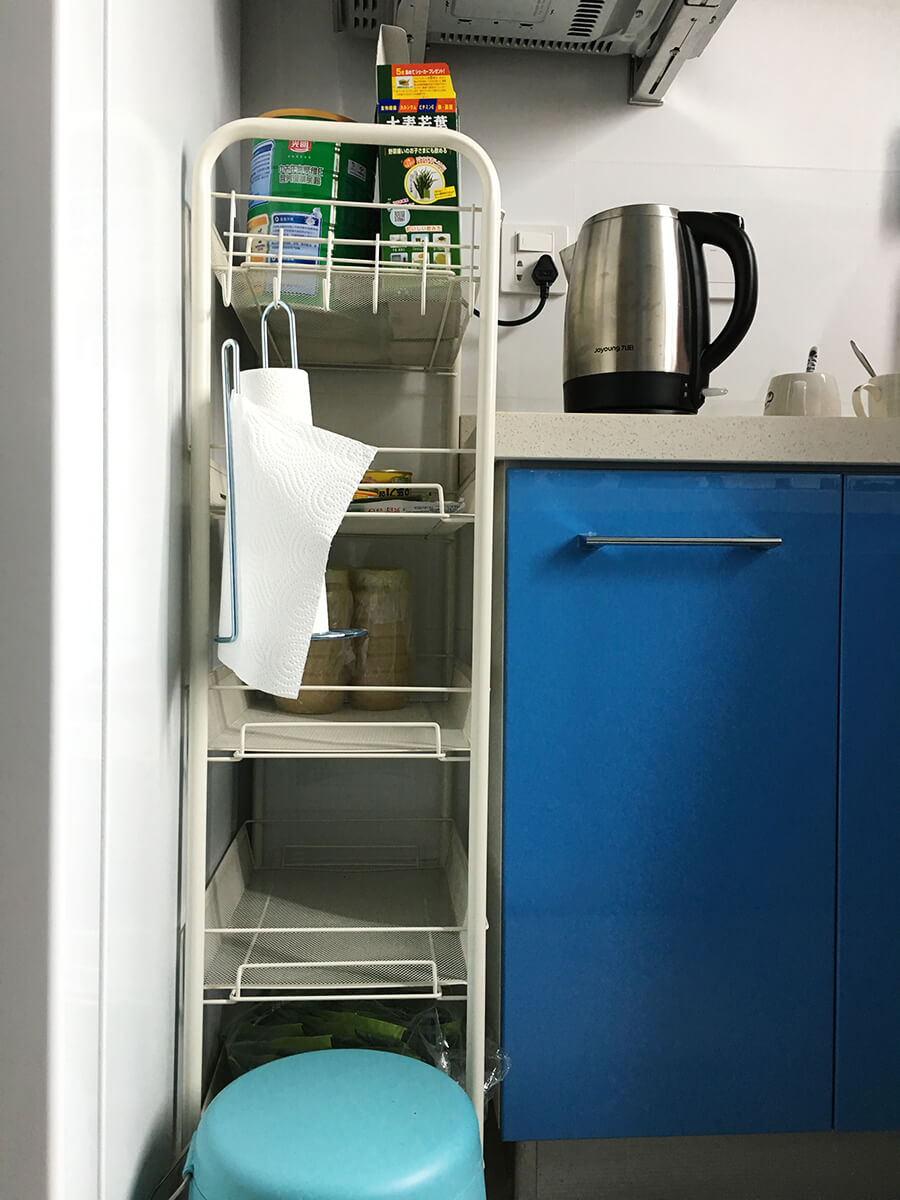
First look into the kitchen. This side has the stove, with standard-sized base cabinets.
Opposite the stove is the countertop, linked by the sink cabinet. The sink dishwasher – the kitchen’s priciest item – is here. The countertop base cabinets are shallower (35cm deep). Yep, even in this small kitchen, I went for a U-shaped cabinet. Storage fanatic…
No wasted corners.
This white 5-tier trolley fits perfectly, down to the centimeter.
The prep area, with task lighting.
This kitchen gadget sticks firmly, no drilling needed. Seriously, using the kitchen wall well adds at least 20% more storage.
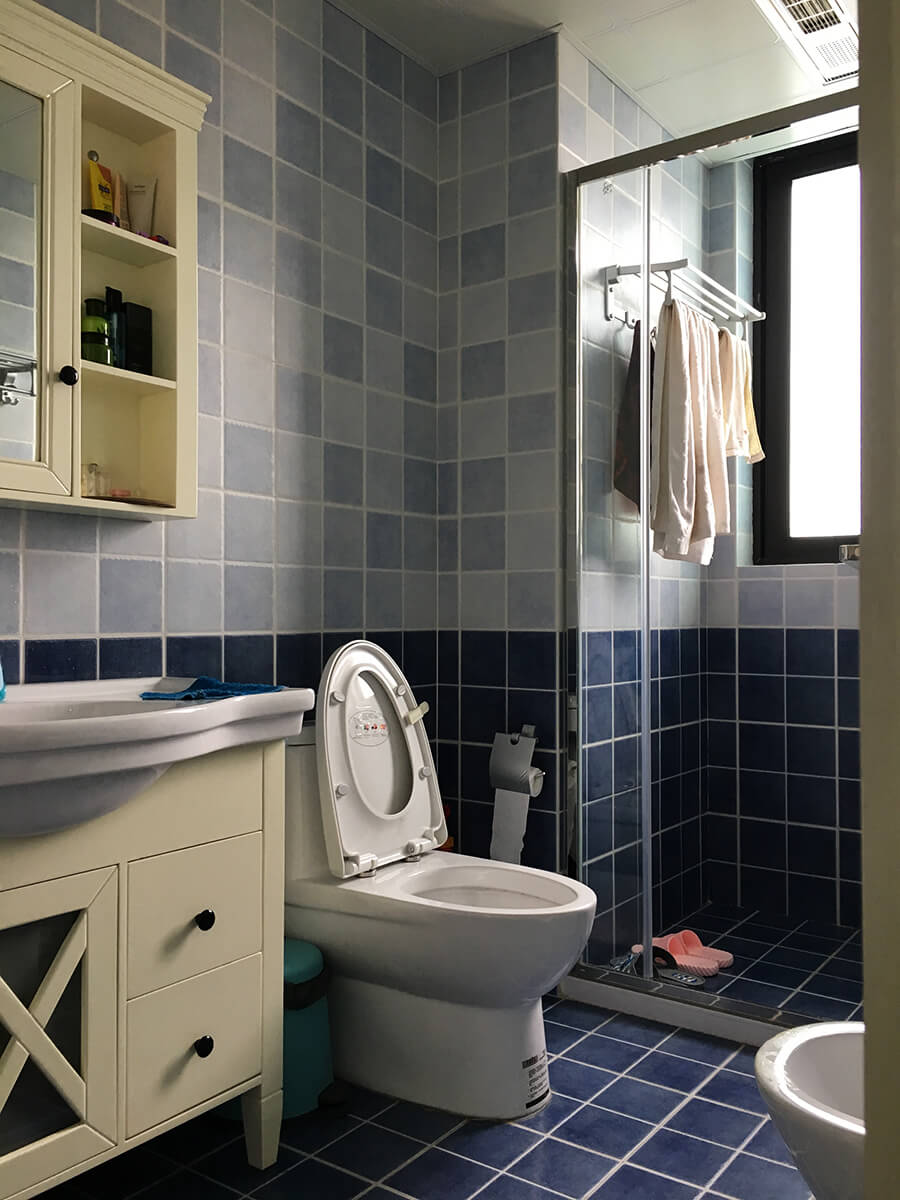
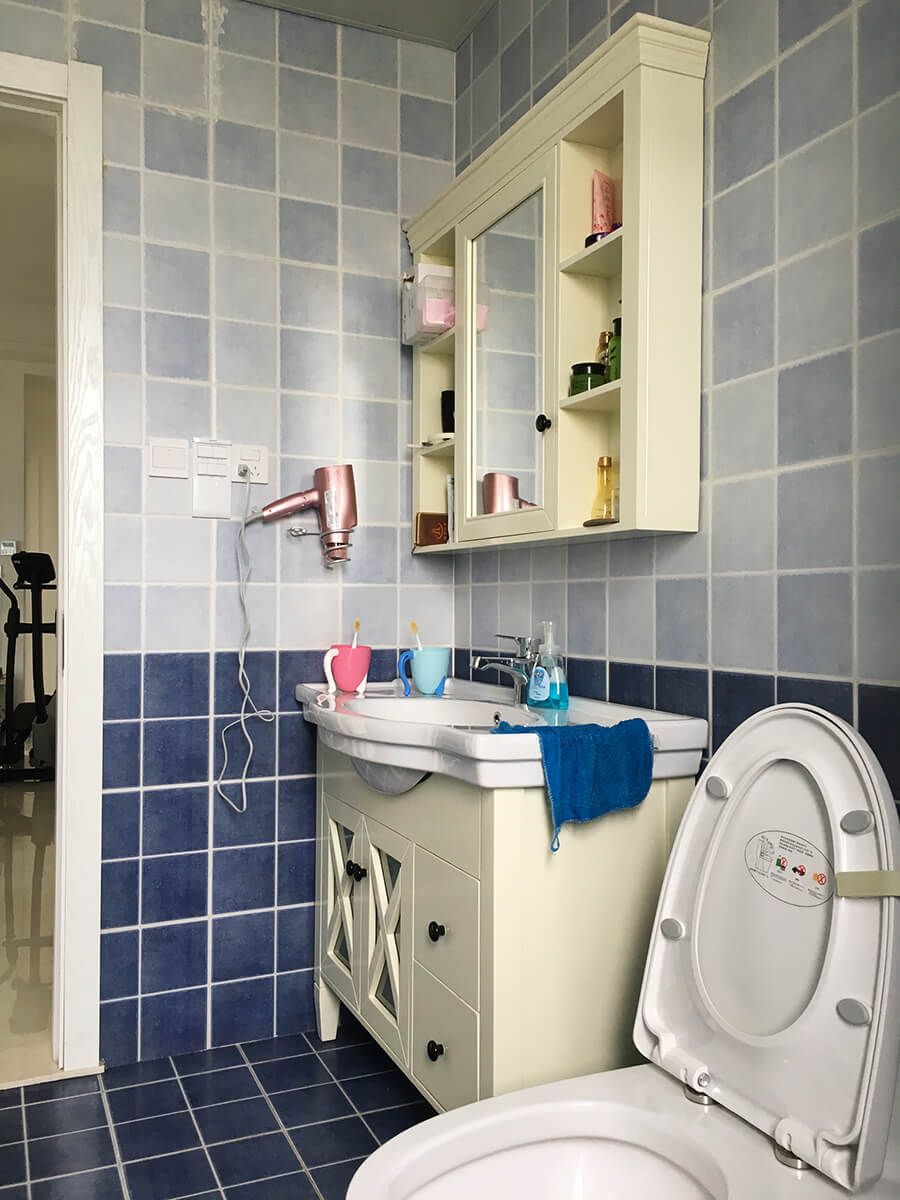
Bathroom
The bathroom showcases the home’s main color. My style’s roughly 60% modern, 25% Mediterranean, 10% American, and 5% Nordic. The ivory white cabinet is one of the few American-style pieces.
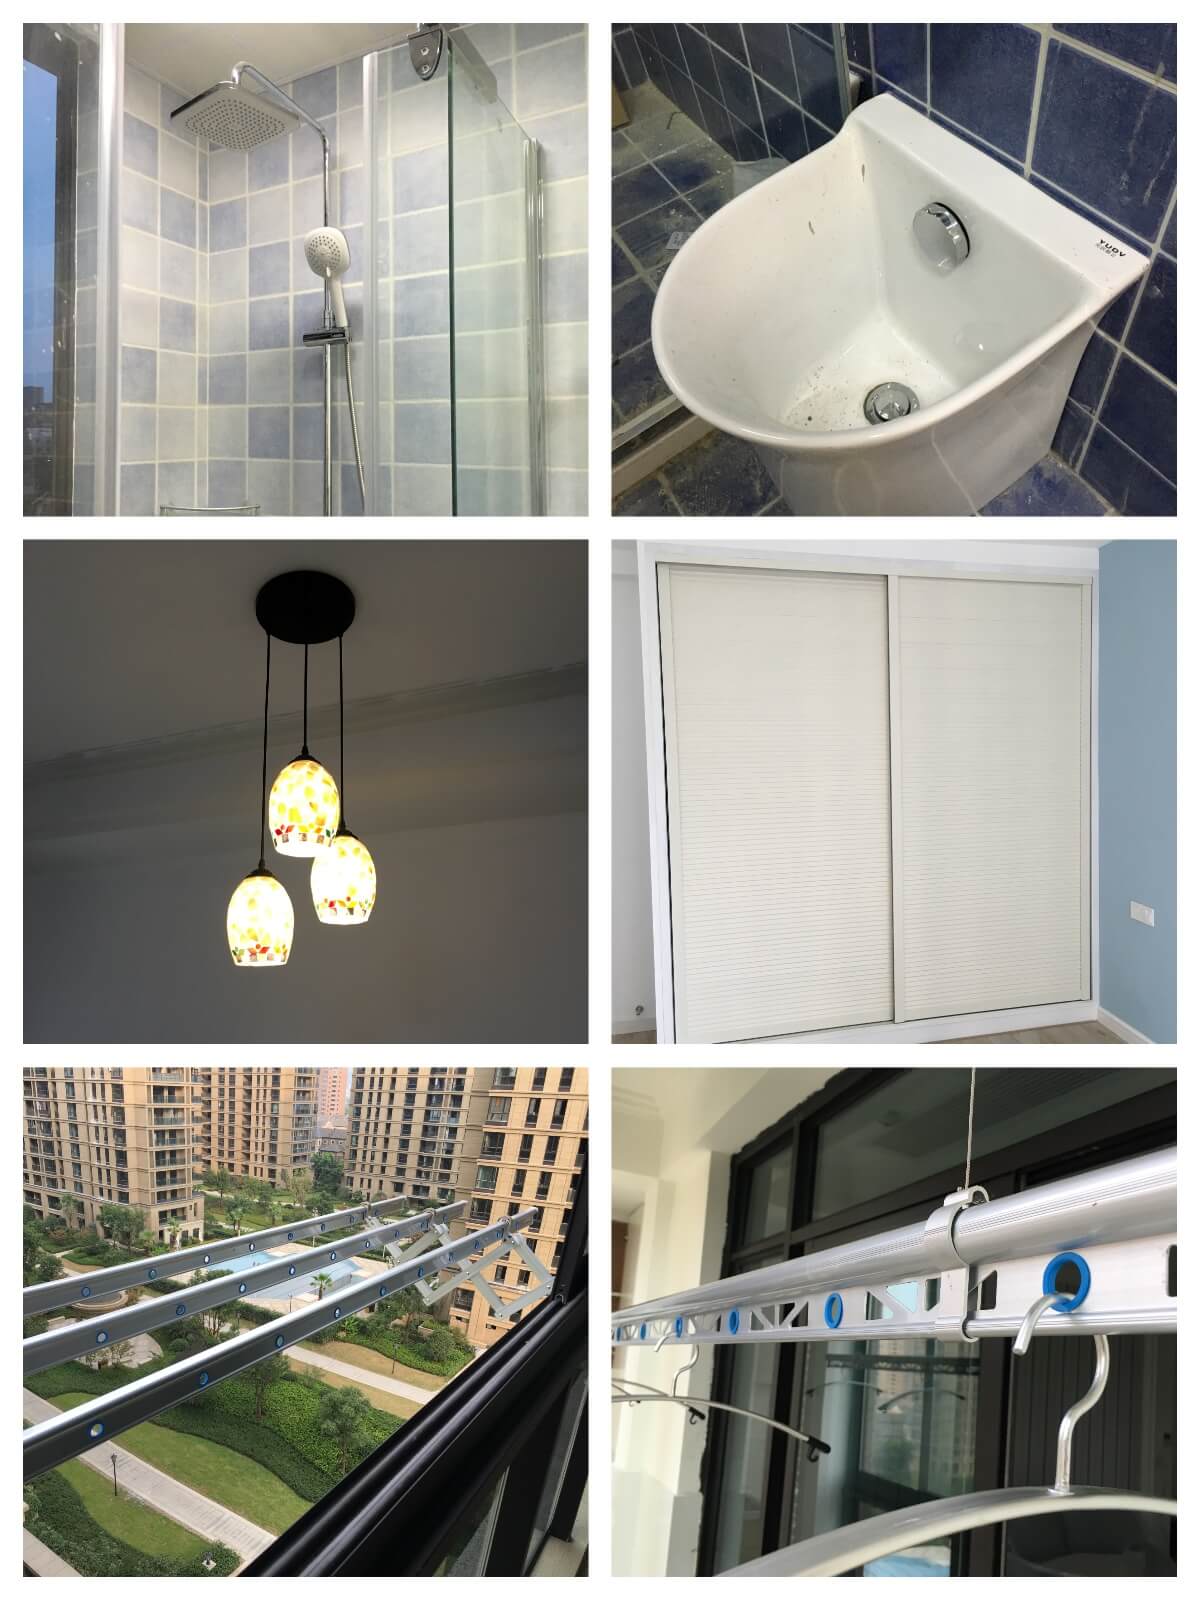
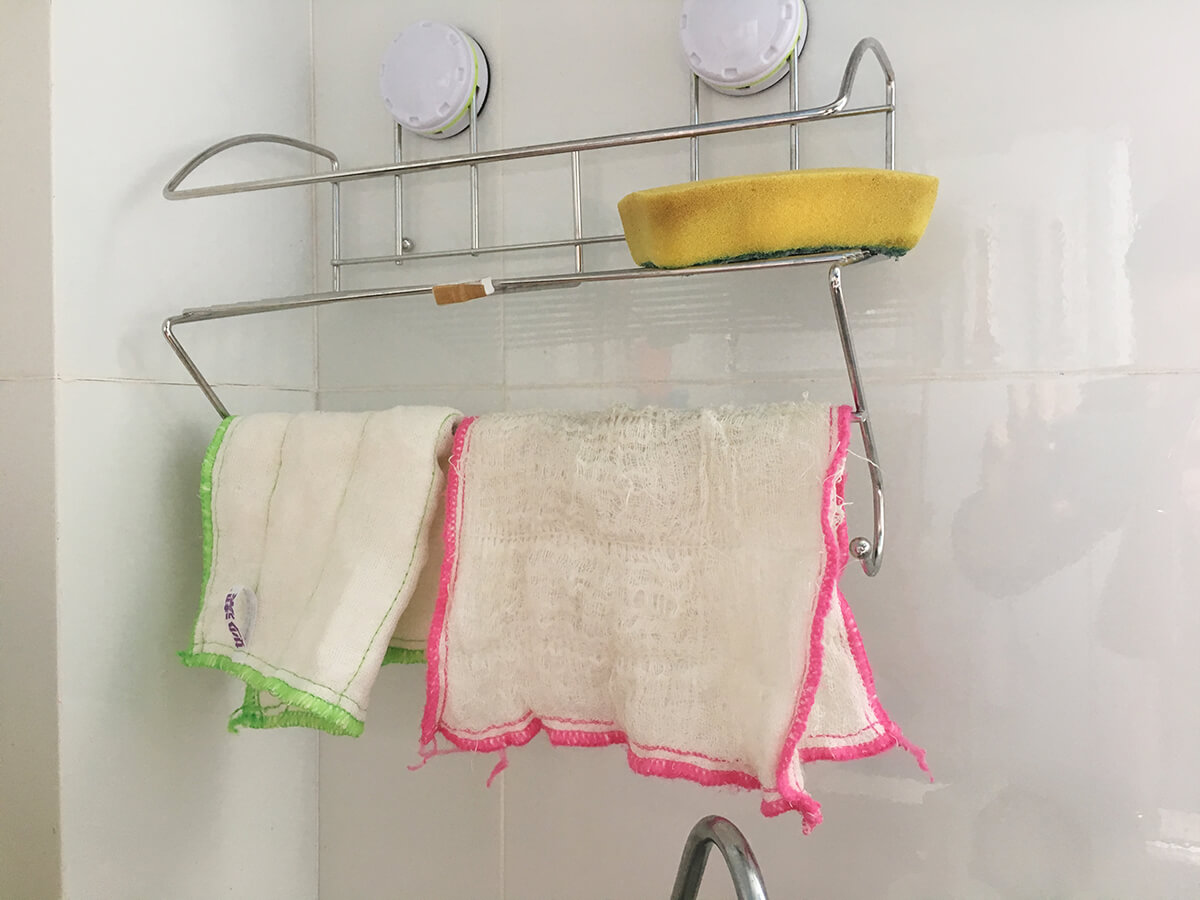
Shower head and shelf.
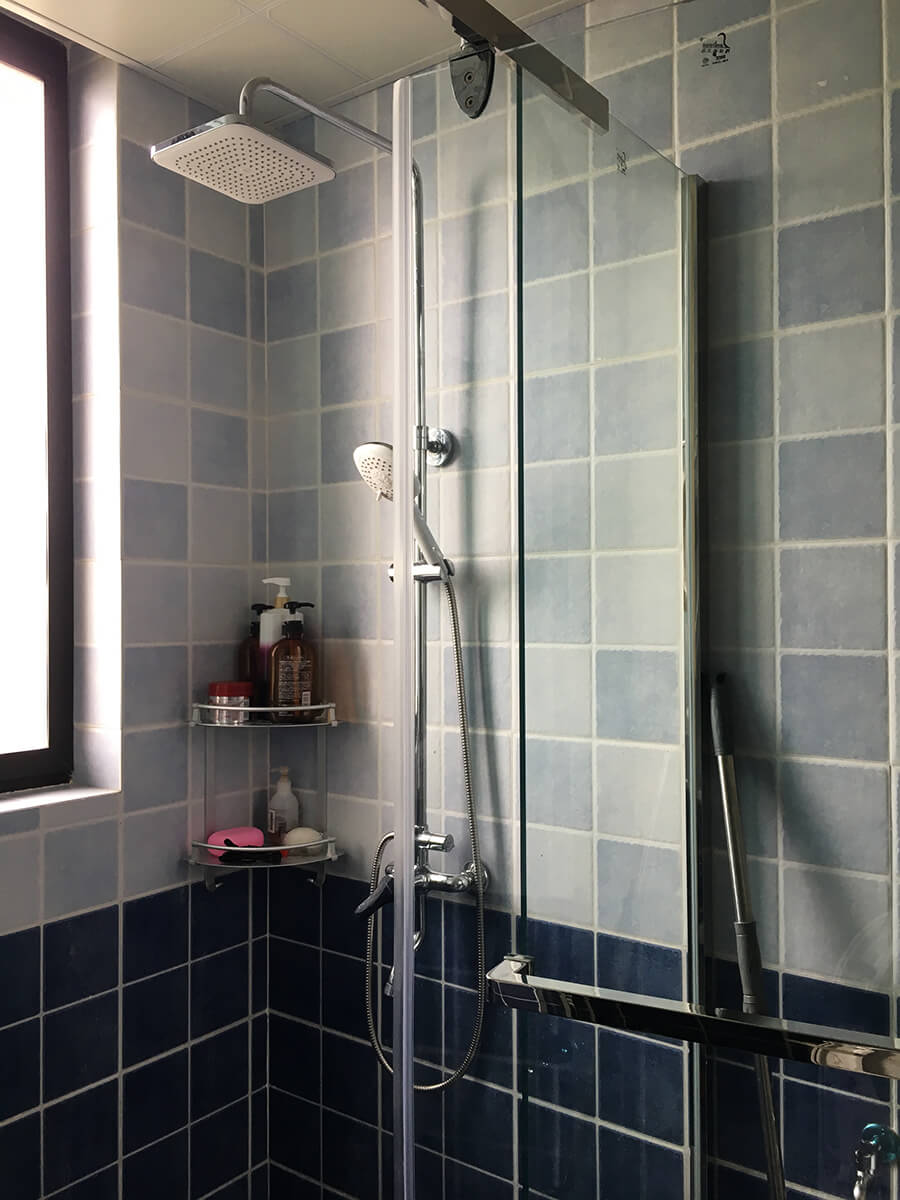
View from the shower.
Towel rack by the door.
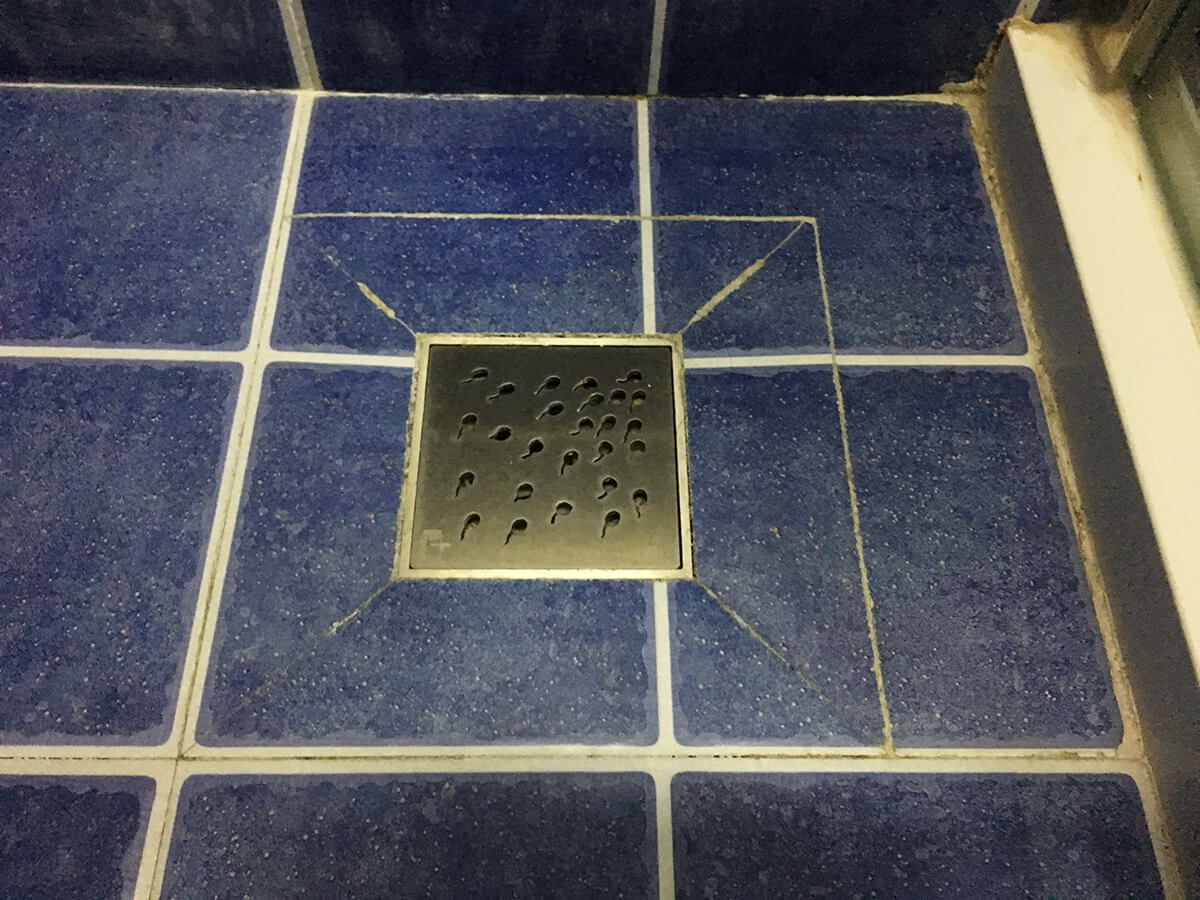
A unique floor drain in the shower – a bit of fun. Pricey, but it’ll be used for decades.
Multi-purpose Room
Next to the bathroom is this north-facing room. I haven’t assigned a specific purpose yet, and it won’t be a bedroom.
It’s primarily a walk-in closet, with a wall of wardrobes! It could become a playroom, music room, art studio, or study – we’ll see.
Unused floor fans are stored here, under dust covers.
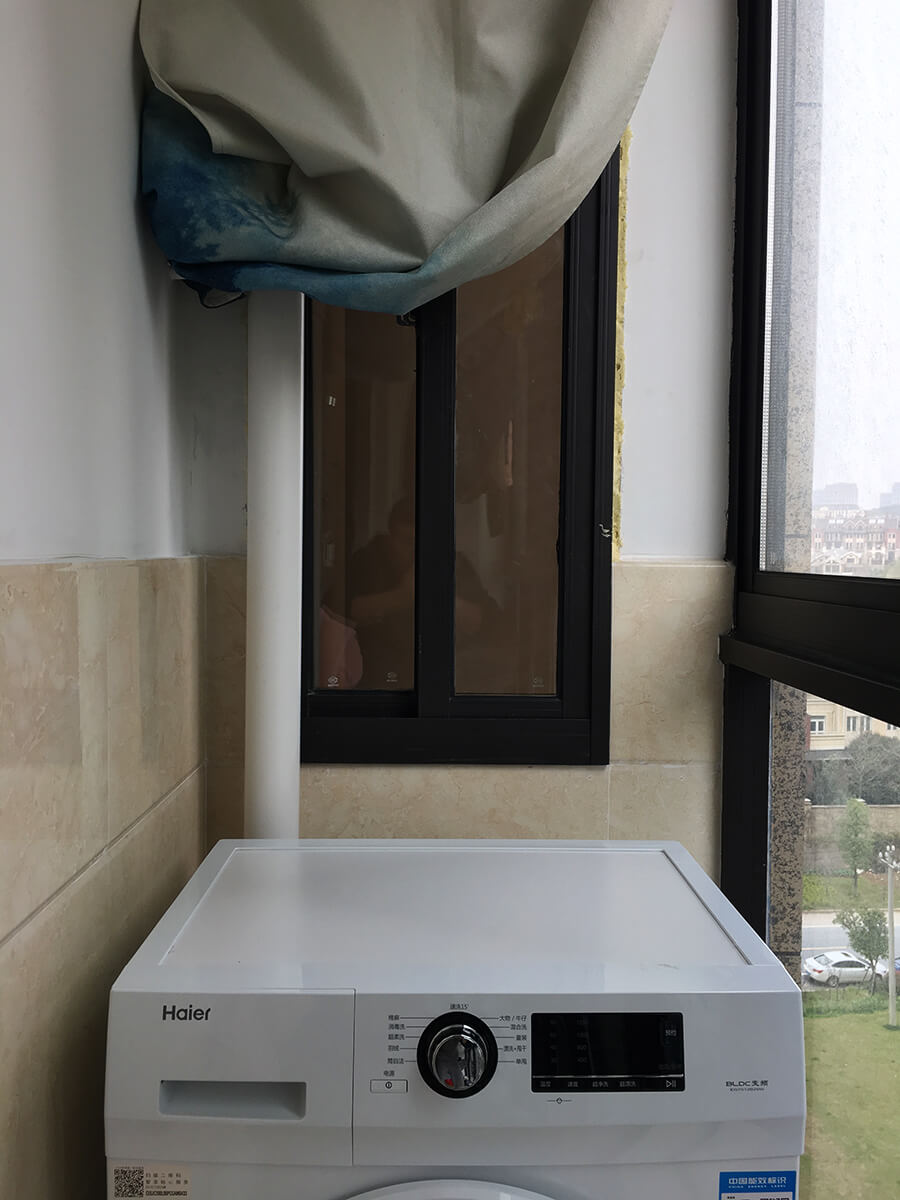
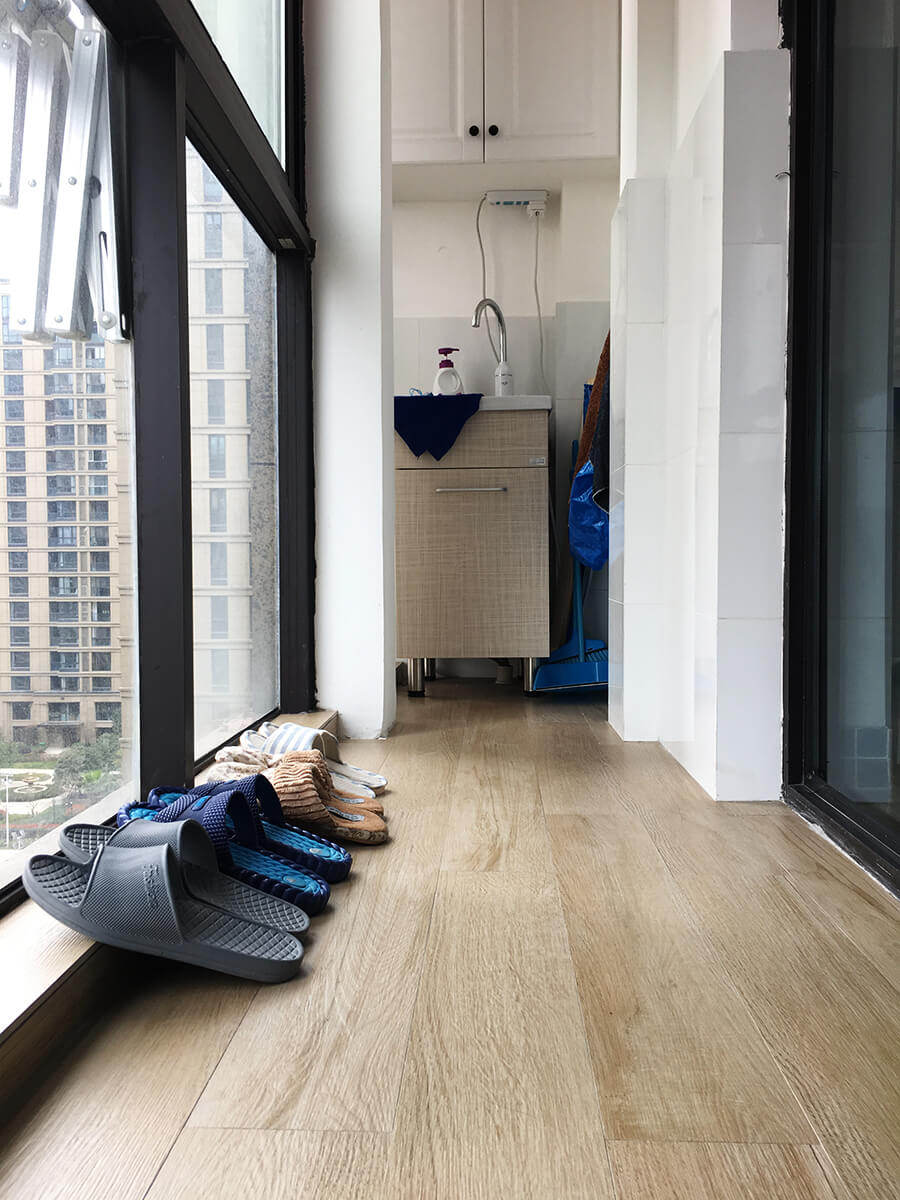
Balcony
The balcony’s my biggest floor plan disappointment. It’s long and narrow, like Chile. It barely functions as a utility balcony; a leisure balcony’s impossible.
The curtain behind the washing machine? It hides ugly pipes and a window overlooking the AC unit.
The laundry sink’s at the other end.
I’m on the 8th floor, with a decent view. The community pool’s shaped like a sanitary pad.
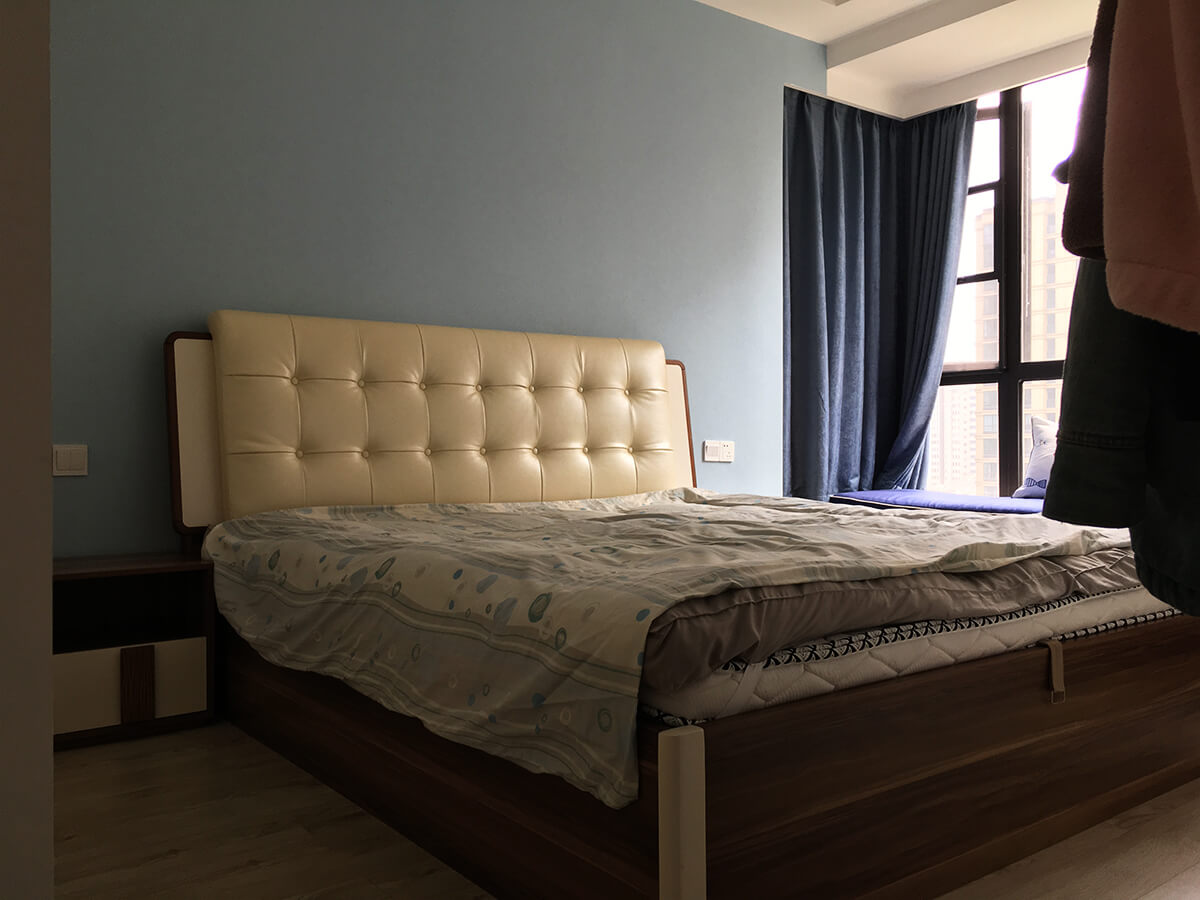
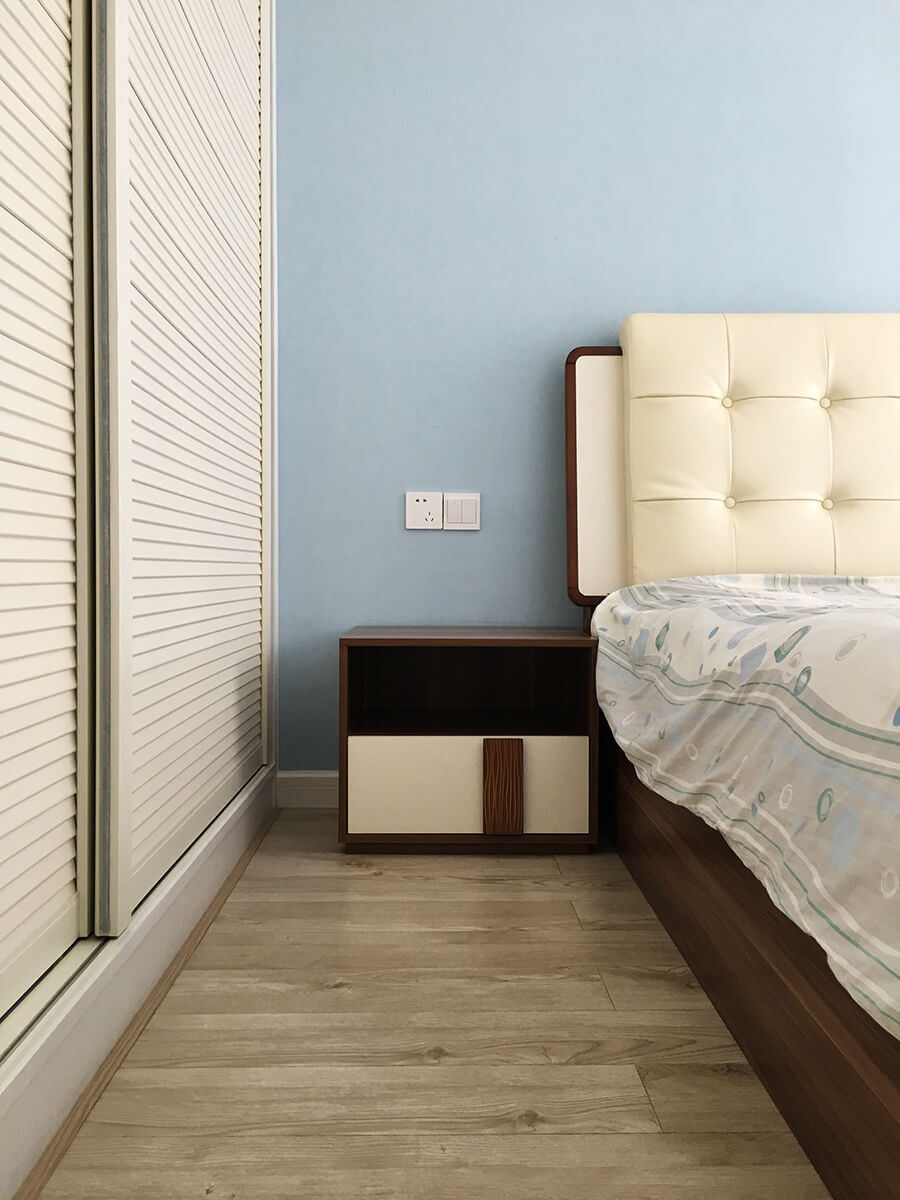
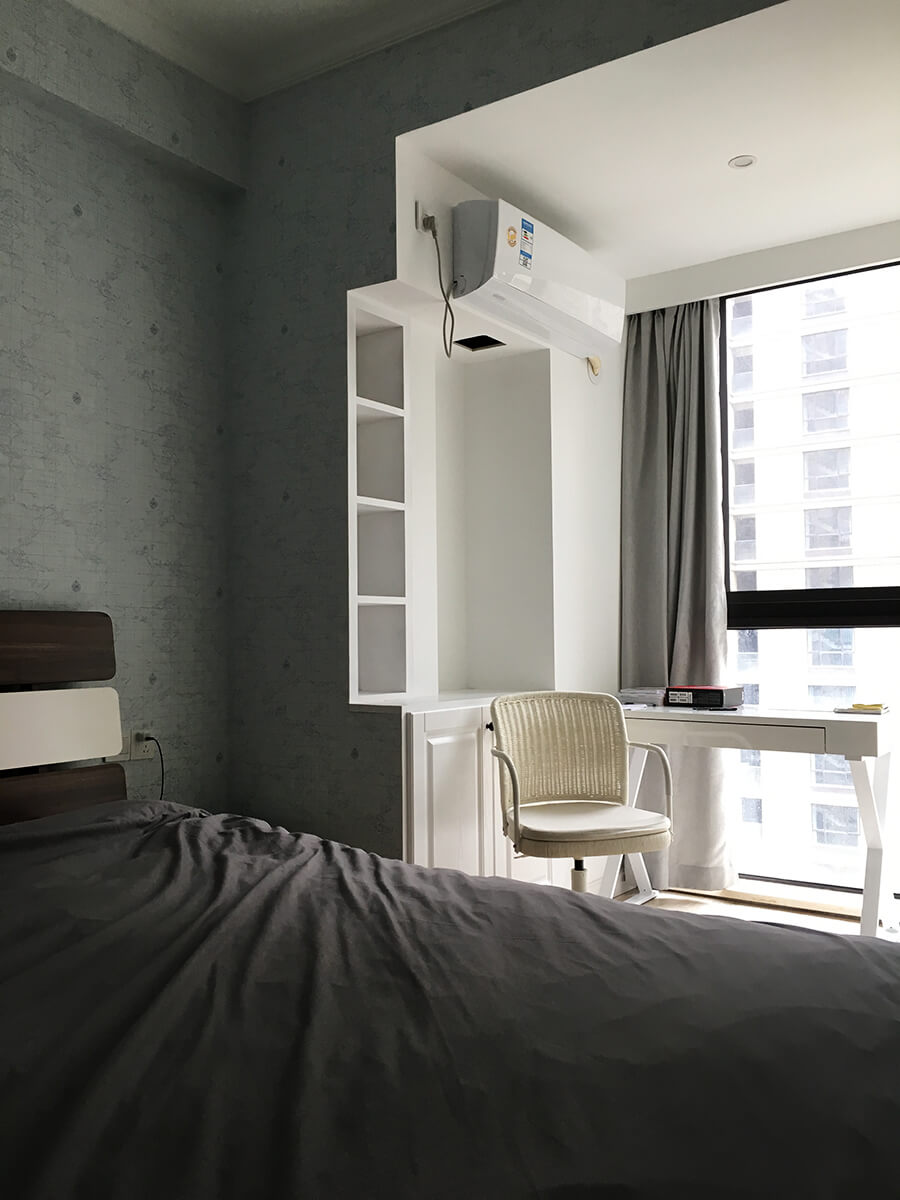
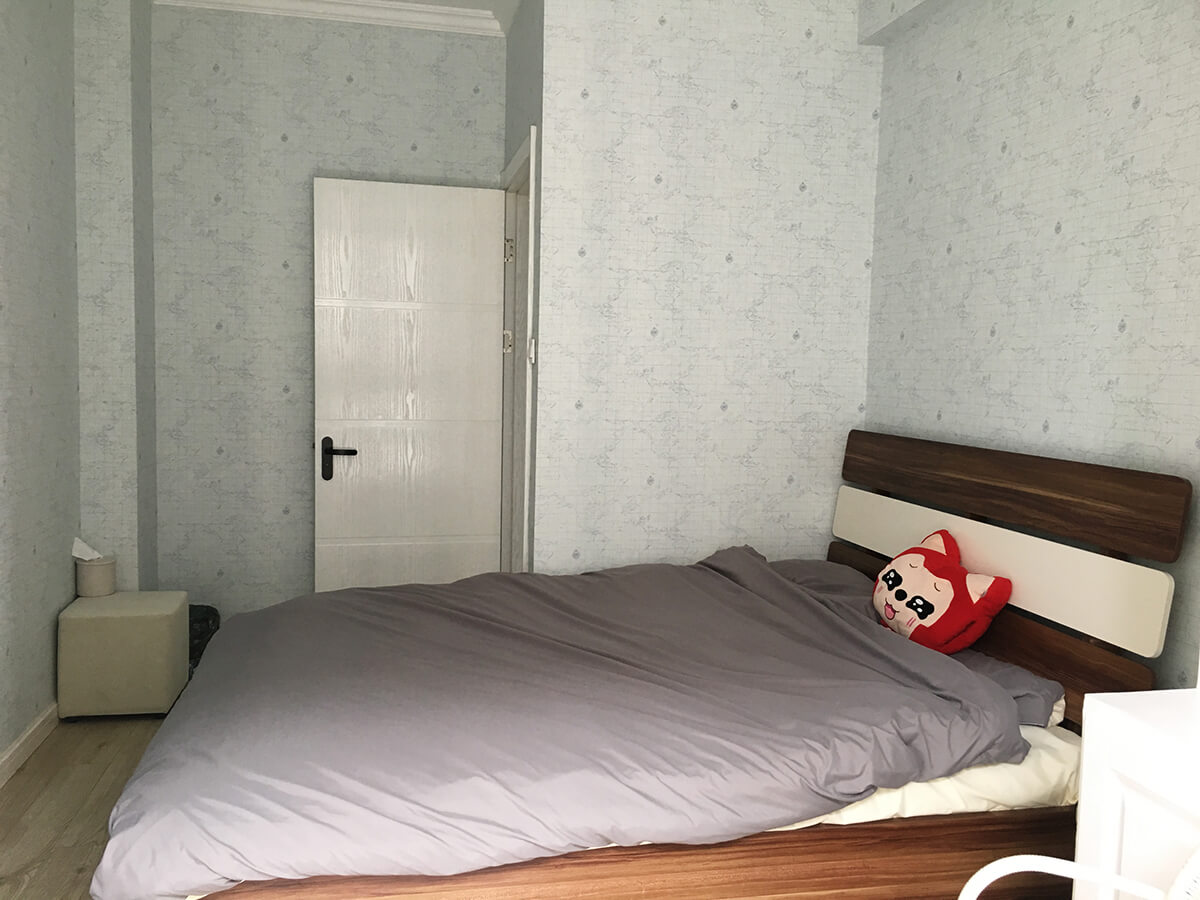
Master Bedroom
Let’s head to the main bedroom. Wallpaper’s behind the bed. Where are the pillows? A cabinet has a strong smell, so we’re still sleeping in the second bedroom. This is an old duvet cover for dust.
The master bedroom wardrobe’s huge, and the bed has storage too. I know, I’m obsessed.
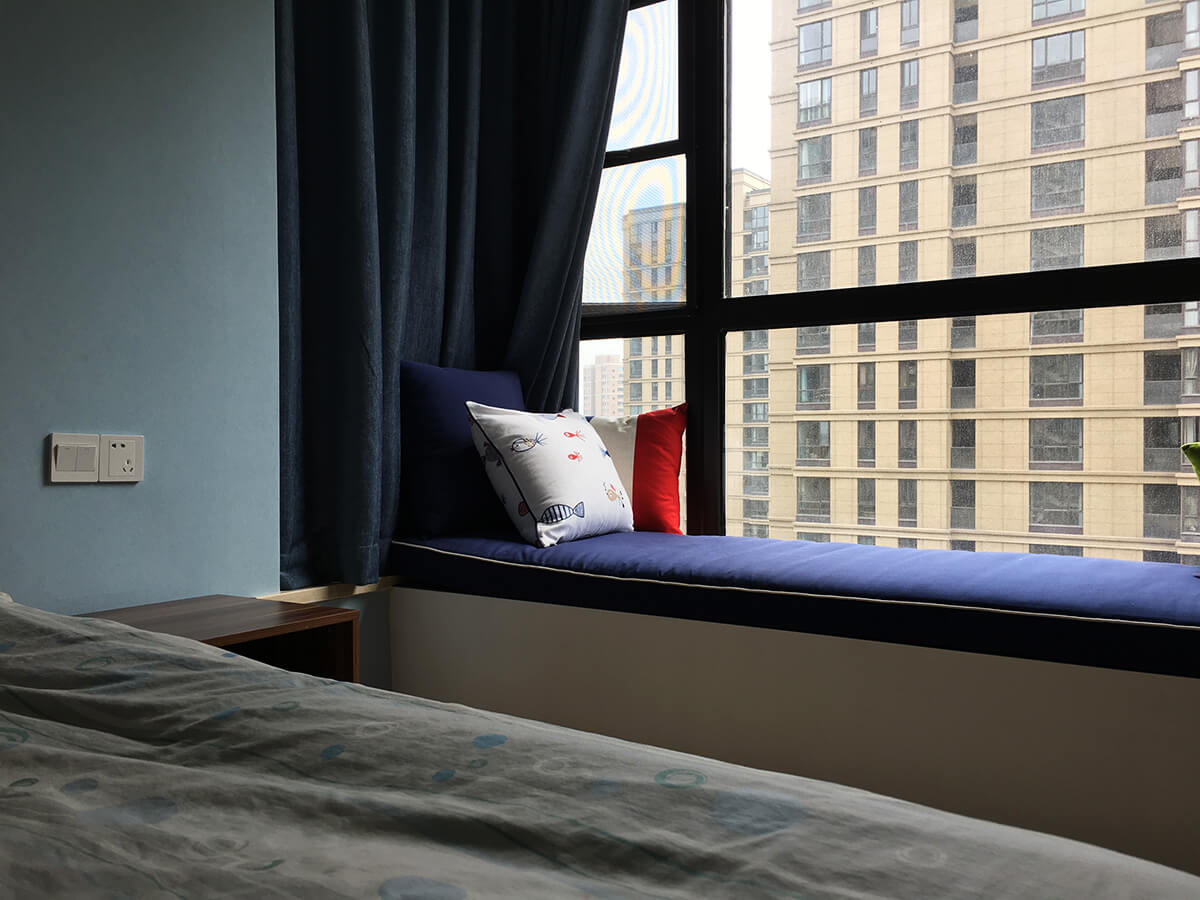
The bay window – the best sunlight in the house.
A six-drawer dresser and computer desk at the foot of the bed. White and blue are the main colors, with red, pink, and brown as accents.
Second Bedroom
This is the guest room/future children’s room. Wallpaper divides it: darker inside for sleeping, brighter outside for work/study.
Beyond the wallpaper line, it’s all pure white.
An open-sided fabric table serves as a bedside table.
The resting area. The room’s small, with beams and columns, but this layout maximizes the space.
Mistakes
First-time renovator here, so of course, there are regrets:
I could’ve removed the door/wall between the living room and balcony, using curtains for separation, making the balcony feel larger.
The sideboard’s upper part should have doors to minimize cleaning. The design’s tacky – I don’t know how I approved it.
The mosaic tiles on the sideboard don’t look great. They’re stunning in the store, but dull in this dim corner. Single-direction lighting doesn’t suit them. Colored tape or fabric might be better.
The hanging cabinet right of the range hood was a mistake. Removing it would’ve allowed the hood/stove to shift, creating a larger corner countertop and a better workflow. Now, I prep on the shallow counter behind.
The toilet paper holder’s placement is awkward – too far back, requiring a two-handed reach.
The TV stand was a mismatch. I took a chance on a dark brown Nordic style, and it clashed. I sold it at a loss and bought a matching one, missing the set discount.
Too many wood grain colors, poorly controlled. The beds are black walnut (reddish-brown); the dining table legs are ash (brownish-green); the chair legs are pine (light, reddish); the TV stand/coffee table legs are more yellow. It’s driving me nuts.
Final Thoughts
The renovation took over six months – constant trips to the new home, building material markets, furniture stores, and showrooms. I didn’t have a car then, relying on ride-hailing. Looking back, it was intense, sometimes 7-8 trips a day.
These notes reflect my living habits. Others will have different needs. This is about understanding your lifestyle and planning accordingly.
I shared a draft with friends, and they were amazed by the detail, saying renovation’s exhausting and they’d leave it to experts. I asked myself: was all this energy worth it? To answer that, we need another question:
What’s the point of home renovation?
It’s not just “making your place pretty.” It made me focus on life’s details and learn a lot. Examining each detail is envisioning a lifestyle, reviewing the past, and considering the future. It’s a fresh start, a life revolution – from chaos to order, from getting by to quality. These were unexpected benefits.
As a designer, loving life is my calling. My home should be my best work.